
Project XJ-7100
What do you get when you get an amateur radio operator, a radio and a Jeep Cherokee XJ together? A fun project with lots of possibilities!
Project posts are in ascending chronological order putting the newest post at the bottom.
If you want to jump to the latest post, click HERE.
Transition - July 30, 2018
Welcome to my project page for the XJ-7100. I have transferred this material I began on my Shack Happenings page in my Heathkit Interests blog as this became more of a project than a casual install. The main reason for this is I'm doing some major repair work to the Jeep. During the initial phase of the repairs I removed the interior to inspect it for damage, rust and whatnot. So far the only rust there is on this 25 year old beauty is surface rust on the passenger side floor pan and a thumb sized hole in a corner of the rear passenger area where I expected to put my fist through. Suffice it to say the story goes...March 31, 2018
I am going out of town tomorrow to look at a 1993 Jeep Cherokee Sport (XJ) for sale. I have been looking forward to getting an XJ again for a number of years. I had a '99 model but this time I wanted something more akin to what American Motors Corporation Jeep Division was building before Chrysler really took over the designing process in the mid-90's. Since the 1984 model year, they hadn't really changed much under the hood even after Chrysler's takeover. Gone was the anemic GM 2.8L (178ci) V6 leaving only two engine options. The inline four 2.5L (150.4 ci) and inline six 4.0L (242ci). They were installed into a body style relatively unchanged since AMC introduced them in 1984 with the Wagoner and Comanche truck. The large Grand Wagoner became the only full-sized vehicle of the type left after the J10 and J20 trucks were discontinued.1991 ushered in the "High Output" version of the 4.0L(242ci) to replace the aging AMC 4.2L (258ci) and the Renault-Bendix (Renix) management system that engine was controlled with from '88-90.
Since my daughter is buying my Jeep TJ, I need another vehicle. It has be Jeep and it needed to be a 1995 or older with a body in good shape. The bonus would be the ability to drive it home. Engines and transmissions for these are plentiful and inexpensive as compared to others. There were over 2.8 million XJ's built after all. But I digress, again.
So the what does an older XJ have that the CJ, MJ, YJ and TJ lack? Yep. You guessed it. Space. One of the advantages of these older XJ's was the open dash feel. The center section, or rather the lack of one, didn't protrude into the vehicle so much allowing a little more room to mount stuff like a control head for an Icom IC-7100 on a stick. The RF unit mounted to a wheel well inside the cargo area and a long, slightly flat run of steel that makes up the roof. A 102" steel whip on a big 'ol potbelly spring can be done on the passenger's side rear quarter for use with the AH-4 tuner and run HF with one antenna and VHF-UHF on the roof mount.
So wish me luck! 73!
______________________________
April 1, 2018
Happy Easter!It is late but I wanted to share some photos of the Jeep I bought today. I'll add more about this as I get closer to completing necessary repairs in a couple of months.

 |
| A timeless classic. That new fangled thing they call a Cherokee today got nothin' on this 'ol girl. The new Cherokee has no bark and no bite. This 'ol girl can still light the fires bark the tires and get you where you want to go. But in all seriousness she's still got it even with a weird bumping feel in the transmission just as I stop. Might be the rear axle but I think not. The AW4 automatic's weren't known for their longevity and I'll be looking through the service records the owner gave me for transmission servicing. |

 |
| Don't focus on the faded rear fiberglass hatch. I mean just don't look at it. That's not important right now. ;-) |
 |
| I'll add a radiating antenna icon to this later. |
 |
| Haven't I seen this before? Oh yeah. 1984, 1985, 1986.... |
 |
| Say! An 80's look in 1993! Nice retro touch. Sweet! |
 |
| In good shape but then, who sits back here anyway? |
 |
| Roomy even before the seat folds down. |
 |
| NOT a runway but a nice plane for a dual band Diamond SG7500. |
 |
| Think there's room somewhere for my IC-7100 control head? Don't mind the missing horn button cover. Two tabs holding it on broke off. |
As you can see, the clear coat is toast. I have spent a little time underneath diagnosing an oil leak, or three and looking for rust around under there. Haven't spotted any so far. Looking more closely at the body, it looks cleaner of rust than any other XJ I've looked at thus far. Transmission needs work as does the rear 8.25" axle. Sounds like carrier bearing are needing replacement. All in all it was worth the $1500 I paid for it. Now just need to get the title changed over and start wrenching.
73!
____________________________
April 5, 2018
So I spent a little time each evening this week doing some exploratory inspection as well as some radio mounting option research. My friend has already told me I'll have the radio installed and working before the Jeep comes off the jack stands! LOL! He's probably right.
Now back to the '93 Cherokee. I haven't yet named her so I'll just use XJ for now.
 |
| Hmmmm. This looks like a good spot...kinda...maybe...I think. At least it isn't a Radio-On-A-Stick yet. You can see the dismounted cup holder in the passenger's foot well. |
 |
| Well, removing the console cover helped a little. I don't smoke so that ash tray looks like an interesting place. Maybe drill a hole and use a RAM Mount? |
 |
| Well, this is fairly shallow. Will need access to the screw later to remove the dash. But you know, the width of the space looks really close to the control head. I wonder... |
 |
| Dang! It actually fits! Must pursue. |
 | |
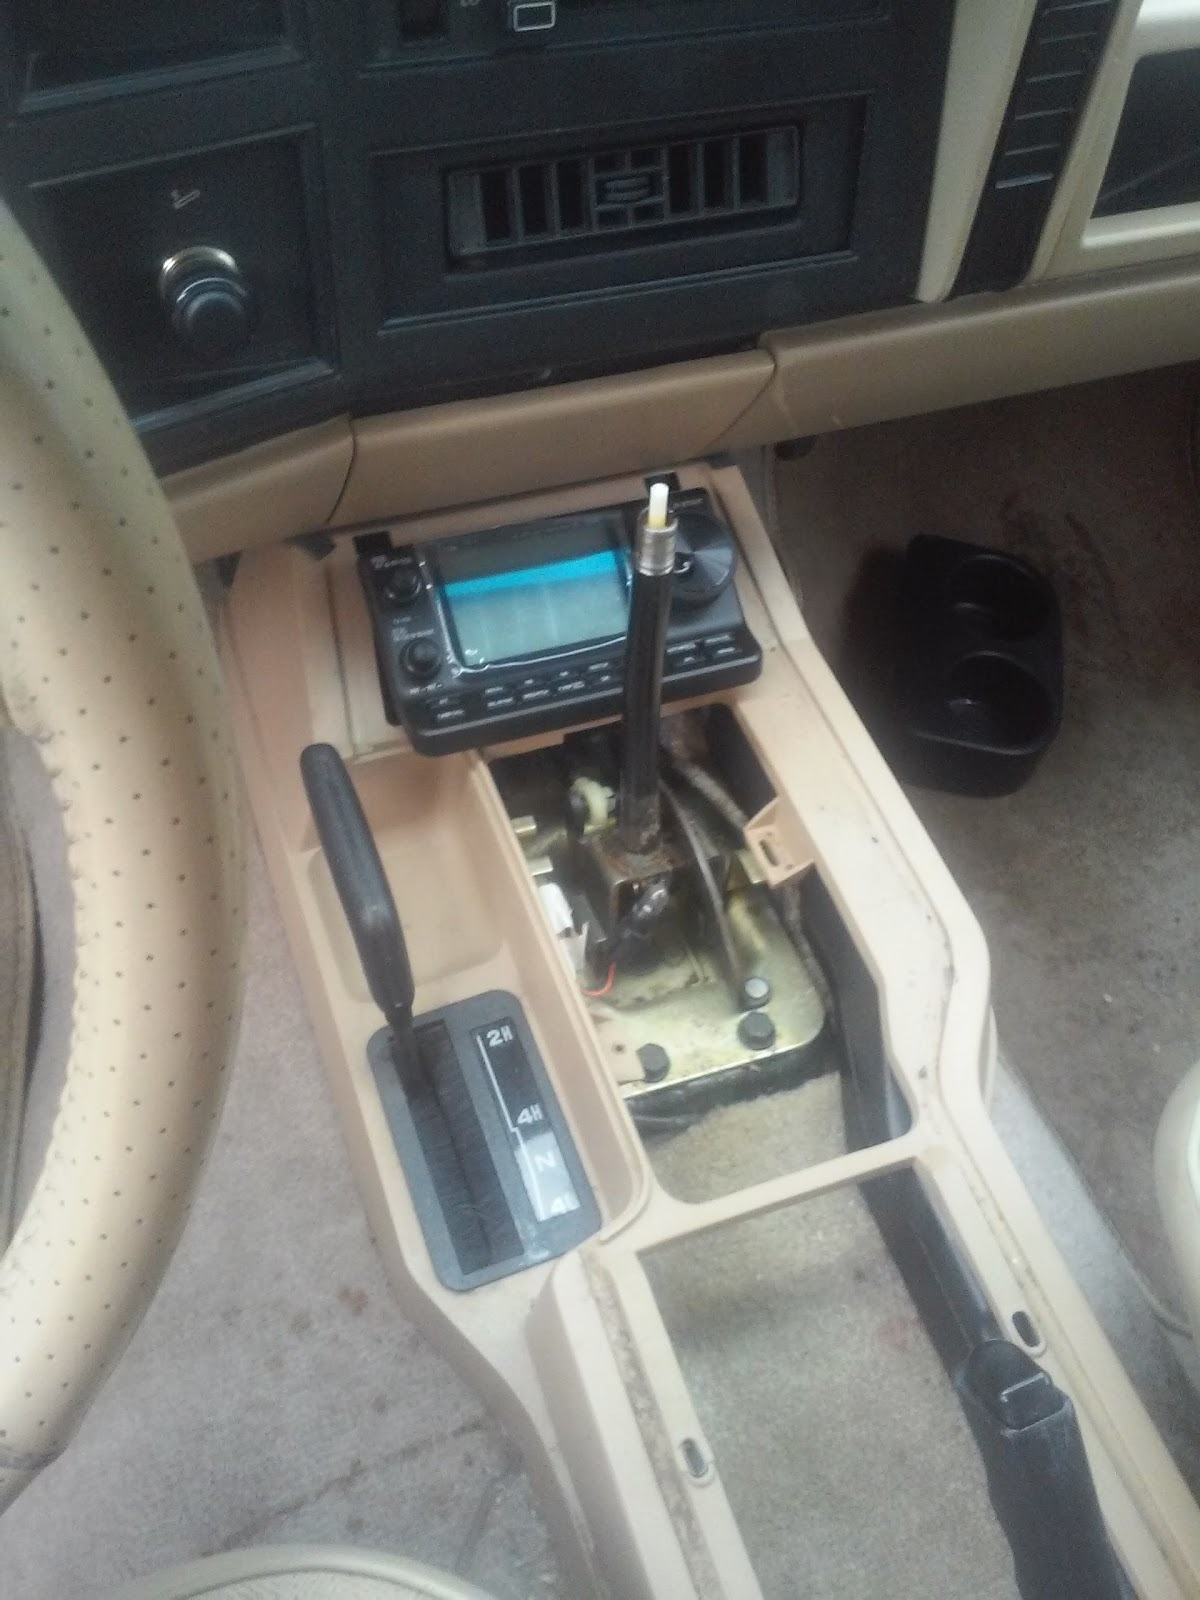
| This would look good here. Unobtrusive and fits well. The automatic shift selector is in the Park position so getting to the controls while parked isn't as easy. At least it isn't a lollipop shouting "I'm worth something! Steal me!" either. |
If I want to install the radio in the center console area like the Police did in their version, I would need to get the foot operated emergency brake and cables to eliminate the front half of the center console. The police Cherokee's also used a column shifted automatic from the MJ Comanche instead of the floor shift to have room for their radio and emergency light controls. I have to get the XJ taken care of mechanically first then consider other options that cost money. But yes, I'm researching the parts used in the Police Cherokee to move the E-Brake first. If I am successful in this I should be able to install the control head, CB and scanner where the hand brake is now. I might be able to keep the floor selector in place since I don't have nearly as much equipment as law enforcement would have. The CB would obviously be for trail trips with other Jeep owners since most don't have an amateur radio license.
So where to put the main or RF unit? Two considerations are to the side of one of the wheel wells in the rear cargo space or to the side of the transmission tunnel on the passenger's side. Unfortunately the latter will negate the use of the cup holders as I wouldn't want anything spilled into the main unit as the cup holders would be directly above it. A third option might be to remove the Jeep's AM/FM/Cassette unit and mount the RF unit there. Access to the vehicle's speaker system (Front L/R) would allow vehicle-wide audio. An aftermarket AM/FM radio with Aux input and remote could be mounted somewhere else to drive the rear speakers just to have broadcast radio available. All things to consider whilst working over the engine, transmission, transfer case, and rear axle.
73 for now!
____________________________
April 15, 2018
More and more stuff that isn't related to electronics keeps popping up as the weather gets warmer. It's raining off and on today so work on the doublet is on hold. I've begun moving stuff from in the house out to the shed. My wife's car needed rear struts so her safety took precedence. I seem to have more "other" things that need doing for now which is why I'm not able to get back to the workbench and move on to the IG-102. I will get to it but I have to take advantage of the good weather (aka: NOT hot and humid, NOT cold and windy) to get things done outside. This includes some work on my Jeep TJ. The XJ is a project right now with a deadline. Once I get the TJ taken care of I will start on the XJ. Once that is completed, my daughter will have the TJ at her leisure.So for now, the workbench is closed as I transfer boxes and stuff to the shed and organize the shack more as time allows.
73 for now!
__________________________________
May 9, 2018
Jeep Happenings
Hello all! Due to some family changes, the Cherokee mentioned a couple of posts below has been taking my time. My daughter is purchasing my Jeep TJ and I needed something to replace it. A 1993 Jeep Cherokee XJ was discovered and rescued. Currently she's up on jack stands having dropped the front Dana 30 out to make working on the engine in-frame. Not an in-frame overhaul (not yet anyway) but a check of the main and rod bearings due to questionable actions by the previous owner. Now the old tried-and-true 242 (4.0L) came from a design American Motors Corporation developed in 1964. Through the years it got better and bigger topping out at 258 cubic inches in stock factory trim. It's been said there's no substitute for cubic inches. Many a block have been bored and stroked to increase the displacement. The stroker engine is one where the bore and stroke are equal and the AMC inline six engine was no exception to this modification. Many owners of Jeep stroker sixes typically run a 286 cubic inch (4.7L) version. This is typically the largest aftermarket production engine but larger ones have been done for race applications.Now all this information is really to give a very brief idea of the possibilities Jeep's straight six is capable of. If, and it's a big IF, the engine's oil clearances pass tolerances, new bearings and a new oil pump will be the least I do to it. Worst case? I replace the engine to get her on the road by September when my daughter is handed the keys to the TJ. Middle of the road issues that come up will determine the next line of action to take. For instance, at least two lifters sound like they have collapsed and won't pump up. Sounds like the camshaft and lifters will have to be removed using a trick I learned from an old-school mechanic for these engines. This engine wasn't designed to remove the hydraulic lifters without removing the cylinder head since the push rod guides are integral to the head casting. Removing the head now doesn't make sense as the compression numbers are good, spark plugs look excellent and doesn't blow blue smoke. She runs fairly smooth with good seat-of-your-pants power so I'm avoiding removing the head unless I see something wrong with the piston movements.
This leads to another item in the chain of events if this line of action is executed. Valve timing. With 226,211 miles on the clock there's bound to be some slop in the timing chain and probably the sprockets. Since these have to be removed to get to the camshaft, well, the rest is predetermined. New rocker arms and fulcrums with bridges are now in the mix since two lifters are damaged. If the push rods are bent plate glass is our friend now. Soooooo, a new camshaft and lifters will be needed then the valve spring height is next, and so, and so forth, adnauseum.
Now these scenarios all depend on the bearings passing muster first. If they do then the pistons, wrist pins and lower cylinder walls, as viewed from the crankcase will need to pass. An endoscope can see inside the cylinder above the pistons through the spark plug ports. If that's okay....you get the idea.
So for now, I've reached the point of checking oil clearances. This will happen on Saturday. I am hopeful that considering how well this Jeep was taken care of by the first two owners (garaged and serviced at the dealer for the first 23 years of her life), the third owner didn't undo it all in two years. Remind me sometime to tell the story of the day I went to see it and meet with the third owner and what I discovered with my brother-in-law.
I'll leave you with photos of a little progress thus far. Oh, I haven't forgot the IC-7100 installation. It's just that there's a bit more to the Jeep's well being than first thought but I will install it.
73's!
 |
| Jack Stand platform for dirt |


 |
| The stands look too close together I admit. They are in the correct location though. Full access to the underside of the engine, transmission and transfer case were the primary reason I went with the stock jack points. |
 |
| Almost completely original. |
 |
| Dana 30 High Pinion front axle on vehicle. |
 |
| Not on vehicle. The control arms are forward as I had to roll it out from under the Cherokee. |
 |
| Shocks and upper control arms remain for now but will be replaced. |
 |
| Clear and unobstructed access to the crankcase once the transmission cooler lines and the oil pan have been removed. |
 | ||
| Trans cooler lines. Quick connects are anything but after 226,000 miles. Tore up the inserts but will likely use AN type fittings from Earl's Performance. |
 |
| Ooooooh! Ahhhh! The wonderful world of mechanical engineering. |
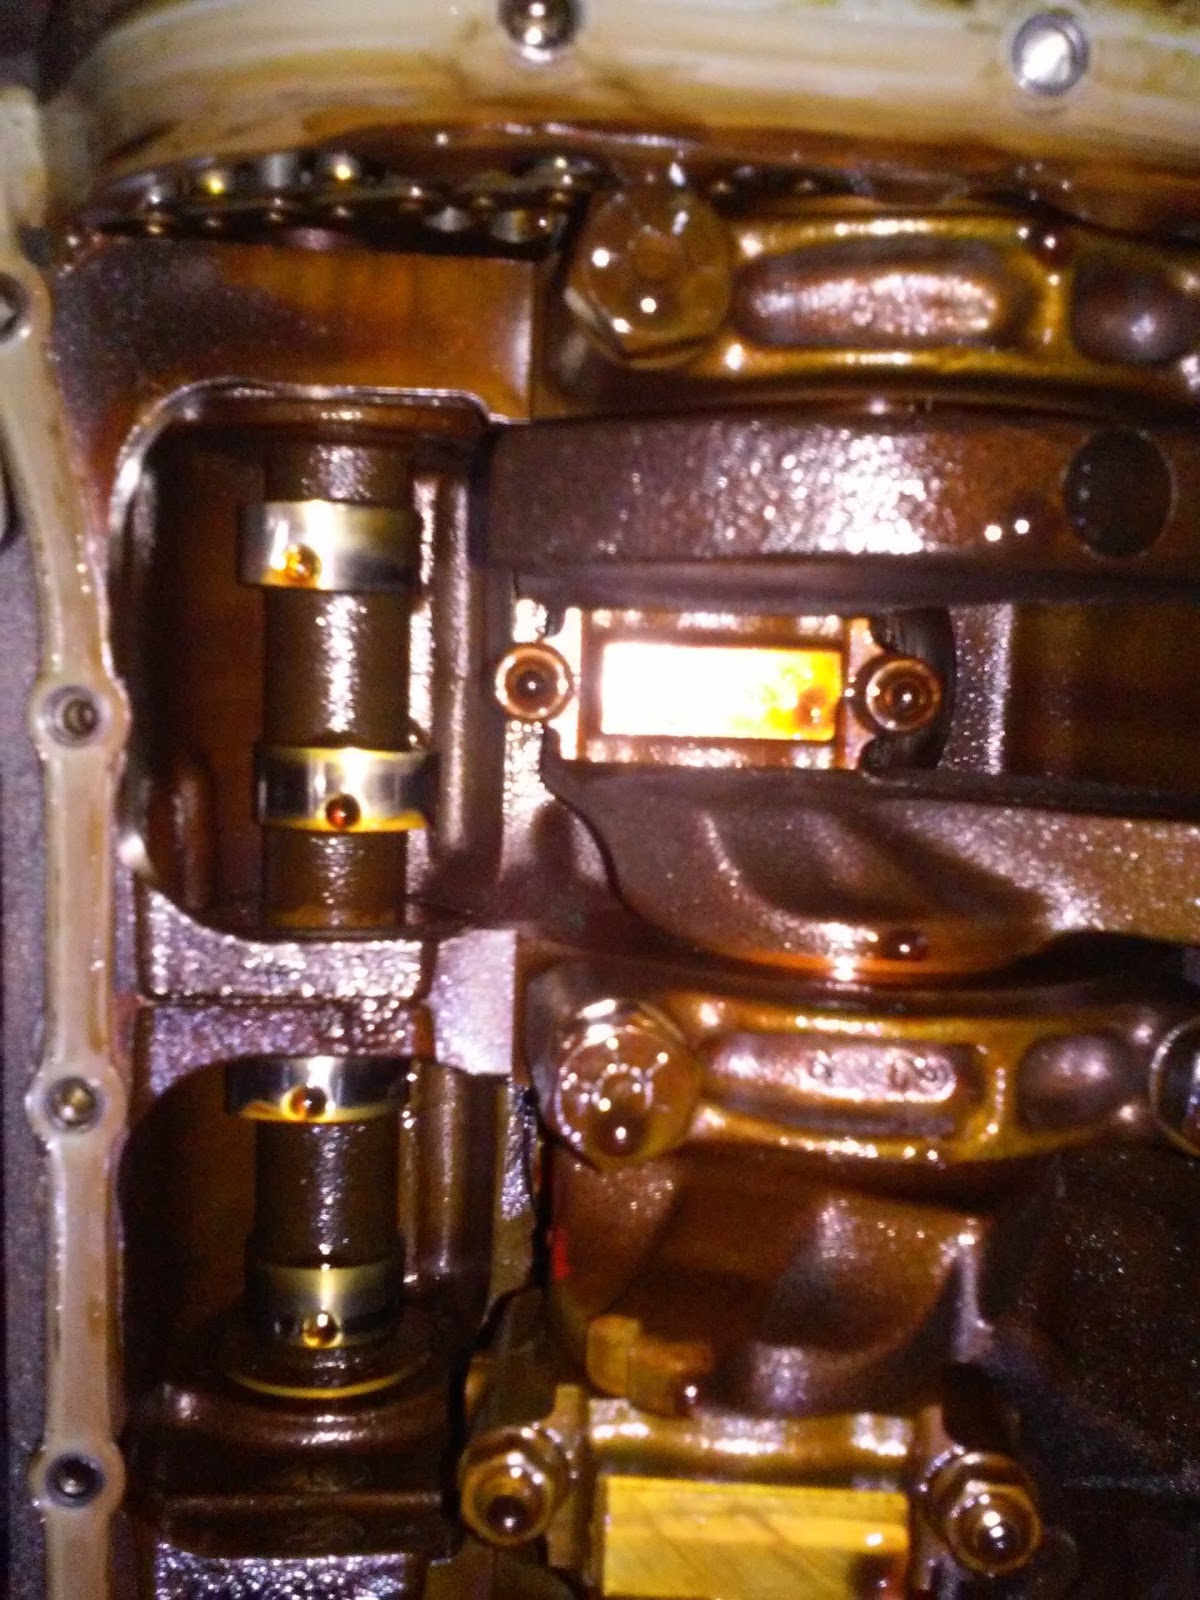 |
| Looks like Cylinder 1 is approaching the top of the intake stroke. That or the exhaust lobe on the cam is nearly flat. |
 |
| Mostly an overall shot. Camera was laying on the ground and couldn't get the whole length of the crankshaft in the shot. Stupid smart phones I tell ya! |
73 for now!
_______________________________________
May 26, 2018
More Shack and Jeep Happenings
Here's a shot of my recently cleaned workbench.

The IT-28 Capacitor Tester seems to refuse to work no matter what I do so I will put it aside and move on. I was hoping to have it to test future capacitors I pull for my "reclaimed" inventory but that will have to wait. My next project will be the IG-102 RF Generator.
On the Jeep front:
A few words on the radio project...
Referring to the photos below, it's easy to see how well this vehicle has fared over the years. It's a testament to the first and second owners of 20 years. Garaged, serviced at a good dealership and well-kept. The third owners, not so much. It was just transportation.
How often does an amateur radio operator get an opportunity like this? With a fresh slate to work with, I have many possibilities and opportunities to install much equipment into this Cherokee. With the photos shown, and more if requested, what thoughts have you on the installation of an Icom IC-7100? What other equipment would you install and how would you install it? Would you choose a cabinet for storage or maybe build a bench that folds out when the liftgate is open? Leave a comment with your ideas and share those thoughts.
My '93 Cherokee project is moving along pretty well. I'll let the photos do most of the describing.
 | |
| Before |
 |
| After |


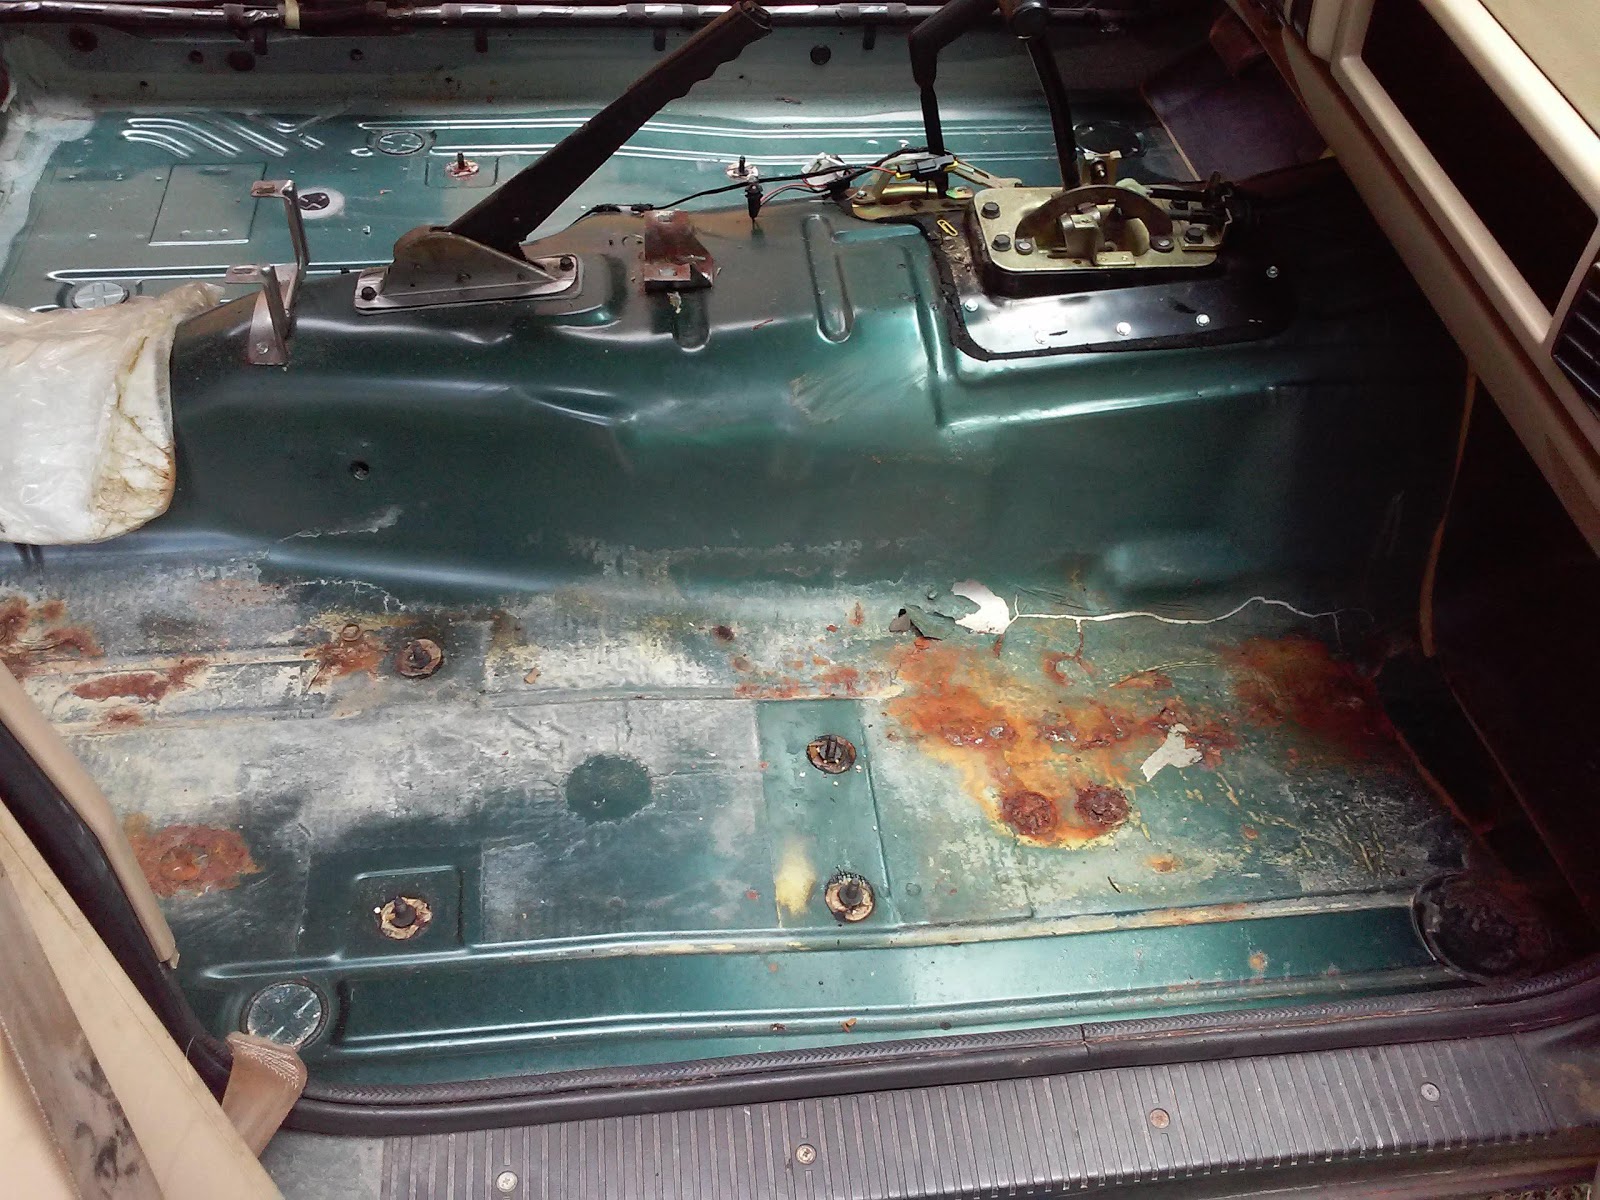 |
| Whoa. This doesn't look so good. |
 |
| Makes you wanna go "Eh? What's up with that? The driver's side always get the wear!" |
 |
| Ummm. Yeah, right! |

 |
| The reason for the seat leaning to the left with no support on that side? A cracked foam seat pan. I will take it to Auto Interiors for an evaluation. |

You can see that if this were primarily an off-road vehicle that saw more off-road than on, mounting any radio on the floor would be a pretty bad thing. Water fording notwithstanding, any holes drilled or screwed through the floor pan must be sealed right away or water intrusion and rust will develop. Also, dissimilar metals do not react well to each other when exposed to the elements so be aware of the material the fasteners you use are made with to prevent bigger problems, ahem, down the road.
The engine bearings were inspected and oil clearances checked with Plastigage Green. All oil clearances are within spec. If the crankshaft were removed, a micrometer and bore gage would have been used instead. This engine will be an in-chassis refresh.
A visual inspection of the bearing shells indicate oil starvation. The connecting rod shells were worse off than the mains but that's to be expected. No bluing was visible to indicate high heat stress. The crankshaft connecting rod journals have also fared pretty well. No scoring. Scratches, yes but no scoring. I can implement a makeshift polishing action to smooth them up. The main bearing journals do not need any attention. The rear main cap has yet to be pulled and inspected though.
I believe the oil leak at the oil filter adapter housing occurred not long ago. The previous owner (third) allowed the oil level to run down until the pump cavitated but all in all, the bottom end of the engine seems okay. From what I can see of the cylinder walls and piston skirts, I should not need to remove the cylinder head. Compression numbers are good although at the low end due to the mileage (226k).
The camshaft on the other hand hasn't done so good. Two, hard-collapsed lifters for cylinder 2 and very wide wear patterns on many of the lobes. This may indicate improper lubrication as well causing the bottom of the tappets to wear flat. Valve action is a tad loose on cylinders 2 and 3 so I will most likely use a compressed air spark plug adapter to fill the cylinders with air to hold the valves closed while I check the valve stems for play and replace the stem seals. The top end usually wears badly in oil starvation situations. I am still hoping for the best. If the valves are damaged, I will purchase a head from Clearwater. Machine servicing this head will cost just as much if not more.
There's where I am at with the Cherokee. I haven't named this project as I just don't know what I'd like to do with the platform. Go all out and build a communications wagon, go more military in style, or something else entirely. It will have to fill many roles but its primary purpose will be my main transportation.
So if you have any ideas on what you'd do with a clean slate vehicle, Icom IC-7100, and empty pockets, share them in the comments.
73 for now!
_______________________________________
June 3, 2018
Good Evening. Since I will post much of my repair work on my Cherokee project, I decided to post to a dedicated blog on my Jeep interests at http://jeepinterests.blogspot.com/I will make a note here when there is an update over there from time to time.
73!
___________________________________
July 2, 2018
Good evening! Hard to believe a month has flown by. Work has been progressing slowly on the Cherokee at jeepinterests.blogspot.com/. Tonight I'd like to share my first radio accessory for the Cherokee's Icom IC-7100 install. I would ultimately like to install an Icom AH-4 tuner with a 102" whip. That's the ultimate goal. In the interim I was hunting down the best price for a Hustler antenna ball mount. I found one on eBay for less than $20. It arrived tonight and couldn't wait to open it.Well I did open it and behold...


A vintage New-Tronics Hustler C-32 ball mount. The instruction sheet clearly states Rev 4/75. So this mount could be circa 1970's or 80's vintage. Without locating any other references to when the next revision of the instruction sheet was made, I can only speculate how new (or old) this item may be. The hardware is all there and was sealed in an almost clear, but yellowing, heavy mil plastic bag typical of the era. The box states "Made in the USA"


 |
| Wow! Not black! I like it! |
 |
| Flat surface to mate against the body panel. May not see that in the modern version since most cars don't have any flat sheet metal, or plastic, panels due to the aerodynamic body styles of today. |
So this is my first purchase toward the installation of my IC-7100 for my Cherokee. Had my daughter not wanted to purchase my Wrangler, I would never have bought this Cherokee and I would have installed the radio with a ball mount on the Wrangler instead. So with the change in vehicles so goes the change in plans. Change is the only constant in the universe.
73 and have a good evening!
_________________________
July 4, 2018
Happy Independence Day!
I hope everyone is getting their fill of hamburgers, hotdogs and everything else that makes our celebration of independence important to us U.S. citizens.As amateur radio operators all know, you can do it without drilling holes. You might not get the best out of it though. If I had a brand new Jeep Wrangler JL, I'd still feel the need to drill the hole. You can't use a mag-mount antenna on a fiberglass roof without some super magnet and a steel plate to sandwich the roof with for an antenna mount. Likewise, you can't mount a side mounted ball mount without drilling. I wanted a ball mount to use a 102" stainless steel whip antenna in the future. For now, the ball mount will hold a Power Rod from Tower Electronics set for the 20 meter band. This is a knock-off design of the famous (or infamous) Ham-Stick that used to be in production. This 20M stick came from my Freightliner when I drove over-the-road. I had a Kenwood TS-450S/AT with me and it performed pretty good. This type of antenna is a major compromise but getting on the air and working stations I could work was fun and challenging. My longest distance QSO was to Italy at about 2AM from Alabama pushing 100 watts. His beam was pointed in my direction and I was able to reach him. Barely, but I did it.
The antenna found a new life aboard my 2000 Jeep Wrangler TJ with the same Kenwood HF rig. My daughter wanted to buy the Jeep from me so I had to locate another suitable set of wheels. Thus the '93 Cherokee was found and brought home. I think I mentioned I'd have the radio installed before the Jeep was back on the road. I may prove that correct if I keep this up. ;-)
Anyway, with drill in hand I went outside to do the deed.
 |
| Picked the spot where I wanted to mount the Hustler C-32 mount. Close enough to a couple of creases or edge instead of out in the middle where the sheet metal is the most flexible. |
 |
| Drill appropriate sized hole. |
 |
| Check clearances, center punch one mounting hole for the base and drill again. I used a pilot bit first then used the smallest step in the stepped bit to size and finish the hole. |
After making the hole I sanded off the lfash and burrs then finished with 3000 grit cloth. Painting the hole is a must to prevent rust from starting and let that dry. While that was going on I set the base in place and center punched for one mounting hole. I drilled that and mounted the base plate. Adjusting the base to get the nut centered in the larger hole I center punched the last two mounting holes and drilled. The result was okay. I must have shifted the base by mistake and the big nut moved up a tad. There's no short but it's too close for my liking. I'm not in the habit of building air-gap capacitors. I'll resize the large hole with the Dremel tool in the future. For now, this is a live mock up for the final installation.
 |
| Note the full-surround backing plate. This vintage late 70's mount really used the good stuff. |
 |
| Don't mind the missing wheel or the fact the Jeep's on jackstands. That's not important right now. So what if it doesn't run yet? I am having fun planning and working on the radio set up. |
 |
| My completed antenna installation. |
 |
| "Behind this panel is the Icom AH-4 tuner." (I came to the same conclusion since this is where the HF antenna is accessed.) |
 |
The aluminum sheet
was already in there. It serves very little
purpose
other than to change the resonance of the sheet metal of the quarter panel. Here's what he had to say about this installation:
"The copper flashing
is 2.5” wide ~ 1/32” thick that is indeed going to the
ground lug on the other end of the AH-4. What you may want to try to limit the length of that copper is to do what I did at a later time (after this picture was taken). I opened the AH-4 and connected a heavy gauge wire internally to the existing ground lug. I then routed that wire around the PC board to the other end by the HV insulator. I then drilled a new hole ¼” and mounted a new ground lug next to the HV insulator where the “Caution HV Sticker” is located in the attached image (red label). That way, you will have a very short ground lead to the car body or antenna mounting hardware. Of course be very careful when drilling through there so as not to hit the PC board."
He said he removed the mounting brackets to the tuner so yes, it is just sitting
there in the well. This allowed it to sit behind the interior cover without having to make a relief cut for it. No packing or anything is holding the AH-4 in place. The copper flashing and heavy lead to the antenna are all that keep in in place. "It had close to zero movement. However, if you go off road you may want to consider some kind of cushy stuff to immobilize it." |


Lastly, he talked about his solution to the problem with the horrendous noise from the fuel pump motor in the fuel tank. I have a problem with my TJ as well but since I'm moving the radio to the Cherokee, I won't bother. The fuel tank in the Cherokee is metal. At least it is in my '93. Filtering the lines is pretty easy. You'll need a couple of these:

He installed two of them like this:

The last picture he sent was this one of his IC-706mkIIG installed in his '06 Grand Cherokee. This was taken with a different tuner (floor mounted) that was "a piece of crap" in his words so he went back to the AH-4.

Back to the mount itself...I've seen many make the mistake of thinking the nut holds the mount to the body and thus only drill the hole large enough for the threaded stud even though they still use the three mounting bolts. Of course they short out their radios and can't figure out why their signal can't get out. Well, read the instructions until you understand them is all I can recommend. I can't tell you how many times I've had to "fix" someone else's installation mistakes for this alone. You wouldn't believe how big their eyes get when they see me pull out the drill and a "huge" drill bit and ask why. I've started using the Dremel tool. Much lower stress for the customer even though I'm doing the same thing.
One thought my close friend gave me was to consider mounting the radio's main unit, or power unit into the indentation of the interior panel. I had put the power unit as a test fit and it is tight. However, once I get the AH-4 and install it, the two will be very close and I'll need less than 24 inches of coaxial cable. I can run the power and control cables through the body up to the front for power and the control head.


Either way the only real length of coaxial cable will be the one for the dual band antenna on the roof. For that, a Breedlove mount will be the order of the day. It's overkill of course but it's well made, very stout and looks great! If and when I decide to use a 102" whip, I'll get the Breedlove ball mount then. For this, I'll coordinate the headliner rework with the Diamond SG7500 installation closer to Autumn when it's cooler. I have to re-cover the headliner and would rather do this in cooler weather. So far the Summer reached August conditions at the end of June and continues to get worse. Working on this project would have been easier with a concrete drive and a cover. Oh well, some people are just lucky I guess.
That's it for now!
__________________________
July 10, 2018
I have two 17-7 Stainless Steel 102 inch whips, Hustler SSM-2 ball mount and a DX Engineery folding camping chair on the way for the Cherokee. One whip (the HF whip) will replace the current 20 meter Power Rod and the other will mount on the opposite side for the 11 meter band. I will order a Breedlove Mounts 3 inch NMO mount for my Diamond SG-7500 dual band antenna to put on the roof. When Jeeping, everyone needs a CB since not all of the participants can use an amateur radio.
The HF whip will be tuned by an Icom AH-4. I hope to have it by Christmas this year. The other will be tuned for highest effeciency on the center frequency while the dual band will be checked for frequency resonance with my RigExpert AA170. It can be tuned a little but so far, every vehicle I've installed it on has not required any changes. Yay!
The whips will use a tie down for running around town. In the deployed position, I'll have to come up with some kind of tether to prevent them from flying to far backward behind the vehicle. That is unless I'm trying to use NVIS while moving. Tricky. Other than that, my final location for the IC-7100's main unit and the AH-4 tuner will be at the right rear quarter panel. The tuner will sit inside the panel between the interior trim panel and the outside body sheet metal. The main unit will be mounted to the interior panel's cubby so I can get to the connections or the SD card. The tuner placement came from K2WH. See the July 4th blog post for information on his install.
73!
______________________________
July 11, 2018
Greetings! Today I received three packages from DX Engineering. The first was a Hustler SSM-2 antenna ball mount. The second and third came late this evening and contained a DX Engineering foldup camp chair and a PVC pipe with two 102 inch 17-7 Stainless Steel whip antennas.First, the mount: I must say it feels quite cheap compared to the C-32 mount I purchased and already mounted on the Cherokee. The ball halves are a formed stamping rather than cast but larger than the C-32 mount. I'm on the fence with this one folks. On one hand it has a larger base made of Nylon with aluminum inserts to keep the mounting bolts from crushing the base and a larger ball offering the impression of a more stout mount. I like that the base is larger and features the anti-crush sleeves. On the other hand, even though the ball mount is larger, it feels cheap and fragile. The look of the ring around it looks a bit cheesy. It might have been put there to attempt to prevent water from getting in between the two halves. I doubt there is any ball mount other than Breedlove Mounts that won't trap a lot of water. Breedlove Mounts aren't hollow like the Hustler mounts. Constructed with a solid brass ball mount and thick aluminum (aluminium) top and backing plates. Though the price reflects the construction and materials used, they are worth the extra money, when you have it. This one is the one I would have liked to get my hands on. Since I needed two, I had to go a bit cheaper. Maybe next year.
On the SSM-2, loosening the Allen bolt to allow the ball to swivel really lets the cheap feeling really shine. The hollow, tinny, almost coffee can like sound doesn't give much confidence it will support the 102" whip it was claimed to work with. It seems I may have to utilize a tether to prevent the antenna from laying almost flat while driving with them deployed. If I could, I would use the mounting box and base the Army uses on the Humvee or the old M1009 shown below.


If I did, they would serve an extra function of preventing the side of the Cherokee to hit the ground. ;-) Well, almost. The backing plate would be pretty darn big and would need to be either welded or riveted to the inside of the body panel. If I were to install body armor for the Cherokee, rivets would be appropriate.
Second item that arrived is a pair of DXE 17-7 Stainless Steel, 102 inch (2.59 meter) whip antennas. As mentioned before, one is for the IC-7100 and the other for the 11 meter radio for Jeep outings and stuff where they are required to participate. If you aren't familiar with some of joys of Jeeping, click here =======> Jeep Jamboree <======= to find out more.
The last item received today was a fold up camping chair by....yep, you guessed it. DXE. I needed something to get past the $99 mark to get free shipping since the antennas cost an extra $40 oversize handling fee. If I knew I needed more, I would have ordered ten and still spent $40, I think. But I don't so I didn't.
Only part left to get is a heavy duty pot belly spring like the first I have already. Once I order that, both antennas will be complete.
I'll try to build a mock up of the Icom AH-4 so I can figure out how to mount it and the main unit in proximity to each other. Antenna coaxial cable length between the radio's main unit and the AH-4 is less than two feet (.61 meter). I'm not sure, however of the length to get to the roof mounted dual band VHF/UHF antenna. I can at least run a length of coax I have to figure out routing. Probably will just go ahead and cut it to length and install a PL-259 connector. Any cable tie downs needed would then be known and ordered. I don't have any plans on reinstalling the interior soon since I still have to wire brush the floor pans and paint on the Chassis Saver. That will be before the cold weather sets in, I hope.
Another consideration will be some snap on ferrite beads for CMC suppression. I've heard and read so many conflicting opinions, "facts" and mathmentical (yes I meant to spell it that way) notes that I need to research ferrite and how it's used. Getting back to basics seems to be the only solution at this point as I really don't know what I don't know anymore after all the technobabble-factinions everyone swears by. Ugh!
TTFN!
_________________________________
July 29, 2018
Not much going on here in the shack. I have the interior panel from the Jeep here inside to work out mounting the main unit of the IC-7100 to it. I have a couple of steel mending straps I can use as backing plates to spread the weight of the main unit over a larger area. The mounting brackets would then bolt through the pastic to these straps. The radio, however needs to be removable and the fasteners used to attach the main unit to the right-hand bracket, as viewed from the direction in the photo, I won't be able to get to them easily. So I thought I would use threaded studs instead. A bracket would be located there anyway but a threaded stud would be thread-locked into the main unit with light duty green thread locker to hold them in place. When the main unit is mounted, the studs protrude into their respective mounting holes in the bracket to hold in there. The other side of the main unit will be fastened in a traditional way with either screws or knurled knobs with the M4x.7 threads. Here's some photos of the panel with the IC-7100 mocked up into position.

 |
| Some cutting will be necessary to make the tuner and power ports accessible. |
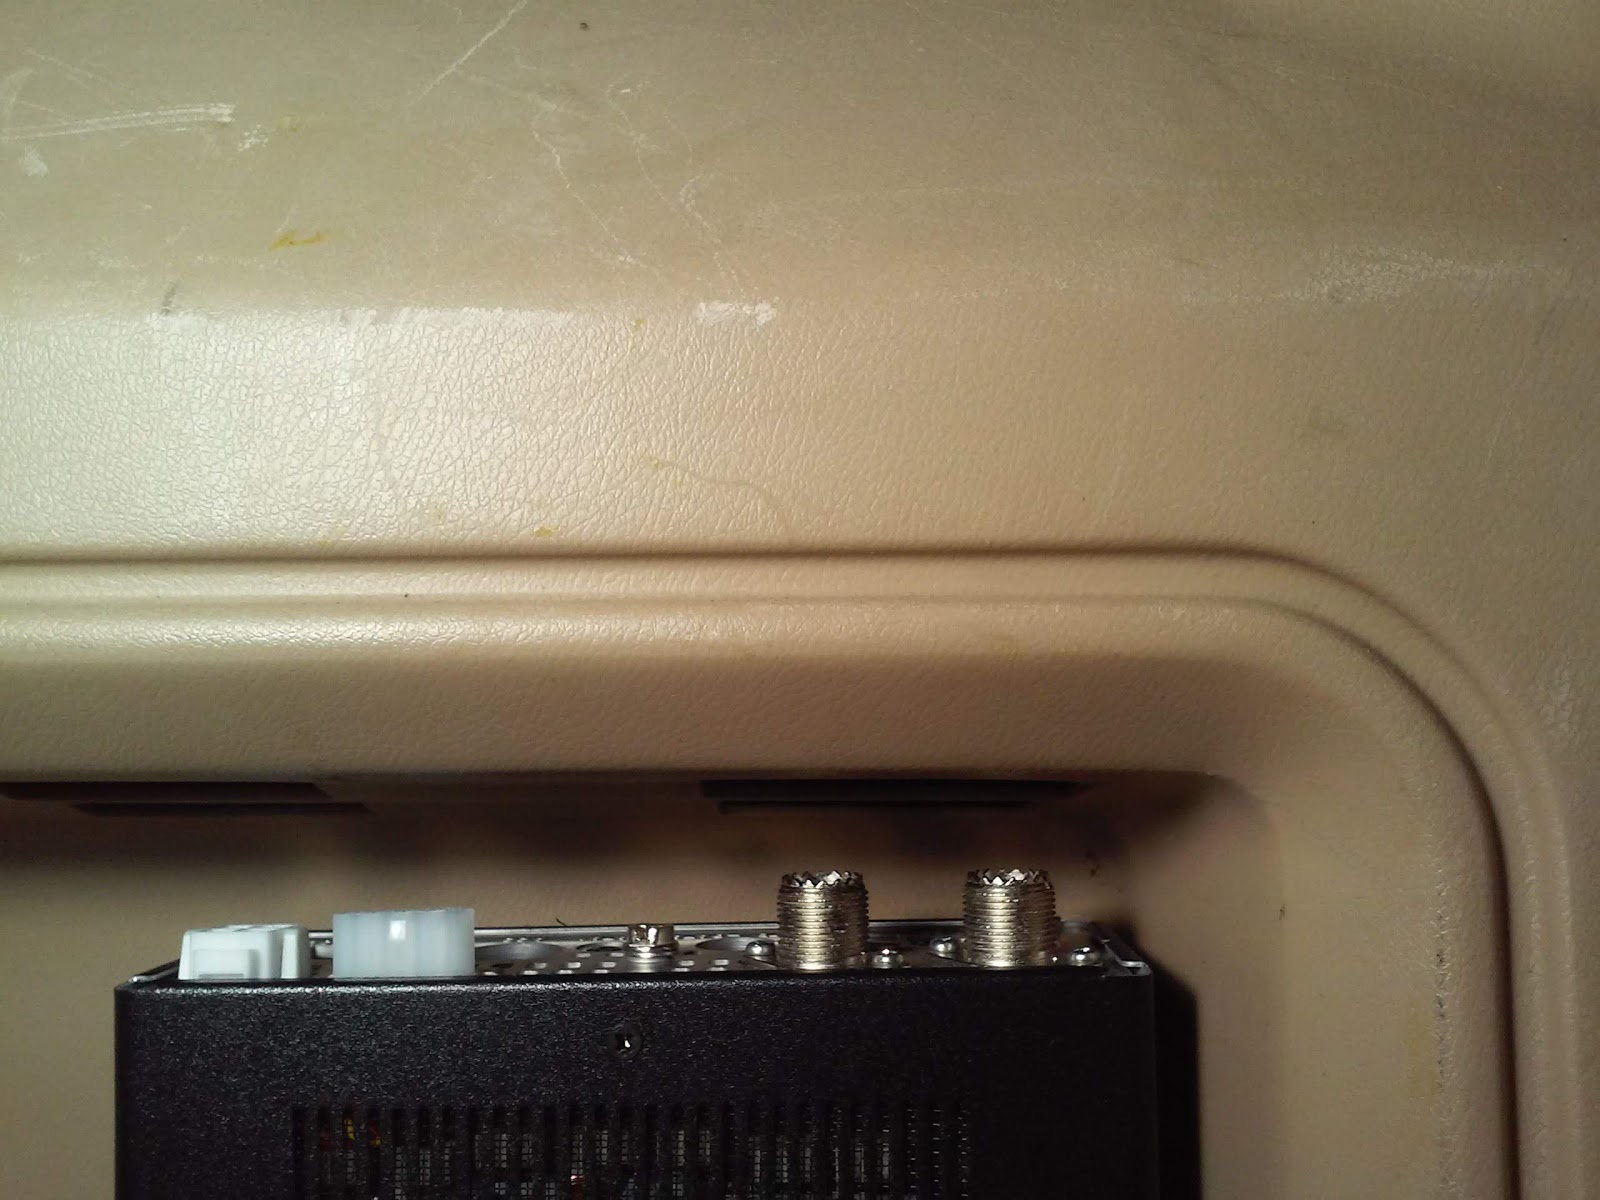 |
| Enough slack in the cabling will remain to remove the main unit. |

I want to put a screened cover over the cubby in the panel and have only a slight idea as to how to go about doing it. My friend, N1XIO - Jerry and I have discussed how to approach it often. I haven't spent much time working on this due to the approaching deadline to finish the Jeep's repairs and get her back on the road.
Here's a link to one place selling perforated steel. https://www.onlinemetals.com/merchant.cfm?id=1004&step=2&top_cat=849 Home imporvement stores carry something similar in aluminum but it's very thin and easily damaged. I might need to use that anyway to prototype with.
The perforated sheet will have some sharp edging so I would want to line the edge with something to keep from getting cut. I also want to form a 90 degree bend so the edge will match up with the groove around the cubby. The real challenge for me would be to get the curves bent correctly. I may find a thin edge protector so when the edge of the sheet goes into the groove it won't click and rattle with vibrations.
How to secure the sheet is another matter. Right now I'm looking into using 1/4 inch aluminum threaded standoffs I can use to support it. Not sure if I can use 1/4 inch round hole perforation or should use 1/8 inch to avoid using washers between the sheet and standoff. Either way there will be several holes drilled into the panel and I'm already looking for another panel in case I remove the radio. The standoffs would be attached from the rear of the panel with fender washers to spread the load out. The plastic is old and will only get more brittle over time, hence the search now to get what I can in the Sand color still in good shape like this one: https://www.ebay.com/itm/Jeep-Cherokee-XJ-Sport-CAMEL-RH-REAR-Interior-Quarter-Cargo-Trim-Panel-97-01-4dr/123190188788?_trkparms=aid%3D222007%26algo%3DSIM.MBE%26ao%3D2%26asc%3D52935%26meid%3Dbffd03ba7b9b45aba771a92b456e71fa%26pid%3D100005%26rk%3D2%26rkt%3D7%26sd%3D122977132889%26itm%3D123190188788&_trksid=p2047675.c100005.m1851
In my July 4 post, I posted photos of another radio operator's installation. His main unit was mounted on the rear of the center console. The AH-4, however was installed behind the panel in the fender well. This area is sealed from the elements. Since the control head cable is quite long, I can mount my main unit back here and run a two foot long cable for the connection to the tuner whilst running power, data, and audio to the front via the now exposed interior channels in the body. Then the challenge would be getting a CarPuter built and set it up for use as an integrated mobile platform without resorting to a laptop on a stick configuration.
That's it for this post. 73 everyone!
______________________________
July 30, 2018

And so it begins.
 |
| Brackets are attached to the main unit using M4-.7 x 10mm with one flat washer each. |


 |
| Marked the position of the radio bracket set. |
 |
| And drilled holes. |
 |
| I placed a pair of strap steel menders to use as the backing plate reinforcements. |

 |
| The plywood is nearly a perfect size. |
 |
| Traced a line for the wheel well cut. |
 |
| A view with the wood in front of the cubby with the trace line for the wheel well cut. It will sit in this orientation behind the cubby. Mounting holes drilled for six of the eight mounting bolts. |
 |
| The hardware set for the main attaching points for the large brackets. #8 machine screw, #8 flat washer, #10 flat washer, #8 machine nuts with star washers. |
 |
| Thread two nuts fully on to the screw. Cut .25 of an inch off the end of the screw. Wear safety glasses! Either piece can become a missle! |
 |
| Raw cut thread. This damages the thread so you can't start the nut. This is why you put the nuts on first. |
 |
| Run the nuts out from the head toward the cut end. |
 |
| I used a gimble socket set with an 11/32 socket as a holder. Inserting one or both nuts into the socket, use a screwdriver to back the screw off the nuts. The threads in the nuts will chase and clean the damaged threads. This is much quicker than spending time filing the threads clear and reshaping a starting thread to put a nut on. The nuts are sacrificial and may be damaged so two nuts were used to make sure the thread is reshaped. Have a few extras on hand. |
 |
| Chased thread and you can put a nut back on no problem. |
 |
| Complete set of main attaching fasteners. |
73!
_________________
July 31, 2018
You know the old saying about the best laid plans? I don't have any for that reason. It saves time. I must have been a biplane pilot in a previous life flying by the seat of my pants. As the mounting of the main unit progressed I was able to see a couple of things I would change now instead of later after it was installed in the XJ.Talking with N1XIO-Jerry about this, he thought of painting the interior of the cubby with flat black paint. I thought, "NO! That would ruin the plastic and be a pain to clean if I ever took the radio out! Are you nuts?!" Just kidding. I didn't say it but I thunk it, a little. To be honest drilling the holes does the irreversible damage to the interior panel anyway so why not paint it flat black. Behind a grille or mesh screen it'll all but disappear. The grille would be the stylish point back there even if I painted it the same color as the rest of the interior. A dark space is still a dark space until you light it up. Right?
So here's tonight's progress:
 |
| Bracket arrangement on the radio decided. |
 |
| Trimmed the backboard and re-drilled mounting holes after centering it up. |
 |
| Added brackets to the front and ran the bolts through them to mock up the arrangement. |
 |
| So far, so good. |
 | |
| With all the brackets mounted, I can put the main unit in and begin clearancing the vents at the top for coaxial, tuner control, remote audio, and power cables. |
 |
| Threaded studs protrude through the right hand bracket set. These will be thread-locked with light duty thread locker into the main unit. Yes, that's the IG-102 project in the background. |
 |
| Close up of the studly stud. They started as a pair of hex head M4-.7 x 12mm cap screws. Cutting the head off shortened them to about ~9mm. |
Next purchase will be some fine sanding discs, plastic compatible primer, paint, and some green thread locker. For now, I'm working on clearancing all the vents with the ports that need it.
73!
___________________________________
August 12, 2018
After the work session on the XJ today, I finally got chased inside by a storm bloom up and producing lightening. After grabbing a shower I decided to work on the radio installation again. Tonight's session was to trim the interior panel so all of the ports would be uncovered to prevent any cables or wires from binding up when installing or removing the rig. Here are a few pics of the work done.


Not much else going on until the XJ is road ready. This will be, however the first radio install. The 2M/70cm antenna will not be transferred from the TJ right away. The Breedlove mount I want is still a little ways off. The IC-7100 can do 2M/70cm but I don't have a way to mount the SG-7500N unless I purchase a magnetic base with an NMO mount as a temporary solution. Probably should get one anyway for E-Com service.
That's it for tonight. 73!
_____________________
August 27, 2018
Greetings! I have a short update for you. Been working on the Jeep and am now driving it to work on a daily basis. Without an interior. Or passenger seating. Or an HF or VHF radio. <sigh>Hopefully that will change in the near future. I think I've located the water intrusion point and can effect repairs and paint the floor pans with Chassis Saver Silver before winter gets here.
As for the radio's....well...I've been thinking about how to go about what I want to do with them and thought I'd draw out the antenna locations first. Click on the image below for a larger version.

The look is nice and I hope the performance will be good. The antenna's on the vehicle will be two 102 inch whips, a Diamond SG-7500N and the AM/FM stereo. The 102 inch whip on the passenger's side will be connected to an Icom AH-4 tuner. The main unit of the IC-7100 will be mounted next to it on the interior side (see previous posts) and the control head mounted up front.
The other whip will be for the CB radio for trail events and general communications while on road trips. The SG-7500N is mounted atop the roof just behind the support bow located slightly behind and above the driver and front passenger's seat. I think a plumb line hung down would place the antenna just behind the center console. And of course, the AM/FM stereo antenna on the passenger's side front right near the windshield. I have some work to do with the HVAC system first so I can't install the control head yet. Have to get a few things taken care of first.
That's it for now. 73!
______________________________
September 10, 2018
Hurricane Florence is projected to strike somewhere on the coasts of South Carolina, North Carolina, Viginia, and Maryland. Where exactly is still unknown at this time. Suffice it say a state of emergency has been declared in all four states as a precaution. Though this isn't identical to the same track as Hurricane Fran of September 5, 1996, Florence seems to have the same characteristics."But Smitty. How does this relate to this project?" Glad you asked. I wasn't prepared to install the IC-7100 yet. This event pushed the urgency a bit higher on my list of priorities. I'll install the new Breedlove NMO 3in mount tomorrow evening. Time is running short of dry skies in the evening. If I am unable to install the Diamond SG7500N, I'll have to work any storm reporting via the Yaesu FT-70D HT. I also have a Baofeng UR5C as a backup. One reason why I never purchased a magnetic NMO mount is that I never anticipated I'd wind up with a vehicle with a metal roof again.
So I'll install the interior panel with the IC-7100 main unit into the Cherokee XJ and find a place to mount the head unit somewhere. There is no interior to speak of so attaching anything anywhere would be either to the metal floorpan or a temporary mounting onto the old vinyl dash. I will figure something out. I still have the gooseneck mount I purchased for the Wrangler TJ and that may be the immediate solution.
To make this all happen, the headliner has to be removed. Once it's out and in the shed, I can drill the hole needed to install the mount. A quick check with the RigExpert AA170 analyzer and hook it all up. Getting power to the rig from the battery won't be such a challenge since there's no interior to get in the way! Advantage plus! This will take time and the most time spent will be on the removal of the headliner and installation of the antenna.
I chose a mount from Breedlove Mounts for the simple fact it is heavy duty. The design is simple and stout. There are cheaper mounts to be sure and I'm sure there are plenty who will swear by their choice for whatever reason. I own a Hustler C32 ball mount that supports an old 20 meter Power Rod mono-band antenna on a pot belly spring. I really like the Breedlove Mounts designs and believe they are worth the extra dollars spent. When I am further along in the XJ's reconstruction, I'll get two of their ball mounts for the 102 whips.


Breedlove uses an isolated core instead of a bolt so you can drill the hole only large enough to clear the threads. You might even be able to drill and tap the hole to screw the base through the sheet metal then use the 2in nut to cinch it down like a jam nut. This would create an excellent contact with the sheet metal for a good ground. True, bonding techniques will still need to be observed for the exhaust system, hood, hatch, and chassis-to-body (if you have a body-on-chassis vehicle). The Cherokee XJ is a unit-body frame construction meaning that everything about the body becomes the frame.
The total for this mount is $40 +$10 S/H. It came by USPS today. I ordered it on the morning of the 7th.
This is a Breedlove Mounts NMO 3in mount.
Puck Mounts
That's it for now. 73!
______________________
September 19, 2018
Greetings! It's been nine days since I received Breedlove Mounts 3in mount in the mail. Today was the day I would install it. Things started out well enough and ended better so today was a win!Here's the photo trip of the work done.
 | ||
| Whoops! Not the puck mount. This is my new-old horn button featuring simulated Allen head screws. These were on several of the small-body Jeeps beginning in 1984. I don't remember seeing these on anything other than the Comanche (MJ) and Cherokee/Wagoneer (XJ's). |
 |
| So here's the roof before the mounting. I placed the puck where I wanted so I could tell where to place the nut for it inside. I needed to make sure where the forward crossbow that supports the roof panel was. |
 |
| Locating where the nut can go was easier from the inside. So I made a mark to note where I wanted the hole initially. Then I measured between the stamped creases in the roof panel to pinpoint where to use the spring-loaded punch for the drill bit. I first drilled a 3/16in pilot hole from underneath as shown above. |
I imagined drilling for RF to take the sting out of breaching the roof panel. Yeah. I know. Real amateur radio operators drill holes. Well, that's what I'm doing! See?! Still stings a little though.
 |
| Maybe good for solar eclipse viewing if it were at Noon and I had about 15ft to the reflecting sheet. But that means I'll have to drill a hole in the floor too. I think I'll install and antenna instead. |
 |
| With the pilot hole made, I switched to a stepped bit. The bit was used to size the hole up three times on top, then twice underneath and once again from the top to get to the 9/16in hole. I believe this helped prevent the metal from being overly stretched and becoming a bit of a dome or dish. Looked good to me anyway. After the final hole size was achieved, I went back to the underside and used the step bit to cut the flash from the edge of the hole that drill bits leave behind. |
 | |
| The is the 2in nut that secures the 3in puck on top with a rubber gasket. The crossbow support to the left is not welded to the roof panel. It is bonded with an adhesive to reduce sound and vibration as air passes over the surface or with fluctuations in cabin air pressure. Try observing your roof panel when you close the door. With all the other doors closed, you'll see your roof bulge slightly then vibrate. Without that support your roof would do a vibrato that would change frequency the faster you go. Trust me on this. There are no good vibrations. |
 |
| Looking through the left rear door, you can see the location of the crossbow support. Ring terminals are used to keep the depth of the mount to a minimum. Breedlove Mounts has other types that have an SO-239 female end too. The headliner won't hit this and cause it to bulge any. The cable hanging down is actually for the dome light. The coax will run along the same side of the support as the nut before disappearing into the body channel. I am debating on using the B pillar or attempt to fish the coax through the A pillar at the windshield. I'm leaning toward the B pillar for the simple fact that I won't have coax running near the engine bay or wiring harnesses and avoid causing issues with the TCS or the ECM. |
Now I didn't make the final cable I'll use with it yet. I still need to find a location for the control head of the IC-7100. I'm still leaning toward that space where the ashtray sits even though it's a bit low and far from reach. I'm also toying with the idea I'll have the Alinco 605 mobile unit with me instead. That way I can monitor and transmit on 2M/70cm separately from HF plus 6M. True, I can really only use one radio at a time but the time saved from pressing buttons to get back to a particular band and frequency is as fast as picking up a microphone.
The cable I have now that was originally planned for installation in the Wrangler TJ is still intact with an SMA female on one end to fish through the body and a PL-259 on the other. I'll just cut the end of the cable with the PL-259 to its natural length between the antenna and the radio's final mounting location.
I did not buff or do any prep work for the rubber gasket under the puck. I simply cleaned the roof surface with some cleaner, rinsed and wiped dry before drilling. I wiped it down again with a damp cloth to get the metal chips out of the way then wiped it dry again. I'm not going to put the headliner back in right away. I'll need a few rain showers to test the gasket before I decide on the next move.
 |
| My workbench, for this project. I still haven't located where the water is getting into the vehicle but it is behind the dash. Next is to remove it and the HVAC system. Once those are out I can see if there's any water stain trails evident. |
 |
| The hole for the mount is so close, it actually partially threaded the hole. I turned the puck until it was hand-tight before installing the nut. The nut does make contact with the bare metal to improve connection for the ground plane. |
Note in the photo above that the center conductor is separated from the outer threaded cylinder. This is why it isn't necessary to have support screws drilled to thread into the puck to secure it like a traditional ball mount does. The cylinder is threaded into the puck and the NMO mount disc acts as a jam-nut.
 |
| Here's the "after" shot. It's well-centered side-to-side and secure. Now all I have to do is remember it's up there to avoid parking garages and drive-thru's. It'll only take one lapse in memory to remember this 21 year old Diamond SG-7500N was up there. That and the clattering it'll make just before it falls off the roof behind me. |

 |
| Here are the SWR results using the test cable. Though the antenna is tad short, I'll adjust it this weekend. |
 |
| Last pic of the day. I'm going to celebrate one more step closer to my goal. |
73!
_____________________________
October 4, 2018
Resetting a setback.
I discovered a rather disturbing rattle/knocking noise on Monday morning. It seemed like it wasn't going away as the engine warmed up. The fact that Jeep's 4.0L is a noise factory, and the fact the Wrangler TJ makes this same noise, just not as much, led me to believe the engine is not long for this world. To read more about this new development, please click here.I guess this will give me more time to work on the other aspects of my mobile ham shack and find that darn water leak on the passenger's side. Buggers!
_____________________________
October 13, 2018
The project is still on hold as the engine was making some abnormal sounds and the Jeep parked pending investigation of the problem. To check on the progress of that project, click here and scroll to October 7th's blog post. Or click here to jump to the last post and scroll up.Thanks for stopping by.
_____________________________
November 7, 2018
I wanted to share some good news. Nearly a month has passed now and I received an early Christmas present from my best friend, N1XIO.


This is the key to using the 102" whip. (See previous post about another amateur radio operator and his AH-4 installation.) The Icom AH-4 is a versatile and durable wire-end fed unit. I have not researched this but it is said that this tuner can be made to work with just about any HF-6m transceiver.
If I'm out and parked somewhere and need a longer antenna, I can clip one to the whip and toss, throw, slingshot, rifle, mortar, or drone the other end over a tree. According to the specifications the tuner can take the AH-2B whip and work 40m and above. My SS 102" whip becomes an approximate 108" whip with the spring and ball mount. I'll be able to run the same range. 23ft is the minimum required to run 75/80m hence the wire extension. It will not tune 160m, according the specs. My LDG RT-100 does but it's designated as my QTH remote tuner and I don't have a doublet long enough to tune 160 properly. I like listening to the band though when I do hear signals.
I am hoping to get the engine, transmission and heater up and running this weekend (10th-11th) so I can return my focus on the radio aspect which is why I bought this Jeep in the first place. Hopefully it shant be too much longer before my next post showing the radio gear installation begin to pick up again.
Bye for now!
________________________
November 26, 2018
I had a chance after getting the heater working to try a dry fit of the passenger-rear inner trim panel. It didn't fit too well so I moved it around to try and find a way that would let the panel fit just as had been done by another amateur radio operator had back in 2004 to his Cherokee.HERE


So either his panel was more shallow than mine or he just kind of forced it in there. He didn't attach his main unit in the same place as I did and I thought maybe the 1/4in plywood reinforcement plate I made was part of the problem. Nope. The brackets on the AH-4 had to come off for sure and it still won't fit. At lunch today I took the brackets off and the panel would not sit properly in its place. Then I laid the tuner down and it almost fit right. The plywood plate I made does hang over the edge of the cubby on the back and figured it still hits the AH-4.
 |
| This may work but I don't like the idea of having such a long interconnect between the tuner and the antenna mount. I will probably flip this over and have the two cable run underneath so they do not cross paths with the interconnecting link to the antenna. |
There is a bit of room between the wheel well and the rear panel the tail light attached too so the stud for the antenna connection isn't touching or near any metal. I will most likely use a Nylock nut instead of the wing nut to attach a conductor to the antenna mount. The plan is to use a piece of coaxial cable from the tuner to the antenna mount. The braided shield of the cable will be attached to the ground plate of the antenna mount on the body panel to prevent the wire from radiating. The cable will be made from a piece of cable from The Wireman. The other option is to use a braided ground strap, insert it into heat shrink tubing and shrink the ends. Either way should work fine since the HF antenna port on the IC-7100 runs 6m and down. The other port is for 2m/70cm, which I may not use right away. I have an Alinco 605 I prefer to use which frees up the 7100 for HF duty. I may install an A-B switch so I can use either radio with the one dual band Diamond on top of the roof.
Since getting home from work I cut about an inch of the plywood off from the bottom and will try another fitting tomorrow at lunch.
So until next time....Bye for now!
__________________________
November 29, 2018
Getting closer. But only just.For the few days I have been tinkering with the AH-4's mounting. I decided on three things. 1) I will not install the Alinco 605 in the XJ simply because I won't need it. Not because the IC-7100 can do 2m and 70cm but rather, my HT can take care of the local monitoring freeing up the IC-7100 (mobile unit) for HF use. 2) If I need the horsepower, I can switch the mobile unit over and adjust the power as needed to make the repeater for local work. 3) I will install an A/B switch so I can use an HT on the dual band antenna on the roof while the mobile unit is on HF. Ideally there would be a dummy load automatically switched in just in case I forget to switch the antenna back to the mobile unit. I might build one to switch a relay instead of using an A/B switch. That way I can use indicator lamps to show me which position it's in. Red for HT and Green for IC-7100
Out of three HT's (one is on the way from my friend, N1XIO) I have, the Yaesu VX7 will be the one I take everywhere. My VX2 did until the battery can no longer keep a charge. I just haven't gotten around the buying another battery for it. And the FT-70DR is just an analog HT because there's no System Fusion around here. I think there it one in Durham but I've never been able to get it to work. The FT-70DR is probably going up for sale. I'll put what I get for it toward an openSPOT 2 most likely. There's no D-Star repeater here either. It's all DMR probably because it's cheap, not because it's a great system. D-Star's biggest fault is the fact it still uses an old CODEC and has had no significant updates to the system or devices. Yes it works. It ain't broke so don't fix it. Yes the audio could have been improved on the VHF/UHF side and lose the ability to use it on HF or program it to have better audio in VHF/UHF modes and automatically set it back to original mode while on HF. Interestingly, the bandwidth is so narrow, everyone sound like Number 5 or worse. That's because D-Star was designed to work with HF and the bandwidth restrictions there. Icom wanted it to be available to a much wider group of interests. System Fusion and DMR only work on VHF/UHF because they use 6.25kHz in a single slot and audio can be improved tenfold with two-slot use of 12.5kHz. More than HF permissions allow for even AM transmissions. Fusion's C4FM works similarly. It uses too much bandwidth to work on HF 6m on down. I have only heard of 40m being used in experiments but because of the band's traffic and the AM comparison in band width, I've not personally heard it myself.
So enter openSPOT 2. I can use my phone to link the openSPOT 2 to the internet and the IC-7100 to use D-Star. I could keep the FT-70DR and have the openSPOT 2 work Fusion's C4FM as well. I can even buy a cheap DMR radio and run that through it. So the DVAP can connect me to any of the three digital networks for amateur radio digital voice use.
Recently, a new Android app has shown up called Peanut. No, it's not the Mom's social network app but an app that let's an amateur radio operator use their cell phone to connect to the D-Star network via a server with access to reflectors, namely, "30Charlie" REF030C. Learn more about Peanut HERE.
I've listened to it and it appears to work pretty good for an app in Beta. Audio from various users equally have various levels of clarity and volume. One operator may be loud and clear while another be clear and very quiet even though my volume didn't change. Again, the transmitter's microphone modulation or gain has a huge affect on whether you can just hear them or get your ears blown off! Many operators either forget this when transmitting or don't think it matters.
So with the mobile comm's wagon I'm building out of the Cherokee XJ, I hope to have the most important pieces in one, go almost anywhere mobile unit that can offer me the best opportunities and experience amateur radio can offer wherever I decide to go.
Now back to our regular program...
The AH-4 needed an interconnect cable to the radio's main unit. The cable that comes with the AH-4 is Marine grade with a solid core and dielectric. Foam dielectric would be a bad thing in a marine environment since it would trap moisture. The solid core center conductor won't wick moisture either. But, because it's a solid core construction, the trade off is limited flexibility so it won't take too sharp of a bend.

The other connection, shown in the photo above, is also marine grade coax and the main feed line to the antenna from the tuner. The shield of the coax is tied to the antenna ground. This is the only end connected to ground to shield the lead from radiating. Note too the tuner is laying on its side. The input coax and tuner control cable are to the right of the tuner in the photo, pass under the tuner and up the wheel well. Ferrite beads will need to be used to control common mode currents. Also, the tuner is laying on its side to fit with the panel in place. The panel has a cubby moulded into it and will press up against the tuner. The panel won't fit exactly right but I don't want to make a relief cut. These panels are getting hard to find in the desert sand color and when I do see them for sale, they are expensive.
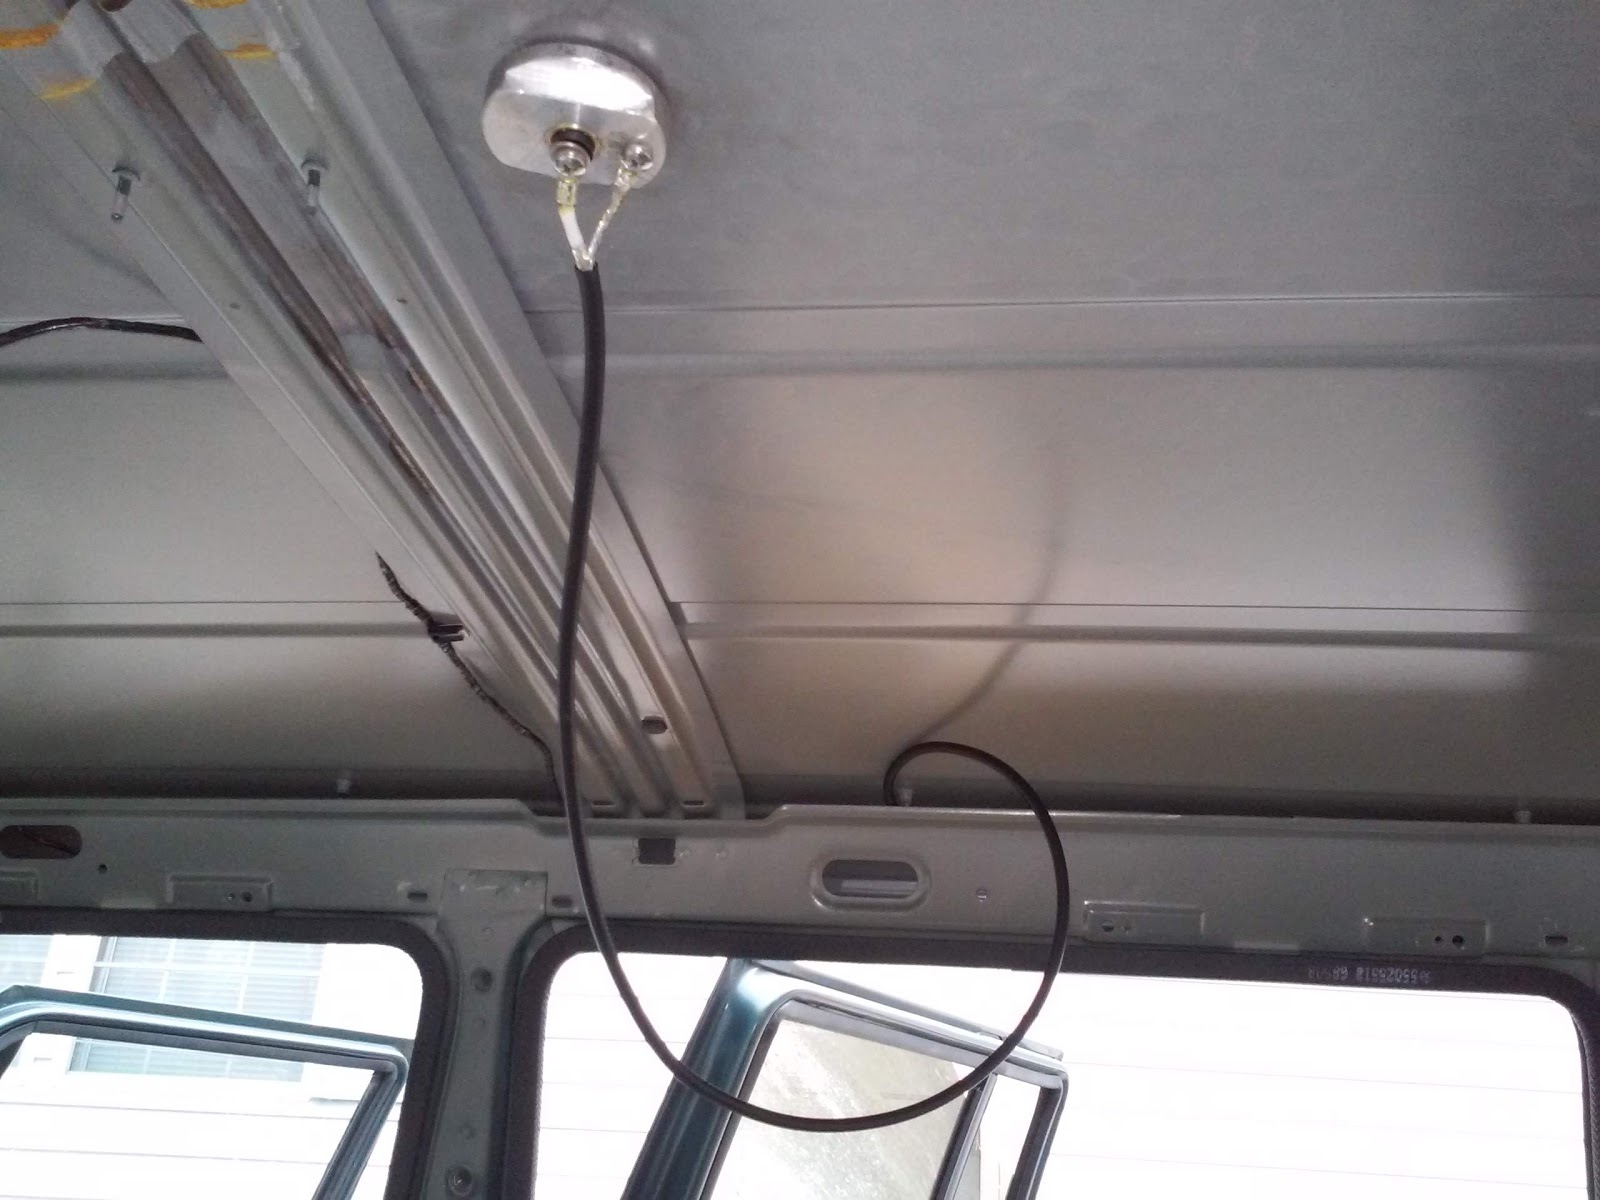
The cable for the dual band VHF/UHF antenna on the roof has been cut to length and ring terminals will be crimped, then soldered, before I put the headliner back in. I noticed today the roof vibrates against the support and after checking it out discovered the black adhesive that holds the roof panel to the support has detached. I'll need to shoot some kind of adhesive to help with that. Then the headliner can go back in to free up space in my shed.
The ground terminal of the tuner is on the opposite end of the tuner from the feed point. K2WH installed his tuner in the same location and used a 2.5 inch wide copper strip. He later moved the ground lug on the tuner to the same end of the tuner with the feed point to make it easier to connect. A wide ground strap performs better than a round wire in most installations. True, a round wire will work but a strap works better. Braided strap works better than a wire so if you only have a 3/4 inch wide braided ground strap, use it.
That's it for tonight's post. I hope to have more on the install by the end of the weekend.
73!
___________________________
December 02, 2018
I got a chance to make a lanyard using some paracord and the Cobra knot. In the past this was a macrame knot before the advent of the idealisms of preppers. It's a simple but strong knot. I hadn't found a video that didn't have a survival theme but this one does a good job of showing how to use the knot in a bracelet. I needed a tie-down for my 102in whip antenna for the IC-7100 and AH-4 tuner. Finding some stuff I had laying about in my portable antenna junk box I made the lanyard. It's made with six feet of Paracord 550 once used as a guy line for my "one-man mast" project for a quick deployed amateur radio antenna.


I got the idea from a couple of other Jeep owners with whip antenna's who posted in the forums a few years ago.


I took the XJ to work today and found that unless I wind up rocking the vehicle pretty good, the antenna doesn't smack the rain gutter. Coming into my driveway, I can make the antenna hit but it doesn't continue. The end of the whip also points over the hood, away from "prying eyes", to the inside of the AM/FM antenna. I could still get a military piece to cap the antenna's corona ball with should I need it.
I now have the lugs needed to make the battery connection to the 8 AWG cables and AGU fuse holders. The fuse holders are on the way and may get here by the weekend 8th-9th. I might get a chance to install them but only if we're not in an icing event. I'll get some pics when I get those pieces.
That's it for now.
73!
___________________________
December 8, 2018
Today started out cold and ended not as cold. I don't think it got to 50F but at least the wind wasn't blowing. We were expected to get rain late this afternoon and I didn't know if I would even attempt to work on the XJ-7100 project today. I did decide to but not without concern. I know I've got a cold on the way and have been feeling crummy the last few days. This was the only day I would have this weekend to get anything done so instead of rake leaves, I worked on the Jeep. Yeah. I'll have to make it up to the wife.To start with, I needed to get the power from the engine compartment into the cabin. I had the AGU fuse holders and two leads from the battery ready to install. The problem I ran into was where I decided to put the fuse holders. I am using 8AWG cable so a typical wire used for ATO or AGC type fuse holders won't work. MAXI fuse holders are large indeed but aren't mounted. They simply float inline with the cable they are connected to. But, those come with 10AWG wire already. Interconnecting 8 and 10AWG cable requires a suitable adapter that isn't readily available in any auto parts store. A sound shop would be needed and went with AGU type fuses the audio circles use for their big audio amps.

Next the battery, battery tray and fuse/relay block were unbolted and move out of the way. Sort of. The underhood fuse/relay block doesn't move much and only enough movement was needed to drill four holes to mount the fuse holders with.


The fuse holders are screwed to the inner side fender in a staggered position to facilitate easy access to one end of each holder should a fuse need to be removed or replaced.
The connection to the battery was easy with the 34/78 group size battery with dual terminals. The top posts are for the vehicle and the side post are for the radio equipment. Standard 3/8 ring terminals for 8AWG cable work perfectly.
After the fuse holders were installed, a hole, or holes were needed to get the power into the cabin. Some, less informed people will argue that the power can be had from the fuse box inside so drilling and all this mess can be avoided. To them I say, "Sure! If you want all the noise from the electrical system being pumped into your radio, then why not?" Also, there isn't any 8AWG cable to the fuse block that would allow me to pull 40 amps way back at the back of the vehicle. To do a radio installation correctly, it takes time and a little planning to get the most gain and the fewest problems out of the rig.
So, I drill holes. My first hole I thought was going to go through to the engine compartment based on some observations of where the studs were to fasten the HVAC box to the firewall but I missed and drilled too low. I wound up drilling into a boxed cavity of the uniframe at the firewall. I think it's the boxed section where the upper control arm is bolted to. I had to drill from inside the cabin as the inner fender creates a tight corner a drill won't fit in next to the blower motor. I considered removing the dashboard and checking to see if I could drill up over the HVAC box but that would take too much time so I re-figured where the markers I was using really were and drilled another 7/64ths hole. I hit daylight in the corner where I was aiming for this time. Knowing where it was I could drill a second hole for the second cable with accuracy.
Next, using a stepped bit I drilled the hole to 5/16ths and test fit a grommet. The hole was too small requiring me to drill to 3/8ths inch which was perfect. The grommets were installed and the cables were pushed through from the cabin through the firewall.

The camera was tilted to the right about 35 degrees so the orientation might be confusing. That vacuum canister operates the recycle air door for the MAX mode of the air conditioner. The rounded housing is where the blower motor and wheel sit and are accessible from the engine compartment.
So you may be asking why two holes? It is easier to seal a hole with a single cable running through it. I will still use clear silicone sealant but now it won't be a mess to do it. I can also drill a size larger hole for 4 or 6AWG if I need higher power requirements back there. As of right now I'm planning on installing an 850 watt modified sine wave power inverter under the rear seat with an outlet facing forward and a remote outlet in the back. Any larger inverter will require at least 4AWG cabling that far from the battery. If I go with a 2000 watt true sine wave inverter, I'll need 1AWG or larger and I won't be going through the firewall. I'll need to make the run down the side of the uniframe rail the up through the floor. It's possible to run through the firewall but where I can get through isn't in the best place behind the engine. It would let me run it down the center of the XJ under the center console and under the carpet to the space under the rear seat. But that's another project.
So the cables have been pushed through to the fuse holders and connected. The positive terminal cable for the radio has not been connected at this time as the other end is bare and I don't like sparks or unintentional welds. I had some 3/8ths inch split loom conduit I bought for this project several months ago and it was now time to use it. I wrapped the two cables from the fuse holders back to the firewall in the conduit and cut to length. This gives the cables a finished, factory look alongside the factory conduit already there.

The only thing left is to either textile tape the ends or use black tie wraps. If I find the conduit attachments I can affix it to the inner fender and really make it look like it was meant to be there. For now, much of this is a semi-finished draft of the final installation. My goal today is to get power to the radio and test. Weather permitting. Now on to the inside.
Getting the cable to the space under the seat could prove to be a challenge. I found a hole already punched from manufacturing and enlarged it to fit the conduit. I pushed the cables through and it looks like a finished wiring piece into the cavity under the rear seat. After looking at it later, it is a bit high and the carpet will not cover it. I may move it or make a relief cut in the carpet. It's not where anyone will step on it but will be visible if I don't move it.
 |
| Down from the firewall. |
 |
| and back into the cavity under the rear seat area. |

This is where the grooming of the power cabling ends. It ain't pretty but it works. Again, my goal is to get the radio operational.
I have been having trouble with placement of the distribution blocks I bought to handle the job. If I install them on the wheel well behind the interior panels, I am drilling right into the wheel space itself. I will have to seal it and that could mean no end of trouble or maintenance. So I am trying out the cavity under the rear seat where the jack is stored. The small bulkhead is stamped and doesn't lend itself for use as a good flat area to mount the blocks to. I might have to use some sheet metal as a mounting plate and use rivets to attach it to the bulkhead. It won't look half bad since it will be covered with carpet.


I connected the distribution blocks to the main cables. I connected the IC-7100 power cable to the blocks and put the clear cover back on to protect from short circuits.
I needed to finish making the feed line for the VHF/UHF dual band antenna and hurried to complete that. Installation went smoothly as did threading the coax cable through the frame and down in behind the radio.

After plugging in all the cables to the radio I was ready to apply power to the buss.

 |
| The camera suffered a color breakdown and produced this neat effect. I'm not sure how it happened but green is the positive line and is now connected. |
I started the engine and let it warm up so I could too after being out there for hours in forty-something weather. I wanted my feet to warm up first so as soon as the temp gauge tagged the 160 degree hash mark, I went full blast on the floor heat. Glad I replaced the heater core and the blower motor.
Now that I was warming up I called my best friend, N1XIO-Jerry. With his help I had the IC-7100 configured for the AH-4 tuner set up and ready to go. He suggested that I start the tuner testing at 80m and work my way up to 6m as he was curious if it would even do it with a 102in whip. We were both surprised that it displayed "TUNE" on the radio at 80m. All we expected to get was 40m and higher but the signals I was receiving sounded strong. I'm sure they were NVIS but it's nice to know this worked the first time.
After some playing around with it and checking out two of the local 2m repeaters, I was comfortable that all was working and the goal had been met. The final mounting of the power blocks has to be dealt with but I have a working system now and that feels really good.

The control head is not mounted there. It's just there for convenience during testing. For now, it will sit in the box to the right while driving until I mount it somewhere temporarily until the rust in the flooring has been taken care of. I did find more rust up under the seam sealant and will have to grind that off and see how bad it is. It's likely coming from water running down the firewall and into a seam somewhere on the engine side of the firewall. This will also have to be dealt with or the poor thing will fall apart. Unibodies aren't as robust a design as body on chassis. The Chassis Saver compound ideally works best at an ambient temperature of 70°F (21°C) but can work at lower temps. this will require longer drying times commensurate with humidity levels. Higher humidity allows for faster drying times. A body shop acquaintance recommended that nothing should be applied in temps lower than 58F (14.5C). So I'll have to wait for it to warm up to apply any. In the meantime, I can still grind and sand to prep for that day in paint. ;-)
That's it for now! This part of the project is mostly complete with some minor finish work left. As I have more radio material that applies to this project come up, I'll post it here. Until next time,
73!
Thanks for reading!
________________________
December 18, 2018
The GPS portion of the project is progressing well. I have built and tested a stand-alone system I can interface to the radio. So far the build and testing has been limited to connection to the PC here in the shack. I'm going to set up an old laptop for use as a software rig controller in the vehicle. A kind of carputer, if you will. I would like to eventually have a full blown carputer integrated as part of the vehicle's use. One day I might be able to read the ECM data in the OBD-I system like the OBD-II system can be. For now, I'm limited to knowing someone that still has Chrysler's DRB scanner.I first purchased this GPS module with the intention of utilizing the PPS (Pulse Per Second) feature to drive the Nixie Clock timing circuit. With it it wouldn't matter where it was located or on what type of power supply. If I were to run it on battery power, it would never keep time as the design is Line Sync. This means that it requires the timing of the North American power grid frequency to drive the clock. That's all well and good until some other power source is used that doesn't provide an accurate 60Hz cycle.
Well, since getting the Icom IC-7100, it uses NMEA sentences from the GNSS to interpret where it is in order to transmit its coordinates while using the Digital Voice mode in D-Star operation. I could simply leave it off and not worry about it. However, I would prefer it know where I was while in operation as a weather spotter or during emergencies requiring amateur radio services. Central Comms can easily determine my location without me trying to describe where I'm at if I'm in unfamiliar areas or cannot get to the next cross street/road sign.
 |
| Take an empty staple refill box, a car charger for USB and a GPS module to start with. |
 |
| After testing the charger's functions and power output, remove the staple label and make a rectangular hole for a Power Pole pair. |
 |
| Check the GPS module's function and make sure it gets a lock. Before putting a door hinge plate under the antenna to make a better ground plane, I wasn't able to get a lock. |
 |
| After the hinge plate? 20 seconds! I configured it to use a Warm Start after every restart either by power up or reset command. |
 |
| Now to install the parts into the box....and not short anything out! |
 |
| And close it up. The aluminum (Aluminium) foil acts as the improved ground plane for the antenna and works nicely. There is a clear plastic sheet separating the foil from the electronics and backed up against the bottom of the antenna. I'm able to get a lock within 2 minutes after being powered down for thirty minutes or more. The self-contained voltage meter shows me what's being supplied by the large AGM battery for the computer's UPS. This makes a good indicator for mobile applications to check out before connecting anything up. |
Tip: TXD
Ring: RXD
Barrel: Ground
On the radio end, swap the TXD and RXD as the labels are derived from that device, not the external piece. So the radio end of the cable should be...
Tip: RXD
Ring: TXD
Barrel: Ground
This is how I had to connect the PC via a USB to serial adapter breakout board. It also passed 5 volts DC to whatever device needs it. By itself the 12V car charger isn't needed but if there isn't a 5VDC source, I can use any 9-15VDC source with the car charger to power the GPS with.
I reused the extension cable and was able to get data to and from the module. Now all I need is a 2.5mm plug with cable or with 3.5mm jack. The radio uses a 2.5mm jack for the GPS feed.
I took my homebrew GPS box with me in the Jeep and a modified cigar lighter plug with a Power Pole end to plug into the box for power. I placed it on the dashboard and within 2 minutes I had a lock after being unplugged all night.
 |
| On the dash just after engine start. You can see the data cable jack here. |
So after all that work and worrying whether or not things will work. Just remember,

and enjoy your cup of joe.
73!
_____________________________December 22, 2018
It seems Friday sucked big time. First, I left my "...Jeep On" cup pictured above on the roof. It fell over and I heard it clatter down the roof and saw it hit the ground in the mirror. The cup's bottom plastic part broke off and the sip-lid was dented badly. But, it's a Jeep thing and it'll stay in use, just like a Jeep. A little body damage adds character. Just don't go overboard.Next, the gps module I put together isn't being read by the IC-7100. I though the signal level for the Icom rig was RS-232 TTL (5V). Either I'm missing something or the module is producing 3.3V signals. Getting discouraged on this part of the project. I'm reading that there have been others who have added some Garmin 18X LVC with success. Problem is I don't want to run a cable past a weather seal. I'd rather use a permanent mount antenna and drill a hole to make the piece look more like a factory installation. But if I can't get this module to talk to the Icom then I will have to find another solution.
That's it for the radio work. Until next year!
73!
Merry Christmas and a Happy New Year!
_________________________________
January 3, 2019
Happy New Year!
The holidays are over? Really? Darn. All I've seen in stores since a few days before Christmas are red heart-shaped things for Valentine's Day. What is this world coming too? Wait. Don't answer that.Hope everyone's Christmas and New Year's celebrations went well! I got a Makita angle grinder for Christmas with a knotted wire brush cup. It will help me strip paint and seam sealer from the floor pans of the Jeep to inspect, repair, and do preventative work to keep rust at bay.
I also got to work on the radio stuff too. After realizing the GPS isn't communicating with the radio, I decided to put aside a few bucks for a GPS that would. That's for later. Right now I needed to be able to hear what's coming out of the radio. Two reasons: 1) the speaker in the control head has a bit too much bass to it making the tone too low. Even with adjusting the bass and treble in the radio controls it just didn't help against the noise in the vehicle. A buddy of mine a while back sent me a Uniden external speaker he wasn't able to get working. I opened it up and found a broken wire and a fuse that was too short thus did not make contact for power. After the repair, it works good. It too is a little bass-y but not as bad.
2) the speaker in the control head fires out the back away from me. This is okay if it's at a table, home base or other quiet ambient location. Not good for some vehicles.
In an effort to stay compliant with ARES and RACES standards for power connections, the power cord was outfitted with a pair of power poles in true amateur radio fashion. All of my accessories and equipment use these. I do have adapter cables should I find myself without a power pole source of power though.

The length of the cord is too short but for proof-of-concept, it'll do. I spent a couple of lunch breaks figuring out where I would want it. My first thought was on the side of the lower center console and realized the cup holder would be located there. It wouldn't stick out to have a passenger's leg snap it loose but it would intrude into the foot well. Next was on top of the dash for giggles and yep, you guessed it, sits much too high over the horizon of the end of the hood. I then thought about attaching it to the back of my headrest and have it fire up but there's really nothing in the headrest to attach a bracket too.
I tried the underside position on the steering column. That interferes with my getting in and out of the Jeep. Next was where I plan to install the control head where the ashtray is located. It could work there but I'd have to find another location for the head. I thought about just connecting the radio to the stereo system. That could work but it would be better to be able to listen to some music while still able to monitor the radio. A mixer wouldn't necessarily fix that as this is an original AM/FM/Cassette deck. The cassette adapter would override the stereo broadcast radio. I wanted to keep the interior as factory as I can without resorting to too much technology and ruin the look of the Jeep design. No, I just couldn't change out the factory radio with a Pioneer. A Kenwood maybe but not a Pioneer. So I held the speaker up to the headliner and realized something. The mirror was too high and the speaker blocked about half of the view. Darn. That wasn't going to work even though that's where it should be. I planned to install an overhead auxiliary lamp there like most police cars have for the officers to do their paperwork at night. I was going to get one of those round incandescent fixtures you see in campers that are about 6 inches in diameter. With the advent of LED's so prevalent these days, it's hard to justify the high heat and current use those old fixtures had. I've not been terribly impressed with the LED replacement bulbs brightness-to-cost ratio so I still buy incandescent bulbs. I'm reconsidering the choice of overhead lamps that are smaller and might work better.
So when I adjusted my mirror to see how far down it had to go before the speaker disappeared from the mirror's view, the mirror came off in my hand. My first thought was, "Oh crap! Really?!!!" After the initial shock it occurred to me this was an opportunity. I adjusted the mirror arm to it's lowest position and held it to the windshield to see how far down it had to be attached. I got two inches and stopped there. It was just enough to clear the speaker and not look like it was in the middle of the window!
I went to a parts store nearby and got a mirror button installation kit and the put the button back on the window. After work, four hours later, I put the mirror back on the button and there it sits. I razor bladed the old adhesive off the glass and pulled out my drill and bits. It was time to drill more holes.
Since my Jeep doesn't have the factory overhead center console, I was able to place the speaker bracket centered between the visor clips, I pressed a bit through the hole of the bracket into the headliner three times. I did that for all three mounting holes so the headliner fabric wouldn't catch on the bit and tear off only to be wrapped around the bit. Next the holes were drilled carefully and with three trim screws, was attached. I had to be careful as I couldn't remember how far I could go before the screw contacted the exterior roof panel. The screws were a #8 x 3/4 inch with finishing washers. Looks pretty good. Unfortunately I forgot to take a photo of the bracket without the speaker.


It's the original headliner. The fabric probably is being held to the crumbling foam underneath by static electricity. The crumbling foam is held to the fiberglass headliner base by tenacity.
I hid the wires underneath the edge of the headliner and ran the down behind the passenger's side trim panel. The power cord is too short now but will be taken care of soon. The audio cable seems to be okay in length. I need to install the lower-front dashboard cover or "knee panel". The cables will be attached to the main core of the dash frame but hidden by the knee panel.
So far the speaker sounds pretty good. I turned the bass down all the way in the radio's settings and it's helped a bit. I can hear QSO's much better now. The speaker is facing mostly down now as having it fire straight back like that caused my right ear to begin aching. I'm used to headphones and hearing everything in both ears. This will take a bit of getting used to.
Operationally, the Icom IC-7100 is doing good. I've been able to hear stations from France and Italy on this 102 inch whip. The Icom AH-4 tuner is amazing. Though I would still like to know how much power actually hits the antenna.
Control-wise, I have a laptop configured with HRD 5 and it working pretty good. I've run DM780 to listen/decode some digital modes. RTTY is difficult still. When I can get a signal and the radio is decoding RTTY, the DM780 doesn't seem to do it as well. Might be an issue with the sound system in the laptop introducing artifacts. Other than that, I'm pretty happy with the results though.
My next step is to put together a Carputer to interface with the radio. I have the original Raspberry Pi B and haven't used it much beyond WSPR monitoring. I'm considering the DVMEGA single band radio hat for it and PiStar to drive it. I'll need a new phone that has USB On The Go (OTG) capability or one that will let me use the WiFi in it as a hotspot for the Pi. Either way, I still need hardware to make it work on D-Star. There's no D-Star here. Only DMR.
73!
_____________________________
JUNE 12, 2019
I had to remove the IC-7100 from the Jeep due to a problem with my Kenwood TS-450S/AT. It suddenly went deaf. I moved it to the To-Do shelf as I'm in the middle of restoring the Heathkit SB-301 right now. I need the IC-7100 in the shack anyway as I will be ordering an OpenSpot 2 from SharkRF in a couple of days. I enjoy the HF in the shack but it will be easier to get to know the OS2, it's programming and how it will work with the Icom when I get it back into the Jeep. Once the configuration is done with the laptop in the shack, it'll be much easier to make changes when needed. I will also be able to use my Yaesu FT-70D and with a profile change in the OS2, can get to the same X-Reflectors as the Icom can. Would be pretty cool to just carry the HT into the house and have it work to talk to my D-Star/DMR friends.73!
_____________________
June 22, 2019
The OpenSpot2 (OS2) from SharkRF is working well on the Yaesu FT-70DR. Next configuration will be for D-Star on the IC-7100 but as I've mentioned before, it is not in the Jeep right now. I will have a chance to configure the radio and OS2 while on the bench. I have a laptop set up in case I do need to work with either in the Jeep but for now, the PC bench is sufficient. Once I get a working HF base rig I'll put the 7100 back in the Jeep.__________________________
June 30, 2019
Good evening. Just a quick update tonight.
I ordered a Hustler C23 ball mount and ProComm JBC305SS heavy duty stainless steel spring for the this project. The new spring will replace the rusty one on in place now for the IC-7100 that will be reinstalled into the vehicle in the future. The rusty spring was made of standard spring steel with a poorly done chrome electroplating. It was one I had in a box for a looooooong time and looked okay before installing it. Now it will need some polishing with the Dremel in hopes of staving off more of the rust buildup for a little while as it sits on the other ball mount waiting for its replacement.
The new ball mount ordered is identical to the one installed on the passenger's side and will mount the 102 inch SS whip antenna on the driver's side. The Hustler and ProComm SS springs are made by the same company and both are roughly the same price. Hustler is found mostly in some better retailers while the ProComm brand is mostly found in truck stops for the same price.
So this next part isn't really part of the project but affects it in that I am unable to fully install the rig because of the following work that still needs to be done.
The floor and the water leak still need to be addressed fully but I've figured out where the water is coming from. It also does this on the driver's side but only when the Jeep is sitting at certain angles. Preventing it from taking the route it does to enter the vehicle is a whole other matter. In trying to follow the path, I cannot reach it from the outside even if I remove the fender. There's a kind of boxed section that extends out from the firewall below the blower motor for the HVAC system. If you recall, I drilled a pilot hole trying to find where that boxed in area was. Turned out I drilled into the boxed in area and inadvertently discovered water was getting inside that. Of course now it was able to run directly into the cabin and settle in the footwell. This led to tracing from there back outside and learning how the water was getting there. There is a seam, with a seam sealer in the pinch weld, that is probably where the leak is. The water follows some contours I can't see and finally to the seam.
So with this knowledge, I should still be able to wire-brush the floor with the grinder and be able to treat the floor with the Chassis Saver. I still need to get some Eastwood Internal Chassis spray frame coating. Check out this product here.
That's it for tonight.
73!
__________________________
August 5, 2019
A quick update. Over this last weekend I installed the 102 inch CB antenna for those times when CB is a group thing for close comms during an outing. Most Jeep owners out on a jamboree or trail outing aren't licensed amateur radio operators and CB is their 'open-source' radio of choice. Not that I need a CB but the XJ wouldn't be a complete mobile communications wagon without one.Here are a few pics of the result of the installation.


 |
| A bit hard to see but both whips are tied down to the front of the luggage rack rails. |
That's it for now. Next work will enlarge the hole for the ball mount's main stud and nut so it doesn't actually touch the body sheet metal.
73!
________________________
January 29, 2020
It's been a while since my last post. Haven't had much to do on the XJ until the other day. I found a '95 XJ with a hitch. My daughter came out with me and did much of the wrenching while I held it in place for her. After getting it home I rinsed it off and put it in the shed. This weekend we'll start cleaning it up and make it ready for paint with sanding, primer, and paint.
I just came from 4Wheel Parts to order a nut-strip kit for the hitch. The hardware on the '95 was rusty and the carriage bolts didn't engage the steel pieces very well so a nut-strip made sense.


February 1, 2020
Good evening all!
Labor Day is fast approaching and so is the Shelby Hamfest radio convention. A few things need to be ready before that event and two of the things that were needed were the hitch from last weekend's sojourn to the local Pick Your Part and the ability of this four-door to carry more than one. I'll be picking up some friends in the radio hobby from their trucks at a nearby truck stop. The hitch will be used as either a platform support to carry a wagon with large container on it to pull around the event or pull a small trailer to carry a wagon with a large container. Depends on how things work out by then.
This weekend's work session went slow as I had forgotten in which order the interior trim panels are supposed to be installed. I was installing them in reverse. After the third or fourth time I had to remove some trim I realized it was installed from the rear hatch and move forward. So far I am missing only four original trim screws.
Overall I reinstalled the upper and rear trim panels since I won't need to remove them to install the front carpet back in. The edges of the headliner are covered once again. The headliner project will have to be put off for now. It's mostly intact as the detachment of the fabric is primarily at the passenger's side edge. There is one small area at the driver's sun visor pivot that has come loose but shouldn't be a problem for now.
All of the reinstalled trim was sprayed with Super Clean, scrubbed with a brush and rinsed thoroughly. Even the tire support cleaned up really good too!
Sunday I am planning on taking the floor mats to the car wash and begin work on them. I'll do the front carpet at home since I have a wet/dry shop vac. It gets really heavy when it's full of water and will drape it over a couple of saw horses. Hopefully it won't rain for a few days so it will dry. While it's doing that I can finish covering the floor pan on the passenger's side with a rust converter and patch up a hole on the firewall.
Here are a few pics of the work so far.
 |
| The main unit of my IC-7100 has been in this position for quite some time. |
 |
| The driver's side rear panel joins the lonely passenger's side finally. |
 |
| Lunch break is over. Time to install the rear seat. |
 |
| Almost there! |

 |
| Done! I do wish I had cleaned the upholstery though. That will come later. |
 |
| A really bright LED work light really helps when it gets dark out. |
 |
| Finally looking like a daily driver! |
Going forward after treating the floor pan inside the Jeep I can spray Eastwood's Rust Converter inside the uni-body frame channel on the passenger's side. When that is done I can patch the hole started for this purpose and put the floor pad for the firewall back on. I don't know if I can do that without removing the HVAC box. I'm pretty sure I can but we'll see. The carpet will be back in place, hopefully much cleaner than it is now. The lower dash cover panel that houses the ashtray can be reinstalled and I can begin mounting the control head for the IC-7100 there. After that, the All-in-1 CB from Cobra and antenna feed line installed. And finally the center console can be returned to its rightful place.
Yes, I'll have to remove the driver's side trim again to install the antenna feed line but for now, my barn has less stuff in it and I can do some organizing without all the parts in the way. I'm hoping to build a workbench for the barn by the Summer.
That's it for this posting.
73
_____________________________
February 2, 2020
You know the old saying: "Best laid plans...?"
Yeah. Didn't happen. Had an odd spongy feeling in the brakes and she wasn't stopping as well as the day before. Come to find out some kind of sludge wound up in the master cylinder's rear brake reservoir (the smaller one) which required me to remove, disassemble, clean and inspect. I'll be getting a new MC in the very near future. I have tried to find a rebuild kit but it seems nobody uses them so none are made any longer. Honestly the new MC is so inexpensive that it seems there isn't a need to sell kits when they can be rebuilt by a commercial company.
I also discovered the vacuum brake booster is rusty. I descaled it as best as I could and shot it with some black paint I had laying about in the barn. But the booster should be replaced too. I might be looking to upgrade it with a larger unit from a ZJ or WJ. I don't want to breathe on it and lock up the wheels, no, no, no! I just want a little more confidence that I'm getting a bit of help in the braking process.
So what did I get done on the XJ-7100? Not much. The brakes and checked the torque on the front upper and lower control arm bolts. I decided not to take the front or rear carpet to the car wash. It would be too heavy with water to lift and honestly I'd spend a small fortune in car wash fees trying to get it clean. So I ordered a Karcher K1710 pressure washer to that with along with keeping the exterior of the house clean. And maybe a car wash or two. ;-)
The nut strips should be in tomorrow but need to finish cleaning up the hitch receiver and prep it for primer and paint. Today would have been a good day to do that except the wind just wouldn't calm down so I'll try again another time. My daughter and I cleaned it up to the point we found the rating sticker under some paint. U-Haul's hitches are made by Curt Industries but when this one was made, Draw-Tite was the preferred choice. Mine too and I'm happy I got lucky with this find.
I couldn't find my JB Weld and the hole I drilled to treat the inside of the uni-body frame channel there can be accessed through one of the floor drains. The plug was rusty and needs to be replaced so I still have a few parts to acquire before the floor prep can be done anyway.
That's it for today.
73
_____________________________
February 18, 2020
The hitch is installed and I'm closer to having a platform to carry a bin or wagon on a hitch receiver mounted shelf. All for the Shelby Hamfest during Labor Day Weekend-2020.


I got the trailer light converter wiring harness installed and tested out today. So far, all I need now is a ball mount with 1 inch hole, 2" ball with 1" diameter shank and I'm ready to tow too! I could, but likely won't, install a larger/longer HF antenna to a ball mount as many have done in the past. Due to the proximity to the ground, I lose a lot to capacitance. There are ways to combat this but are still a strong compromise. It also makes getting access to the cargo area more difficult with a lift hatch. I think my current configuration with the 102" side-mounted whip, HD spring and the Icom AH-4 end-fed tuner works well so the ball mounted HF would make an interesting and probably fun project to explore with.
Down under, I treated the inside of the uni-frame channels with Eastwood Rust Converter. A single can did both rails but I think I'll apply another treatment in the future. Right now the wife's car needs an engine. Like I said: "Best laid plans..."
So what's next in getting the XJ-7100 more complete? I ordered and received, from Team Cherokee, a set of body plugs for the floor. The XJ uses ten IIRC. I need to order the larger size too but they were out of stock so I'll search elsewhere. I like Team Cherokee as they buy up dealer stock that is discontinued and offer it up at reduced prices. My girl is getting on in years so New Old Stock parts are harder to find. More aftermarket parts are in her future.
So most of the interior is back in but what about the carpet. Well, it's nasty. Smells bad when it get wet or warm, and worse when it's wet AND warm. The front just looks awful. The rear stinks of dog. I have been watching video's on using a polymer coating instead of putting the carpet back in. However, that makes it more noisy and honestly, not as comfortable looking. This isn't a rock crawler nor is it a Mall Crawler, most of the time. I don't like Malls. It will go off road to the beach or a light trail up in them thar hills. If I were in Colorado, it'd be more like a rock crawler. But I'm not and so she won't be.
Floor prep is going okay. The hole in the rear corner passenger's side still needs to be addressed as does the power cables from the battery for the IC-7100 and other stuff that will be back there. Those tie-in blocks aren't fastened down so I'm afraid the cover will pop off the + block and short out. I took a look at where the blocks are and even with the factory bottle jack installed, there is room for these. Not the best place for them as they are low mounted. If I have to ford water, I'll either blow the fuse or enjoy a roaring fire while I wait for rescue. So deciding on where to mount them has been a challenge. Any mounting behind a panel requires screws to be removed to get the panel out of the way to get to the blocks so I'm still working on a better solution.
One idea is to mount a thin wood panel to the back of the passenger's side rear panel and screw the power blocks to the outside through the panel to the wood. Gives excellent access, offers above-water protection and is general out of the way of most items in the cargo area. I'm also looking into a shelf/cabinet combination to keep it accessible but hidden. This would raise the floor of the cargo area but offer a lot of hidden storage. Between Matt's Bleepin' Zombies Jeep of Bleepin' Jeep and many Overlander's rigs, I should find something that should suit my needs. I like how the Overlander community finds ways to put what they want/need in their XJ's. There are some really nice builds out there.
Here are the links to the cargo space build.
Part 1 - https://youtu.be/cV8sT_04AQ4
Part 2 - https://youtu.be/U1QKBZA-sUk
Final Walkaround - https://youtu.be/dP0B2phuEN0
Skip to 8:25 to get to the cargo build.
I guess that's it for this installment.
______________________________
February 22, 2020
Greetings! Been working on the Jeep XJ-7100 project lately so haven't been working on radios in the shack.
Just a quick update:
Signature Tracer Project with the Heathkit OL-1: Scope is working. Case cleaning remains for basic operations. The tracer portion (Mr. Carlson's Lab material on Patreon) has yet to have parts ordered and built.
IG-102 Signal Generator: Mine is sort of working. The other one is not working. I got up with K6WHP - William on the Heathkit group on Groups.io about a transistorized modded IG-102. There are three articles about the subject so I will modify my IG-102 to use FETs instead of tubes. My Dad's will be restored as designed in the future.
All the other projects I have waiting will be on hold for now. Just too much work and diverted funds for the Jeep right now. So far, the radio and AH-4 tuner are working very well. Just trying to get the sheet metal everywhere else taken care of before I put it all back in. All of the interior panels above the carpet are back in. The carpet seems to be a lost cause at the moment so I'm working on the rust issue.
To recap: My daughter and I pulled a hitch receiver from a salvage yard 1995 Jeep XJ, cleaned, stripped and painted it before installing on my XJ. I filled up with fuel the other morning and have smelled gasoline now and then when I go to the rear liftgate. Found it last night and it seems a portion of the tank's pinch seam has rusted through or split. It's making contact with the hitch's flange and I think the pinch seam is bent. If that's true then the tank is trashed. There's no fixing it now. Those pinch seams are a cheap way to attach sheet metal together and I'm not in the mood the "try something new". I need this taken care of ASAP. The leak is on the passenger's side by the exhaust pipe. So if I keep only half full it should be good until I get the new tank in and installed.
This isn't going to be a fun job as I won't be able to use any cutters making sparks due to the gas fumes present. Will probably use a fan to blow air to keep fumes from accumulating while I work with hand tools though. If those tank strap bolts are rusted bad they might twist off. That's okay since I have new parts coming but keep it soaked with some nut buster won't hurt. In fact I might need a nut cracker if they won't turn.
I will also have to uninstall the hitch I just installed last weekend. At least the fasteners are new and might give me an valid reason to make a heat shield. Some were and some weren't equipped with one. It appears mine wasn't.
Parts to be replaced will be the fuel tank, fuel pump kit, fuel filler and vent hoses. Those are coming from Amazon. The factory roll-over vents and tank straps with J bolts are on the way from teamcherokee.com. The fuel fuel filter and roll-over vent hoses are coming from Carquest/Advance Auto.
The tank from Dorman will come in painted in black but I'll spray a protective liner onto it for added protection anyway after I rough up the surface with sandpaper. Since the tank is out I can see the underside of the floor and do some quick work on it if needed. Time permitting I may also replace the tail pipe as it is rusted at the muffler and barely hanging on. I'll need an exhaust pipe expander to make the muffler's pipe round again I'm sure since it's clamped.
I found the two coax cables I was looking for to consider using for the CB that is yet to be installed. One is LMR 240 with a solid core for more permanent installations or the WireMan's loss cable with stranded core. Both have excellent shield coverage but the WireMan's cable is more flexible. I wouldn't worry about the center conductor breaking from vibration. With that in mind I routed the cable where I think I want it routed to get to the dashboard with some slack to go either to the left side or the right side. The CB is primarily for Jeep outings or when highway travel requires info regarding traffic slow downs. Weather and travel conditions would be via the South CARS (Southern Coastal Amateur Radio Service) or East CARS in my area.
I'm getting itchin' to install the control head of the IC-7100 in a more permanent fashion and might pull it out and start working on that portion while the knee panel with ash tray mount is out of the vehicle. Makes it a tad easier to work with at least.
That's it for now.
73
_______________________________
March 1, 2020
Today started out with enthusiasm and a sense of purpose and ended up with aggravation and the feeling of spinning wheels.
Wanted to install the CB I received from a bud up in Canada last year. Got out there with it and figured out where to put the all-in-one unit. Next was to lift the rear seat and see about the wiring for power and where the coax will come to.
After making several false starts I figured I'd work on the power blocks under the rear seat in the jack stowage area to get a change of pace and perspective. Realizing a couple of things about the planned install for the CB and the IC-7100 control head, I pulled the center console out of the barn to clean it up and begin the cable routing planning.
To make a long story short, I didn't get anything of note done. I don't remember ever spending so much time and effort as I have this weekend just to accomplish nothing. This is all thanks to Amazon. They shipped me a giant oil pan for a big rig's engine instead of a gas tank for my Jeep. Trying to work on other stuff while the mind is constantly occupied with the frustration of not getting work done that is needed badly and can't get it until the week after only to have to wait another week for a two-day weekend to do the work. I would have accomplished more if I'd just locked myself in my ham shack and just watched YouTube videos of other people getting stuff done on their Jeeps. Better yet, I'll watch Justin King's off-road recovery
Better luck next time.
____________________________
March 5, 2020
Well, I got something done today. Actually it was spread over Monday and Wednesday's lunch hours plus today's final work. The power blocks are in and the radios have their permanent power now! Yay!
 |
| Space-Saver CB. Putting the majority of the circuit in the hand-held portion and the interfacing in this box. The coil of coaxial cable was simply convenient to roll up here since I decided not to install the box under the dashboard. There might a little "choke" action but probably not much. It's LMR240 cable so the center conductor is solid, not stranded. Solid core cable doesn't make bends very well and core-shift is a problem. |
 |
| I use rivets too. I had to use a 3/16ths washer to grab the tab. |

 |
| Routing the main power supply cables from the battery terminals directly to here. Positive block is higher up on the driveshaft tunnel in case I ford water that winds up inside. The ground block is to the left. |
 |
| Kind of a neat package under the rear seat. |
73
_____________________________
March 13, 2020
This week I installed the control head for the IC-7100. I will probably use another mounting solution but for now this will work. Just need to be able to listen to SW radio or the ham bands. I'm an Extra class operator after all.
 |
| Four stainless steel sheet metal screws for the base. |
 |
| Head mounted and cables attached. Used rubber insulated cable clamps to help stabilize the rod. |
 |
| How it looks from above the driver's position. |
 |
| View as the driver. |
73!
____________________________
May 22, 2020
For the most part this project is done with a few caveats but all of my focus is currently being put onto the Jeep's upgrades such as a lift kit, bumpers, winch, wheels, etc. Join my posts at
https://jeepinterests.blogspot.com/2018/08/jeeps-are-4x4ever.html for updates until I get things done to return to the workbench.
______________________________
August 25, 2020
It has been quite some time since I've updated this part of my Jeep build. Nothing much has changed except that I now have a netbook given to me by a fellow ham radio operator. It was just laying around collecting dust and when the subject of carputers came up and what I wanted to do with mine, he remembered he had this and offered to me as a possible solution.
The netbook is a Dell Inspirion 10 mini and originally came with Windows XP. I have some radio software that won't run on it so I figured out it could handle a 2GB SODIMM memory module. I blew the system away and installed Windows 7. After a couple of days getting all the updates installed I loaded up Opera browser, AVG anti-virus, MultiPSK, and WSJT-X. It sat for a while until I wasn't working much with the Jeep suspension, tires, steering, etc to have time to get some radio work done. Low and behold the system was soooooo sloooooow that it was really unusable. I had to find another way.
I had a Kinston 110GB SSD installed in my home system as a page file drive and had some miscellaneous radio software on it. Deciding to move those to another drive I formatted this SSD and brought the hard drive from the netbook over and cloned it. The netbook now takes about 30 seconds from power ON to logon prompt rather than the usual three minutes. This is by far the second best example of how fast an SSD will improve a system. The first was when I cloned my old 1TB hard drive to a 500GB SSD, also from Kinston, and experienced similar improvements. I now can log on in 40 seconds versus nearly 2.5 minutes. The page file still resides off-drive so the SSD cells don't get overused.
So my next issue to resolve is the power for the netbook. I am looking at DC power bricks for it to avoid the harsh buzz from the 150 watt modified sine wave inverter plugged into the cigar lighter. I used a battery clamp adapter for this and got the same results telling me the inverter is the source of the noise.
Another issue I'm having is the driver set for the IC-7100. They aren't loading and I'm not sure why. Actually a couple are loading but 2/3rds aren't and fail the install. I downloaded the Icom driver package and will tray again later.
The goal of my Jeep build is threefold. For the Jeep itself I want it to be a mobile communications platform, emergency service support vehicle, and an Overland capable rig. For the netbook I want digital mode capability coupled with weather maps, and internet available content when needed via my mobile hotspot. If the internet fails then the netbook with radio communications take center stage with digital mode communications. What I don't have is a Pactor capable TNC. I think Pactor I was structured to be encoded and decoded with typical audio cards but Pactor II and III won't. I need to get more information regarding those protocols. For now, SSTV, DRM, PSK31, APRS, JT65, and FT8 should keep me quite occupied on the air waves.
Mounting the netbook is a challenge as I'm not sure how I want to operate. Stationary is easy.

Steering wheel desk like the one I used when I drove OTR. This is fine for stationary work. But there may be times I need to be moving and able to see weather radar. A more solid mount like those in police and emergency vehicles would be a better solution for that mode of operation and one I'm not going to exclude. A tablet is probably a better idea as I can get tablet holders for my Kindle to mount easier than the netbook mount. We'll have to see.
That's it for now!
______________________
That's it for now!
______________________
Comments
Post a Comment