This was my Dad's. I remember this and the SB-303 solid state receiver he had set up when I was about four I think. I loved the noises it made as he rotated the dial to find active amateur radio stations. He showed me how to do it and there were times when he wasn't around I would turn on the receiver to listen to amateur radio operators talking or listen to short wave stations within the receiver's coverage. The transmitter however, was a different matter. I was told never to press the red button on the microphone when the pair was turned on! Ever! So I didn't. Well, I now have this transmitter and it needs to be repaired to operation so I can finally press that red button! :-D
Begin Date: October 10, 2021
Update: 11-07-2021 Mixer/Bandpass board reworked. Next up, Carrier Generator board.
Purchased from ebay, this unit was turned on and the display worked. No other testing was done. The IM-4120 will be used to align IF stages and final driver circuit in RF work with attenuation.
Begin Date: January 7, 2021
Update: Electrolytic capacitors replaced, unit works!
Status: Completed
OL-1 Oscilloscope Received two of these 2017 from one owner wanting to downsize. Packed really well, they came in ready to be evaluated. One gets the nod while the other becomes the donor, if the need arises.
IT-28 Capacitor Checker Obtained this capacitor checker from ebay a little over a year ago. Disassembled it completely and rebuilt it from its kit form. The original harness was replaced with modern 18AWG 600V wire making it quite a challenge to make it form and fit like the original 22AWG wire. I had some voltage issues I wasn't able to find right away so was shelved for a while. Brought it back out and found the problem, fixed it and now it works. Update: Completed - October 2019
SB-301 Amateur Receiver Tube Type I bought this vacuum tube type receiver with an SB-401 about twenty two years ago. I loved the SB-303 solid state version and SB-401 transmitter my Dad had, so I got my own all-tube set. Little did I realize I wouldn't be able to work on it for two decades only to find that I was given my Dad's set within that time. So now I am restoring/resurrecting mine to make mistakes on first.
Update: Mostly Complete. Receiver works. Chassis cover work is left. October 12, 2019
Status: No progress as yet. Case work still pending. - 01-07-2021
IG-102 Signal Generator Acquired this piece from the RARSfest in 2017. Though it was my Dad's but later discovered his in the shed in a tote I did not remember getting. So I have two. This one was resurrected back to operation, however it is not as stable as it should be. Will have to compare to Dad's unit later. Update: Completed - April 2019
Status: No longer stable at 10 MHz. Assume failed component. - 01-07-2021
Not having a known RF signal generator frequency, it's hard to know what you're calibrating your receiver to. So I made one with a 9 digit VFD frequency counter. I've used it, open chassis, to test my transmitter's output and it seems to be spot on. So I put in in an enclosure to use as a cheap desktop counter. I had bought a Heathkit IM-4120 but it didn't work. It only powered up so another project for another time. This one was a fun little project that can sit virtually anywhere with it's own power source. Updated: Completed - April 2019
IM-13 VTVM Got one of these as I had not discovered at the time, I had my Dad's Paco VTVM in a tote in storage. Resurrected this piece of Heathkit History back to operation. It was in pretty clean shape and was well-assembled but most of the resistors had gone way out of spec. Fortunately the precision resistors were still on the mark. Shows as accurately as my DMM does. Update: Compete - August 28, 2019
Nixie Tube Clock Purchased the circuit boards and a component package from the designer. Bought the IN12 Nixie tubes from a seller in the Ukraine made in Russia. Nixie tubes made in the USA carry an unfair premium due to greed more than availability IMHO. Anyway, Russia manufactured them long after the US stopped so I believe these are as good as the older USA types. It's a Line Sync clock that uses the 60Hz frequency of the North American power grid as the timebase for the clock. Works great is really accurate, when the power stays on. Based on vintage technology design, this clock does not use an internal clock with battery to update the display. This is a digital clock using Line Sync just like the Heathkit SB-630 did with a drum type clock did using an induction motor to drive the clock mechanism.
Update: Completed May 15, 2019
SB-630 Station Console This was part of my Dad's set. The timer would run one time but never reset. The electrolytic capacitors had basically become resistors and needed replacing. I went through the whole thing and replaced all the resistors and e-caps. Checked out the tubes in the rebuilt TC-2 emission type tube checker and they came out good by those standards. The clock runs and keeps good time, sans power outages, and the time works very well now. Update: Completed July - 2017
TC-2 Tube Checker
This was my Dad's first or second Heathkit built when he was in high school. The wiring insulation was cracking and the one capacitor to protect the meter was bad. So I decided to disassemble it completely down to its original kit components, wash the faceplate, clean the sockets, switches, switch hats, and knobs. I call it a Re-kit and I would find use for this kind of restoration useful and educational in how the product goes together.
Update: Completed November - 2017
Started: September - 2017
November 8, 2019
From the Ashes
There is no recovery of the original page content so I'm rebuilding it as I can. However, I saved all the other posts and they are on my local machine in two places for safe keeping. Also, all posts will be in chronological ascending order putting the newest post at the end of the page instead of the beginning as before. All of my project pages are done this way and I had this reversed for Phase I of the Shack Happenings posts thinking it would be easier to find the newest update. Nope. Since doing it the same way as each project post, this will mean more consistency in the formatting. Will I find another blogging site? I'm currently looking into my options. Now for some good news!
Update Summary to all projects follows:
OL-1 - In Progress. I've made up the BOM's and saved them. All electrolytic and tubular capacitors have been replaced except the two .1uF 1200VDC capacitors for the CRT. Those have yet to be acquired. Paul Carlson of Mr. Carlson's Lab suggested the Power Film type Polyethylene capacitors as replacements. I'll purchase those with the resistors since all but the 2.2 megohm resistors exceed tolerances. All original half-watt resistors will now be 1 watt. The 2 watt resistors will be 3 watts rated. The multi-section capacitor will be restuffed with modern parts to keep the look and improve the function. SB-301 - Operational. Stripping the old, flaky paint is in progress. I haven't chosen a final color yet so stay tuned. IT-28 - Operational. After some curious digging about the guts of the machine, I found the problem! TC-2 still operational. IM-13 still operational. IG-102 still operational but not as stable as I'd like. Will look into improving this if possible.
Project XJ-7100 - Ongoing. Curently I have installed a dashcam with rear facing camera. The Icom IX-7100 is working well.
Eventually I will put up the list of project at the top with update dates and such like before. Mistakes were made. Lessons were learned. It's not a matter that the company is too big to fail. It's a matter of it being too big to succeed. Just like AT&T. 73! _________________________
>
November 14, 2019
I have been studying for my Extra Class amateur radio license upgrade from
General.The test is Sunday the 17th
at 9:30am at the JARSfest. No progress on the OL-1 project due to the study time needed.I hope to get back to work on it in a couple
of weeks.I’m usually tied up with the
stress of the holidays and don’t like working on anything.I will post, just not right away. 73 _____________________
November 17, 2019
Today, I became an Extra!
Now I know there would be those who scorn me and those like me who didn’t have to pass the 20wpm code test like others did. Honestly, I sympathize with them. My Dad passed his 13wpm for his Advanced Class license while I go get my Extra without code seems a bit lackluster. But what I’ve found out over the years since no-code licensing began is an increase in those using CW and I think I know why. It seems that when a person is required the take the code test, they shy away thinking they can’t do it. Now they have a license and have found it more comfortable to pursue it now that they’ve had some time to gain experience and get a much better idea of what they want out of it. So after six weeks of reading, listening to the CD’s and studying the extra class material, I was still hesitant to take the exam because with all of the material available, there was no experience using the material. I never built my own radio beyond a small crystal set from an experimenter kit. Without having been exposed to those things, I felt I was studying for an exam based on no experience or working knowledge. Even after arriving at the JARSfest in Benson, I just wasn’t confident I would pass. I know my memory isn’t great. Walking through the flea market I decided to try anyway. I’d only lose $14 for the exam if I didn’t pass it and still had at least three more shots to take it at future hamfests next year before this one rolled around again. While waiting for the exam session start to arrive I spent the time wandering around the indoor flea market and noted most of the used equipment was in good shape and most of it worked! Unlike other hamfests I’ve been to I’d guess the number or working used radios, accessories, and test gear being offered for sale was a high ratio indeed. I bought a couple of oscilloscope probes, a 1x and a switchable 1x-10x for my oscilloscopes. Now it was time to take the exam. I went in, filled out the forms, received my exam, and borrowed one of the calculators they offered since I’d forgotten my TI-30. No amount of anguish will change the future for no amount of regret can change the past. Press on. Forty minutes later and much disappointment in myself, I took my completed paperwork to have it graded. The first VE graded and gave it to the second one, and he graded it. The third one was checking it when I saw the number of wrong answers was marked as 7. I figured I had botched it and began to run through my head when the Winston-Salem Hamfest was. The last VE handed me my folder and congratulated me. I took it to another VE for processing and filling out the certificate that showed I passed. It felt weird. I am not used to success and this one just felt like a dream. Only when I was handed the certificate and thanked them for providing the exam services did it start to sink in. I took it back to my seat and got my things together and went back out to the indoor flea market, in a little bit of a daze. Things seem a bit brighter to me now. What’s next for me? More learning and hands-on experience in the Extra related stuff for sure. Maybe GROL+RADAR perhaps? Even stuff I hadn’t really been interested in as a General I think I could look into a little deeper. I think a door has opened. I’m pretty sure I heard the squeak of a hinge down that hallway of life.
73! ___________________________
November 28, 2019
Happy Thanksgiving America!
My Velleman VSS5 soldering iron went up in smoke. Literally. I'm getting this as my Birthmas Day present to myself this year. https://www.amazon.com/Aoyue-Function-Solderi…/…/ref=sr_1_5… A soldering/desoldering station. It's supposed to be in the day after my birthday on Tuesday. I have a few more things forthcoming that are also slated to be in on Tuesday. To combat the Porch Pirate problem, I send everything to my workplace. I'll post updates and photos when I get them.
73!
_____________________
December 03, 2019
Good Evening! Had a fun birthday yesterday. Got some great gifts and some awesome Carrot Cake too! The new soldering rework station works very well. So far it has performed as advertised and made my job of removing the old resistors on the OL-1 that much easier. The only complaint I have on this piece is the fact I have to switch between the desoldering gun and the soldering iron to suck up the solder or smoke. I will put a valve on it so I don't have to keep working the hoses back and forth between them. Other stuff I got was a backlit keyboard and a UPS (on the way). My daughter gave me Halo: Master Chief Collection through Steam. So awesome! It loaded tonight but had an error so I will have to try again or get in touch with Steam Support. I also got some light Merino wool socks, Echo Dot and a calendar from Mr. Carlson's Lab.
With the new station I will continue work on the OL-1, albeit a bit faster and learn to use the Echo Dot. I've already changed the "wake word" to Computer. Star Trek lives!
That's it for tonight! Until next time.
73!
____________________________
February 22, 2020
Greetings! Been working on the Jeep XJ-7100 project lately so haven't been working on radios in the shack.
Just a quick update:
Signature Tracer Project with the Heathkit OL-1: Scope is working. Case cleaning remains for basic operations. The tracer portion (Mr. Carlson's Lab material on Patreon) has yet to have parts ordered and built.
IG-102 Signal Generator: Mine is sort of working. The other one is not working. I got up with K6WHP - William on the Heathkit group on Groups.io about a transistorized modded IG-102. There are three articles about the subject so I will modify my IG-102 to use FETs instead of tubes. My Dad's will be restored as designed in the future.
All the other projects I have waiting will be on hold for now. Just too much work and diverted funds for the Jeep right now. So far, the radio and AH-4 tuner are working very well. Just trying to get the sheet metal everywhere else taken care of before I put it all back in. All of the interior panels above the carpet are back in. The carpet seems to be a lost cause at the moment so I'm working on the rust issue.
My daughter and I pulled a hitch receiver from a salvage yard 1995 Jeep XJ, cleaned, stripped and painted it before installing on my XJ. I filled up with fuel the other morning and have smelled gasoline now and then when I go to the rear lift hatch. Found it last night and it seems a portion of the tank's pinch seam has rusted through or split. The leak is on the passenger's side by the exhaust pipe. So if I keep only half full it should be good until I get the new tank in and installed.
This isn't going to be a fun job as I won't be able to use any cutters due to the sparks and gas fumes. Will probably use a fan to blow air to keep fumes from accumulating while I work.
To be replaced will be the fuel tank, fuel pump kit, and fuel filler and vent hoses are from Amazon. The roll-over vents and tank straps are from teamcherokee.com. The fuel fuel filter and roll-over vent hoses are from Carquest/Advance Auto.
The tank is painted but I'll spray a protective liner onto it for added protection anyway. Since the tank is out I can see the underside of the floor and do some quick work on it if needed.
I found the two coax cables I was looking for to consider using for the CB that is yet to be installed. One is LMR 240 with a solid core for more permanent installation or the WireMan cable with stranded core. Both have excellent shield coverage but the WireMan's cable is more flexible. I wouldn't worry about the center conductor breaking from vibration. With that in mind I routed the cable where I think I want it routed to get to the dashboard with some slack to go either to the left side or the right side. The CB is primarily for Jeep outings or when highway travel requires info regarding traffic slow downs. Weather and travel conditions would be via the South CARS (Southern Coastal Amateur Radio Service) or East CARS in my area.
I'm getting itchin' to install the control head of the IC-7100 in a more permanent fashion and might pull it out and start working on that portion while the knee panel with ash tray mount is out of the vehicle. Makes it a tad easier to work with at least.
That's it for now.
73
_______________________________
April 16, 2020
I've been busy with work, surprisingly enough. I haven't gotten to any radio or test equipment projects for a while. Most of my attention has been toward my dear Jeep Cherokee. She's been needing a lot of attention, as most of my Jeep's have. I seem to have gotten caught up on the issues she's had as well as finishing my wife's car repairs. That Camry is done! So join me on my Jeep Interests page as I'm posting info about the work being done, including an upcoming long arm lift kit I purchased.
Once I get these done and it gets too hot to be outside for me, I'll return to clean the workbench and get started on repairing my IM-13 VTVM I blew up. Well, it made a loud POP! Might as well have blowed up. ;-)
By for now!
______________________________
May 22, 2020
All of my focus is being put on the Jeep's lift kit, bumpers, winch, wheels, etc. Join my posts at https://jeepinterests.blogspot.com/2018/08/jeeps-are-4x4ever.html for updates on that until I get things done to return to the workbench.
______________________________
September 24, 2020
Come on in! We don't stand on ceremony. Glad you stopped in. Got a lot going on IN the shack now so pour yourself some tea or soda and have a seat whilst I tell the story.
What a ride this year has been! I don't want a recount, redo, redux, reset, retry, or do-over. I want a complete and total refund. It's not likely we'll see a second stimulus check but I'm moving forward with my Autumn/Winter plans anyway now that the weather has finally turned cooler.
To start with, I achieved my main goal for my Jeep XJ-7100 project. She runs good, performed offroad better than expected, and has the radios I need installed. Further mods will be for Overlanding with equipment for recovery/rescue purposes. All in all I'm building my dream Jeep and making progress. The season's change and so does the focus. Which brings me to the next goal inside my shack. Here's a layout for what I want my shack to look like when I'm done. Don't forget you can click on the image to enlarge it.
Before I get into it I want to say I live in a 14x80 manufactured home. The room I use has a closet I want to remove. Without the closet the room is a 9ft by 9ft (2.74m) square. The closet is in the way and I want to remove it or most of it depending on the wiring that needs to be moved or modified. The short wall by the door jutting into the room is that wall with a light switch. There is another wall with the doorway to the closet that has an outlet near the switch. This part isn't represented in the drawing above. Only the light switch wall portion. Eliminating the light switch wall would be nice as it would give me the whole room to work with for entry, storage, work surfaces and such without anything encroaching into the space except the entry door. The only thing I would change is the window. It's below the standard desk height so I will either have to frame up the opening to accept a standard window or leave a little more room behind the desk extension to get to the latches at the bottom to raise the inner window up and then the outer window. The window is represented by two small hash marks near the center of the opposite wall of the entry door.
The first item of business is what kind of workspace do I want? My easy answer is to build a electronics workbench to work on my projects and a separate desk for the computer. The above plan is the result of coming to a decision based on some discussion with a friend of mine that is also building a room for his ham shack and computer stuff. Since he's retiring in a couple of years and I'm not, I decided to be the test subject with the ideas we came up with for the space. A few personal modifications on specific shelving and storage solutions hasn't been finalized yet. That will come later. Right now getting the main work spaces built and in place are the cornerstones of the project.
Below is a basic elevation drawing of the electronics workbench before I flipped it to the corner with the closet. It spans the entire 9 foot wall with one corner section as indicated by the stool in the first drawing. The computer desk is in the opposite diagonal corner to increase the space to move the chair around without having to keep moving the workbench stool. The window will remain to let natural light through but not purposed as a primary source of light for any work surface. It just happened to be helpful lighting on the desk extension.
The shelves diagrammed to the right are profiles of the workbench and shelving along the wall. Between the middle shelf and workbench surface is planned to be 24 inches (60.9cm). From the top shelf to the middle shelf is planned to be 12 inches (30.8cm).
Small parts storage drawer cabinets for the resistors, capacitors and other electronic components would be stacked two-deep on the 30 inch (76.2cm) deep workbench. Three if I require more cabinets for parts. Cubbies may be constructed as needed for plastic bins. The top shelf can house anything less used or for small knickknacks to display.
The four oscilloscopes I own are the largest of the test equipment I possess and will be likely in the corner space. Capacitor checker, VTVM, small test meters and such will occupy spaces near the 'scopes. I'm trying to have all the testing equipment in a more localized location so the soldering station wouldn't be hampered by all the gear.
The main workspace is a virtual cube of 24 inches (60.9cm). I need to take this into account for any shelves I install. A Lazy Susan would be available to turn large items around like the Hammarlund HQ-150.
Since most of the planning is done and the workbench design has been decided on I went ahead to scope out flooring options. Carpet was ruled out. It may bring some insulation and sound deadening factors to the table, er, the floor, but I need to be able to roll around easily in the chair(s). The flat carpet was considered but getting it in a light color and still be able to maintain it would have it looking quite dull and dirty in no time. The lighter colors would allow me to see small parts that fall off the workbench or out of devices for easier retrieval. Audible feedback that something fell became important when I dropped a pencil and didn't hear it hit the carpet so I decided a harder floor surface would be better. The two choices came down to cost and function. Hardwood flooring would have been nice but incongruous to the theme of the home. Bamboo was preferred and would be a really nice touch but expensive. Linoleum was definitely on the list but getting it without any details of any kind was expensive. This left me with two choices in material left. Drop down a Formica panel on top of the sub-flooring. Very doable. Or go with a Vinyl floor tile. Also very doable. After careful consideration I chose a commercial grade of VCT or vinyl Composite Tile from Armstrong which arrived today.
I know the color palette of monitors differ so don't take the coloring too literally. The color of the tiles did happen to be correct on my monitor/graphics card combination compared to the actual tile color. You can imagine my relief that I got what I thought I was getting.
Here's a dry-fit look at what I chose. This view is toward the corner with the computer desk. The right half of the window is above the outlet in the photo.
The color is similar to what I've seen in labs during my past career in IT support. It's light enough to see a small black screw on it and dark enough to see a chrome or dulled finish screw. It's light weight, durable, and is touted as being easy to install with the right adhesive. I've never laid tile of any kind so this will be a learning experience. YT is my friend now more than ever.
For this to happen, the room needs to be cleared out and the closet removed. I still need my computer so removal of all other items has been the choke point. Even I'm surprised at how much stuff I actually have in here. Took most of five hours to clear the old workbench and get it packed up and into the shed out back. Took another four to work my way around the window wall to the desk and clear it off of extras. I still have to finish this part before I can move the desk over to the opposite wall where it will be placed after the floor goes down. For now, it's temporary.
The SB-61/620/630 station accessories will be next on the packing list. The Kenwood TS-450S/AT and the Astron R-20S will remain in the room. Gotta have my radio time. After the printer stand and stuff on it are removed I can excavate the closet. There are several totes and boxes so that will go pretty quick. It's the smaller stuff that has to be gone through that will take the most time. Once these are out I can remove the shelf and begin demolition of the closet wall.
The aforementioned lamp switch and outlet wires direction in the walls isn't known currently. If the outlet goes down through the floor like I suspect, the power for the light should also come from that outlet box, then up to the switch and finally into the ceiling and over to the overhead fixture. I don't plan on changing anything in the ceiling but moving the switch to the main wall shared with the hallway might prove difficult since the wiring will be too short to reach. This is the dilemma I'm facing now. I can't just wire-nut an extension without a junction box. Depending on how the wire reaches the fixture I may delete it if I can't run new wire to the box without removing drywall on the ceiling.
But that's only half the wiring issue I'm facing. The other half is the outlet next to the closet door. It's possible to install a floor outlet box and hope it won't be in the way but there's a wiring challenge here relating to the home in general. 2/3rds of the home outlets and lights are on a single 15 amp circuit breaker. The living room, minus one outlet and overhead, my room, and my daughter's room share that one breaker. Can't run the vacuum on the circuit with three computers running and a couple of lights with the 12 amp motor in the vacuum cleaner. So we run a shop cord from the kitchen into the living room and from daughter's bathroom (on its own circuit) to vacuum her room and mine plus the hallway. When I fire up the soldering iron, nobody is allowed to turn on the laser printer. It's a pretty messed up design but that was allowed back in 1999 when this was built.
So there's the crux of the issue. Too much demand for the circuit and when I want to fire up the vacuum tube equipment, nobody should be on anything. The outlet next to the closet door needs only to be moved or terminated and a new line run from the breaker box. Underneath the home is a steel chassis. On top of that is wood framing to support the entire home. Between the floor joists is insulation, plumbing, and wiring. Holding all of the insulation up is a polyethylene sheet barrier. I am hoping I don't have any critters living up in the insulation. The home has been here for 20 years. Anything is possible at this age I guess.
Removing the barrier and insulation isn't so much an issue in itself. It's putting it all back up and taping it back together is the real challenge. Again, I've not done anything like this before so YT and talking with manufactured home repair people is helping a lot. I want two 15 amp circuit in my room. One for the workbench and one for the computer desk. Daughter can use the main wiring she's sharing now. I can isolate my room and the living room with new breakers if getting the wiring to it isn't that hard. We'll have to see. I don't relish the thought of losing my workspace for months during Winter and still keeping the critters out while working underneath with the electrician.
That's it for getting you up to speed on the Shack Happenings. Thanks for stopping by!
73
___________________________
September 27, 2020
Some more progress has been made on the remodel. There's so much stuff I was overwhelmed and went into "I don't care. Just dump it in a box and get it out of here. I'll sort it out later." mode. After the old workbench was taken out I kept finding little things here and there. Just boggles my mind. It seems I truly cannot manage my organization of stuff. This weekend was more of the same. Just throw it in a box and pack it. I really have no idea where anything is at this point and this is my failure in the project. There is no silver lining since I'll have to deal with it later. So far I do have more carpet taken out and the closet is empty save for the standard shelf and hangar assembly. It's actually a wire shelf.
In the corner is stuff I can put in a box and store. I'll have to get the cardboard in the living room over to recycle to make room in there for the last of the stuff. Some other stuff can be put in the Barn like the small antennae and the printer stand. I thought about breaking that down but figured I'd lose the screws somewhere.
So the desk is left and the Heathkit station accessories need to be boxed and put away in the master bedroom closet. I won't subject them to the outdoor climate like I did with my Dad's SB rigs as well as my own. The paint on all of it is flaking off.
Hopefully I should have everything but the desk out of the room and all of the carpet pulled by the next weekend.
___________________________
October 1, 2020
Today was a day off from the regular job as I work on Saturday this week. Taking the evening before to get the rest of the carpet out I felt slightly ahead of the game. I had borrowed my brother's corded orbital sander as I couldn't find the charger to my Porter Cable. Anyway, I got the edges of all the floor panels sanded with smooth transitions then went around all the sub-floor to knock down any excess glue or mud from the manufacture process they didn't completely clean up. It wasn't bad at all. Some spots where the joints in the sheetrock had a bunch of mud and the glue chipped off just as easily. A little sanding and all is flat in the world.
Now at this point I have the option to lay 1/4 inch (6.4mm) Birch down. It offers quite a flat and even surface and screwing it down every four inches (101.5mm) to hold down the edges is one of the best ways to maintain a flat surface for the tiles to lay on the adhesive with. I've never done this type of floor before I'm a bit hesitant to spend more money. One sheet of the stuff at HD here will cost 26.92+tax(US) per 4x8 (1.22m x 2.44m) sheet. I'll need two full and one partial to fill the 9ft x 9ft (2.74m) room.
Some construction worker had a little fun on the job during assembly.
This was the end result of today's work. My saws-all blade was too dull to cut through the nails to cut the top center section out so this part will have to wait. The section tied to the common wall on the right with the living room is screwed in. I hope it's only screwed in from this side.
With the sheetrock pulled I have a large enough piece to fill the gap left by the common wall stud for the closet. It's been a long time since I've taped and mudded a wall joint. I just might have to take a refresher course on YT to make sure I have all the required materials.
Don't mind the trash bag. It was getting underfoot and had to put it in its place. X-D
This corner wall is the problem. An outlet on the facing side and a switch on the side. This is where "going below" means something. Before I do that I will remove the sheetrock on the inside of the closte to see where the wiring goes. If it goes up, not much I can do about it. Unless it's easy to run a new feed to the ceiling fixture to add a fan, I'm stuck with that singular lamp above. If the wire runs below, I have a much better shot at moving it to the wall shared with the hallway. Just don't know if the switch wiring will be long enough. I suspect it isn't but the electrician will have the solution. I can't stand creepy-crawlies and I need to wait until the days are colder before going under there myself. Also need to be prepared for disturbing any of the wildlife that might have made the insulation home. Before I do that I need to purchase some of the underbelly wrap and repair tape so I can put it back together. This looks like a job for some floor jacks supporting wood panels to hold the insulation up there while I tape it shut again. So I need to get a few estimates for getting new service to this room as well as daughter's room.
That's it for tonight's update. Night all!
_______________________________
October 4, 2020
Got a little bit done by taking out the studs and framing above the door. Pulled some more sheet rock out of the inside of the closet and discovered the wiring for the light switch and associated outlet comes from the ceiling channel. There is a conduit for the run but I'm not sure if there's a junction box hidden in the ceiling somewhere of if it runs straight to the breaker box. Fishing a tape through it might be fruitful and might not. Since some of the wiring runs down through the bottom of the breaker box it's optimistic to hope that outlets without an associated light switch would run under the floor and come up through it where the outlet box is. If that's the case then it's still possible I can have the room put on its own circuit. I'll need to study the wiring more closely when I remap the home's electrical wiring.
Nothing more the add. Working on workbench design and if the light switch wall needs to remain. If it does the outlet can be moved to the workbench side of the wall and new sheetrock is installed. I am hoping I can take it out and move it to the common wall with the hallway but that may require more carpenter skills than I possess.
___________________________
October 10, 2020
The closet has left the building!
But wait there's more!
Mmmmm. Yeah. Gotta figure out what to do with this. The cable on the left goes to the overhead light fixture. The one on the right comes from a junction box somewhere. From there the living room and daughter's room are connected. The source to all this is from a single 15 amp breaker in the breaker box but I have no idea where the junction box is. By law it's not to be concealed or inaccessible so, by law, it's not supposed to be in the ceiling which mean it should be accessible from underneath the home. Having said that, this is a manufactured home and I think that regulation still applies even though they can get away with other things. For now the light fixture has been temporarily wired as an always-on light. I just unscrew the LED bulb to turn it off when I don't need it.
Besides the weird wiring I have spots of adhesive to clean up here and there as well as on the common wall with the hallway where the closet wall connected. I have three large pieces of the wall board and a few smaller pieces I can use for repairs. If I have to pull the panel next to the door to route these two cables I will. Otherwise I'll build a kind of fascia box with an indirect lighting scheme. Haven't figured out how that's done but eventually it'll come to me thanks to a dear friend I can bounce ideas off of when I get stuck in the mud.
As for the bench I'm holding off on the final design pending the chair I choose to use. I can get two different height chairs and the most comfortable one wins.
Chair Requirements:
Comfy seat - with either memory foam or some other material that won't cause fatigue or cut the circulation off in my legs
Supportive backrest - has good lumbar support whether it's mesh or solid and can adjust somewhat
Flip Up Arms - there are times when the arms are in the way and others that I wish they were there - arms that raise or lower straight up and down are a no-go
Foot Ring - to support the legs and not strain the knees or hip joints - Ring or support cannot be attached to the seat and rotate as these aren't wide enough for long sitting periods
A good height adjustment whether it be 24-30 inches or 28-36 inches - this is the determining factor for the final bench height
That last item is the gotchya. Until I find one that sits well, I won't know its height range and I'm not interested in adjusting the bench after the fact. As for the basic bench design, it's straight forward. A nine foot eight inch long (+/-) straight work top approximately 24-30 inches deep on a box frame similar to model railroad bench work is done. 1x4s make up the framing, is light weight and strong. 2x4 construction can be used but is much heavier. I don't really need a bench that can support an engine or transmission. At most I'd say fifty pounds worth of radio in the work space. Other items on the bench is spread out and be of lighter weight like the soldering station or the test station where the equipment is large but not heavy by any stretch.
I was thinking of building this in a modular format in three foot sections except for the last one. If a section needs to be upgraded I can do it without having to take the entire bench apart and rebuild it. It also affords the possibility of an adjustable section where I can lower it should the piece be overly tall and remain upright. This three foot section would give me adequate space underneath for my legs and feet so supports can be out further from my sitting position. I still have to put this feature down on paper and look at how it needs to be supported.
To mark where the studs are will help in the placement of the rear support rail long before I need it. The bench will sit on this rather than be screwed directly to the wall. The wall is a common wall with the living room and any noise on the bench will transfer into the living room so some kind of isolation mount is needed to reduce this.
I'm also looking into acoustic foam. Egg crate shaped, pyramid shaped and others are very expensive. One box of 12x12 inch acoustic foam containing 12 panels costs $236. That's excessive. I'm sure there are other solutions.
Before any of this can progress, I still have some material I need to put somewhere for safe keeping.
Good night all!
______________________________
October 17, 2020
Good evening. A little progress toward getting the floor done. The extra sheetrock and trim pieces are in the barn now. The trash is gone and the floor vacuumed. The only things left are a few smaller boxes of stuff that needs a place to stay but remain accessible without being in the way of anyone. Tall order to be sure considering the limited space inside this single-wide manufactured home.
I went by HD this evening and picked up three 4x8 sheets of 1/5th inch hardwood underlayment. I had them cut into 4x4 squares for portability though would have preferred having two full sheets. They would not fit into the back of the Jeep even with the rear seat folded down. So thin are they that the flexing would snap them before I got home. I accidently cracked one loading it into the Jeep and will have to act as the sacrificial piece for filler pieces for the outer perimeter of the room. The first piece will get laid down at the door to make the smoothest transition from the carpeted hallway into the room. The others will be laid down in a pattern like a stair step to keep mating lines from intersecting more than three pieces. Basically I'm trying not to recreate the Four Corners Monument anywhere in the floor layout. To do that I'll create a 6 inch offset at the baseboards so none of the tiles line up with any of the underlayment seams.
The 4x8 sheets weren't expensive at $14/sheet while precut single 4x4 sheets were $11 each. No brainer there. A little sanding will be needed to smooth off the splintered edge from the cut so it will lay flat. Once the pattern is figured out I'll need to staple them to the OSB sub-floor. The tool I wanted to use was the Dewalt 5-in-1 electric stapler/brad nailer but found it won't fire 1/4" flat crown staples of 9/16 or 5/8 inch lengths. It can staple heavy duty 3/8 crown staples with a 9/16 length but those are too wide for underlayment anchoring according to the pro's. They used 1/4 inch or 3/16 inch flat crown staples for this kind of work. T-brads could be used but will uproot more easily without the paired straight parallel fastener a staple has to double the grip. The other trick was to make sure the staple will not penetrate all the way through the sub-floor to the other side. That will invite moisture into the sub-floor via the high humidity and rust from the staple or brad whose coating would inevitably dissolve in the presence of moisture and weaken the anchoring of the underlayment. Since I'm using Vinyl Composition Tile (VCT) and it's commercial grade I'm not worried about the rust staining through the tile and be visible. That usually happens with luxury vinyl tile, planks, or sheet vinyl or Linoleums due to their much thinner spec.
So I'll need to rent the Roberts 1/4 inch electric carpet staple gun which is perfect for the job as it only fires 1/4 inch flat crown staples. I was hoping for the Dewalt so I could use it for upholstery, picture framing or canvasing since I don't like to spend money on things I can't use more than once and rental fees are exactly that. Spend it once and only have the results without the tool when it's done. The fee for rental could have gone into a tool that did the work plus other stuff but not unless I have an pneumatic version which presents even more expense. I guess it's better than a contractor at a few hundred bucks plus materials. Total cost in materials plus the rental will be under $250 when it's done.
The underlayment is inside the room now to acclimate to the room's environment. I should have the staples and the rental staple gun for next weekend's work so I need to reserve it now and finish getting the floor scraped and a final check for flatness and smoothness. That's it for now. ___________________________
October 21, 2020
Good Evening! Progress on the lab has been a bit slow due to the things that interfere the most like a job. I decided to pull the trigger on a manual staple gun from Dewalt and 1/4 inch flat crown staples with 1/2 inch length diverging legs. If it works I have a suitable multi-purpose stapler. If it doesn't, I'll be pounding 3/4 inch ring shank nails. The staples the home manufacturer used did go all the way through the subfloor. The subfloor is 19/32 thick as stamped on the sheet with the mfr's name. The underlayment is 1/5th inch thick and I wasn't able to find 9/16 inch long staples with 1/4 inch wide flat crowns to keep from fully penetrating the subfloor so it was reasonable to use 1/2 inch as most of the staple will be embedded into the subfloor. It seems 7/8 inch is the standard short length available. Well, I found a factory staple left and pulled it. It was straight so I measured it and it came to 7/8 inch. This confirms penetration through the subfloor in 1999 when the home was built is a great possibility. Until I pull the insulation on the underbelly down and get a visual it looks like they didn't follow the rule. So with that I decided to design the underlayment cuts to avoid having "Four Points" seam intersections. Below is a photo of the plan.
Click the photo for a larger view.
So with some trial and error after measuring for the subfloor seams I've got a plan to keep any seam in the subfloor, underlayment, or tiles from lining up. All seams will bridge any below it. I have section 1 (with the register marked), 4, and 7 lined for cutting this weekend. Hoping to get 5, 6, 8, and 9 lined tomorrow and Friday night. This will get 2/3rds of the room ready for adhesive. I'm hesitant to lay 4, 5, and 6 down since my desk is still up and running and the chair will crush the edges of the plywood. However I won't precut any of them until I am ready to place the next piece because the walls aren't plumb and the room not square. Minor deviations in the cutting angles will be needed to fit the pieces together snug. This should help leave a relatively even expansion gap of 1/4 inch at each wall without really thin strip filler to be cut. To cut the underlayment I needed a high-count tooth blade for my circular saw. HD had a 100T 5 1/2 inch blade I can use so I won't splinter the super thin plywood too badly. A 200T blade would have been preferred but would have to be special ordered. The price was only $20 but I'll only use the blade for this project so far as I know so I'm going as cheap as I can right now. I still have lumber to get for the workbench itself. None of the sheetrock is suspended above the floor. All the sheetrock was set on the floor and leaned up into place. Looking at the seam with the ceiling, I'd say they cut to near precision leaving no gap for the underlayment to run underneath thus the expansion gap. I'll use quarter round moulding to cover the gap after the tile is in. I may use standard baseboard moulding if it pans out. I hope this weekend is productive and I am able to make a lot of progress. _________________________
October 29, 2020
The demolition is done, the trash taken out and the pieces worth keeping are in the barn, along with a ton of other stuff. It's been a while since the underlayment portion was started and some more progress has been made.
The underlayment chosen was 1/5 inch thick Birch plywood. This offered a nice flat (relatively_ surface and something to apply the adhesive to. OSB was never found to be recommended by any tile or adhesive manufacturer due to it's construction. So the underlayment was required.
Without moving the computer desk and a couple of other boxes out of the room (my Stubborn) I was able to get down enough underlayment to install 30 tiles in three rows. Working kinda backwards I wanted to put down tile in a small enough space to try out how it's done but large enough move my Stubborn on top of it to finish the rest of the floor later or perform a redo. After the adhesive was spread out, I discovered to my surprise 1 quart of the stuff did not cover 45 sq/ft as advertised using the 1/16 - 1/16 - 3/16 trowel recommended.
Speaking of trowels, I found the economy trowel just awful. It was bowed and wouldn't lay a consistent layer of adhesive. Unless the trowel was perfectly perpendicular to the floor, it would lay a much thicker coat one quarter of the way in from each end. So over and over I went to get it the correct thickness. So mistakes were made and lessons learned but, the tile I did install went on well. I'm satisfied with the results.
First piece down.
About half the room's underlayment installed.
Friday evening about 7PM the adhesive was applied.
After the adhesive turned clear, it was time to apply the tiles. Each tile had to be wiped down due to the grittiness as they are made with limestone thus the name Vinyl Composite Tile or VCT.
30 tiles down with only three on the far left against the wall being normal size. All the other against the wall are custom cut since the wall isn't straight. The cables coming up through the floor are, from left to right: Internet Cable, (thick cable) DXE400 Max for antenna 1, (thick cable) DXE400 Max for antenna 2, and not seen far to the right is the telephone cable into the room but is disconnected from the phone company's D-mark. The two small cables in the very corner goes through the wall into the living room for the wife's PC and the blu-ray player.
Stubborn has moved again on Sunday afternoon once the adhesive has set well enough to keep the tiles in place.
Even after wearing knee pads for protection, after the weekend's work my knees were bruised and the jeans abrasion cut into the skin. Achy and very sore I was miserable at work on Monday. Thankfully I forgot I had Tuesday off and didn't just sit around to heal. I finished breaking down the computer desk to get it out of the way for the rest of the underlayment. I then wrapped a couple of cotton gauze patched onto my knee caps and wrapped gauze around them before putting on the sweat pants and finally the knee pads. Though sore it didn't feel like the burning sensation I had felt before and went to work on cutting and nailing the panels down to the subfloor. After I was done I pulled off the bandages and applied ice packs, which felt great!
Satisfied the floor panels were done I went to work on filling some of the gaps between panels. The worst one was at the wall and wedge shaped. It didn't matter how I tried to cut the panel, the next one would be out of whack. It's really amazing at how not square this room is by only an inch. And this is supposed to be Palm Harbor's top of the line single wide from 1999. Their Masterpiece series as they call it. Mmm. Not their best work.
At any rate the underlayment is done. The fill-in is done and ready for adhesive...a week and a half later. Yep. That's right.11 days. 11 days without the PC. Oh well, I'll just grab my old laptop and use it. Just don't need to do everything I do on the PC, right? Eh, well, not!
I soon went into withdrawal by the end of Thursday. I am writing this post on the PC as you see it in the photo above. Barebones and a no-frills setup. But it's enough. Took about five minutes to set up so I'll have it taken it down on the evening of November 5th. When I get home on the sixth, it's adhesive time and when I get up on the 7th, tile mania begins.
That's it for the progress update. Time to catch up on a couple of Hulu series!
TTFN!
________________________
November 10, 2020
Greetings! Some progress has been made in the lab. I'll let the pictures do the talking.
Found this drafting chair at a local furniture thrift store. It's in good condition and no stains. The casters need to be replaced is all it needs.
More adhesive work right after work on the 30th. It turned clear about 10PM, only three hours this time.
Now comes the fun part.
Almost there.
And we're done. In 24 hours I'll be walking around on it checking for high spots. So far, so good!
With the next 48 hours having passed, I moved the computer desk back into the space it was temporarily set up. The old file cabinets were set on their stands this time and I can still comfortably sit at the desk in my failing gaming chair. I may prop the desk up on 4x4 blocks and move the casters to the drafting chair. The Arrozzi has been a comfortable chair but most of the cross braces have broken loose now. Metal too thin and welds too cheap to hold up for more than a year. I had the back replaced 1 year after purchase. The replacement has already broken. So I may only have one chair to use.
I still need to seal the tile with something and looking about for that. I don't want a glossy shine as I think the matte look is better for finding tiny parts that fall to the floor. The baseboards have yet to be acquired and installed but that can wait. The workbench gets all the attention, and funds for now.
Now that the frame is done I can pursue the work surface. I had a couple of options. One was 3/4 inch finished plywood, adhesive, and a white mica top. Second was MDF with now hard surface but a 3/8 inch plywood underlayment for support. Third was Melamine. It's particle board, or pressed sawdust, with a plastic veneer. I chose white to make seeing small parts easier.
The first would cost most than the second and third options but would make an excellent work surface like an industrial electronics workbench would have like the one below.
This is the type of bench I worked with in my past life in IT. Solid, heavy steel with a wooden core, mica top, and edging with plenty of outlets along the front edge of the bench and shelf.
The second option with MDF would prove to be more quiet but damage easily, can burn if the soldering iron were to touch it, and absorb liquids. It would also require support.
Option 3 offers the best value being flat, heavy, smooth and takes a little more punishment. Edging would need to be done but that's easily handled. It's also $30 for a 4x8 foot sheet. I will need two sheets. First one will be cut to fit the corner space eliminating the seam at the corner. The leftovers and the second sheet will be for shelving and fill for the rest of the bench's length.
The bench is 9 ft, 9 in. long and 30 in. deep for main section. The "L" is 27 in. deep and extended 18 in. beyond the depth of the main bench. This will give me a 2 foot space between the end of the "L" and the door to put vertical storage, wall mounted stuff or just a place to temporarily put things as I enter the room. There will be a 2 inch overhang by the work surface to apply small utility devices like a small vise.
The wiring still needs to be taken care of and I might have to open that section of wall anyway so keeping the "L" shorter than planned will work out much better.
I have two drawers from my father-in-law's work bench. I think I'll use those for small parts, tools, or notes, plans and drawings.
I am also thinking about an additional function for the workbench to make it a little more versatile. When I decide on how it will be done if it's feasible, I'll post it here. Until then it's just a thought.
That completes this update. Bye for now!
____________________________
November 22, 2020
Greetings All!
The shack is starting to shape up into a useable space again. Here's a few photos of this weekend's progress.
Went to HD to get some more supplies. A 15 3/4 inch deep and 12 inch deep shelf were on the list of must-do things. Three 1x2 inch strip wood for use as supports and two primed 1x3 select pine boards as finish trim. All were 8 feet long and fit inside the Jeep XJ using the glove box as the front support. In back is a 2x4 foot piece of Melamine panel.
Finished the right-hand side of the workbench.
And began installing shelves. This one is 15 3/4 inches deep. It will hold some of the larger test gear. There is a four foot span of shelf over my main workspace. I may have to reinforce the front edge of the shelf to keep it from sagging too much.
Adding a ledge to support the rear of the second shelf. This shelf is twelve inches deep. Both are eight feet long and are covered in Melamine with a finished front edge.
Temporary supports are in to support the shelf but will be replaced with something else.
Time to fire up the Smokey Joe. Grilled burgers were on tonight's menu.
So with the second shelf installed I'm kinda seeing this might not work out as well as I thought it would.
I might use a 15 3/4 inch shelf as the second shelf and move the 12 inch shelf to the third spot.
Staging of some equipment.
Top Shelf: Heathkit GC-1107 - Oscilloscope probes - 4 foot Aluminum level Middle Shelf: B&K Precision 1570A Oscilloscope - Heathkit IM-4120 Frequency Counter - Homebrew Frequency Counter on top - Surpeer AV4 DMM - Zurich APS-715 Regulated Supply Main Work Space: PACO Model S-55 Oscilloscope - Dremel Tool bag - Aoyue Int701A++ soldering station
As you could see in the second photo above, I put out some of my test equipment to get a feel for where things can go. The oscilloscope on top of the older one will go on the first shelf.
I mentioned in a caption above I'm thinking the 12 inch shelf won't work out to my liking. I may need a deeper shelf to get large test gear or radio gear as some of them will be 14-18 inches deep. A 15 inch shelf will just allow the front feet to sit on it letting the equipment hang over the edge. I'll have to rethink my equipment distribution for the workspace.
Another issue that will become a problem is the particle board or "press board" may be nice and flat but is not rigid enough to support itself over a 3 foot span. I might have to come up with an arched brace that attaches to the wall in the center to support the center of the span.
Behind the main workspace area underneath the second shelf I am installing 1x2 inch strip wood to mount peg board too. These will give the pegboard some space behind it for the peg hooks and hangers for my tools and such. I might hang pegboard on the sides of the main workspace too if I find the need to have more tools at-hand than I think. A drawer isn't going to work as well as predicted either since the 2x4 framing already shortens the distance between the floor and the frame. Adding a drawer will force me to lower the chair to clear it. If I do a drawer I think I'll mount it under the right-hand side of the workbench instead. If not I might build a drawer unit to sit next to the door at the end of the workbench's L. Hanging on the wall will be some of the component storage drawers I already have.
That's all I have for now. I'm sore and tired so I'll close this post out with a quote.
_____________________________
November 29, 2020
Ladies and Gentlemen, may I present the functional completion of Phase I of my electronics work bench project. For my next trick I'll demonstrate a built-in drafting surface without pinching my fingers. Film at eleven....
I had to take down the 12" second shelf to get this done. I built support frames for the first 15" shelf in both positions. I expect the Melamine will sag at the spans I'm using so a little extra support won't hurt. I like the homebrew look so I probably won't paint bare wood. I have some 1x3 pieces that are primed to use as coverings for the vertical supports. Over to the right, out of the photo, is the drafting/work station part of the bench. I'll set up some amateur radio equipment here. The shelf is framed on this side as mentioned since the equipment is pretty heavy. Can't wait to put the Hammarlund piece up there. Might make the wall bow in some.
The second shelf is the new 15" shelf I wanted in place of the 12". This one has a support frame under the left side above the main work space section for the same reasons. Heavy and large equipment. The 12" shelf will be the third shelf and hold trinkets and treasures to display. Who knows? Maybe I'll wind up with a collection of Heathkit clocks or something. I'm accepting Heathkit donations by the way.
With this part of the project done I can start bringing my component storage cabinets back in. The bread rack is slated to go to the barn for boxed items storage once I make a place for the equipment staged on it. I'm thinking of building a rolling rack using a furniture moving dolly. Component storage could also be built into one of those and use a slide-out shelf set for the longer term stuff that can't be outside in the barn.
I don't have all of my test equipment out yet but these pieces are my basic necessities. Those will come in time as I go through the boxes and boxes of stuff I need to root through. I started packing the room with some semblance of organization. After two days and still no farther than I had gotten I started just throwing stuff in anything to get it out of the room. Mistakes were made, lessons were learned.
That's it for today's work session update. Have a great week!
__________________________
December 2, 2020
Having the day off for my birthday I went to work on the "Lab" to get the shelving finished. Once the top shelf was installed and secured it was time to head to the eye doctor for my annual exam. After that, I simply went back to work on the shack.
As I mentioned in a previous posting I prefer the bare wood look so I'll leave it that way. The primed 1x3 boards were used to support the rear of the top shelf while 1x2 Select Pine boards were used for the front supports. All turned out well and the main bench still stands after putting all my weight on it to put up the top shelf.
Cleaning up was the usual pain the arse but got it done and the floor swept, vacuumed and wiped down in preparation for the vinyl tile sealer. The sealer is a Matte or low gloss finish to it and offers protection from some wear as well as spills. I did about half of the floor with three coats, two thin and one thick coat of the sealer, waiting for each coat to dry before applying the next one. The edge at the middle of the room was feathered to a single coat so there wouldn't be a defined line between the two halves of the floor when the other half was overlapped with it.
With the first half dry I moved moved all of my equipment to the shelves and realized I could have used more space between the first and second shelves to stack the Heathkit radio sets. A receiver on top of a transmitter or something like that. Instead I wound up with 5.5 inches from the tops of the first set so the second set had to occupy the second shelf with the same results. So smaller Heathkit gear will be located on top instead. I'm not about the tear down the shelves and rebuild them. If I find I really can't use it currently then I'll consider a new layout.
With the equipment up on the shelf I really couldn't appreciate how much gear I have. It was all on a small bread rack three feet wide and fourteen inches deep with five shelves. I have to say it looks pretty darn good with all of it on display like it is. So with that I started on the component cabinet retrieval from the "barn", aka: 12x12 foot shed, along with other detritus needed for working on equipment. Now the bench looks cluttered and unorganized. Time for more work this weekend.
And with that, I'll end tonight's post with some photos of today's work session. Bye for now!
___________________________
December 11, 2020
It's been a little over a week and the shelving and workbench are still standing. So I guess it'll be safe to occupy the room for long periods. LOL!
I managed to get the bread rack in the hallway emptied and in the barn where I was able to organize the space a little better. Though the same amount of space was used it's easier to get to stuff now. As for the lab? Wellllllll, it's coming along.
In the previous post you could see the floor in those photos. Now?
As you can see the "under space" has been mostly used up. It's an odd optical illusion that everything is further under the work bench than they look. The support leg in the middle of the second photo is actually a foot from the front of the bench. So there is room for my feet when sitting at the drafting station or the project station. These boxes will get gone through over time and the gray crates will have stuff sorted in them by amateur radio purpose. One for antenna deployment, one for portable antennas, etc. One has an AGM car battery in it I keep on a battery maintainer. When I finish drilling the holes in the shelves and bench I'll have the channels I need to route cables where I need them.
Speaking of cables, I made another unfortunate discovery while figuring out the cable routing for equipment on the first shelf.. The shelf heights for the radio gear above the drafting station aren't working out. My original plan was to build two shelf systems. One, above the project work station, would have the shelves in their current positions. The second one was to be above the drafting work station which triples as a auxiliary work bench and a radio operator's station. Well, I felt rushed and didn't follow that plan. I instead just put the shelves up and took the easy route forgetting I wanted to stack the Heathkit gear two-high which would give me the room I needed to keep the station monitoring pieces within working reach. Instead the space between shelves is two inches too short to allow that. To fix it required complete tear down of the shelving, re-cutting them to the original plan and putting them back up. The second shelf also must be raised 1.5 inches from the first shelf's surface for the same reason. This then requires the top shelf to be raised 4.5 inches to clear equipment on the shelf below it. The top shelf will loose approximately 3 feet of useable storage space thus requiring it to be shifted over to butt against the wall at the other end of it. And I only get 21 inches back.
It strains the brain to consider all the possibilities this room could have and seeing everything turning out differently than originally envisioned causes me to doubt my planning skills. It might have made more sense to work out the workbench against the wall with the door and put the computer desk in the corner instead of across the room. Something like the drawing below.
I know there are several ways to get what I wanted but I tried to keep it simple, clean, and maintainable. Instead of two or more shelving units for storage I opted for under-bench storage to maximize the workbench surface area. So yes I could have gone with this and gained some functionality but in the end I needed storage AND work space. That's the only justification I could come up with as to why I went the route I took. I'll figure out how to make better use of it but the stacking of the radio equipment must be done. So over the next month or two I'll work on that aspect. I really want the Hammarlund HQ-150 up on the shelf instead of on the floor if I'm to keep the drafting station intact. If I choose not to use the drafting station then I simply don't raise it and put the equipment down on that surface instead. We'll see how it works out.
On the drafting station...I am still trying to get back to working on the support for the raised surface and how to make it secure. I'm leaning toward a simple closet hanging rod cut down to fit inside the frame across the open space underneath. The attach two "catches" that will have slot cut into them to catch the rod when I lift the table. The notches in the catch will slip on to the rod and settle down capturing the rod via spring action. When I want to lower the table I can push or pull an actuator rod to prevent the catches from engaging the rod.
As mentioned above the bread rack I used for staging of equipment to be worked on is now in the barn. The hallway is freed from my stuff and the wife's stuff is the only remaining items left. I think the hallway will once again be one.
On the left is my test equipment. On the right is the radio gear. Only the low-profile Heathkit gear like the HW-7, 1410 electronic keyer, and HM-102 power/SWR meter will fit in the remaining space above the SB-301 and SB-401. The SB-610 and SB-303 on the shelf above would fit better stacked without all that wasted space above them. To the far right is the SB-620. Below that is the SB-630 and Kenwood TS-450S/AT. Down in the corner is the Astron RS-20S linear power supply and the Kenwood MC-60 microphone on top of that. The RS-20S features a front-firing speaker I'll make good use of for the Kenwood.
Component storage cabinet population grew quickly a year ago and stopped only from lack of space. A shelf will be installed at the same height as the first shelf to the right. Did mention I need more shelf space? In the center in the corner are a Heathkit O-12 on top and PACO Model S-55 oscilloscopes. To the left of the PACO and partially hidden is a Heathkit OL-1. On the top shelf is a Radio Shack Archer bookshelf speaker, Heathkit Cantenna, SB-600 speaker housing, Heathkit HW-101, and just visible is a Hallicrafters S-40B. Second shelf is a Heathkit GC-1107 clock, IT-28, IG-102 (x2), Echo Dot, Heathkit SB-401, and my Christmas bear. First shelf up from the workbench is a B&K Precision 1570A oscilloscope, Analog multimeter, home-brew frequency counter stacked on top of a Precision Communications FC-70 frequency counter stacked on top of a Heathkit IM-4120 frequency counter. To its right is my Aoyue 701A++ soldering/de-soldering station control box. On the workbench is a Black and Decker oversize toaster oven I found by a dumpster. It has two big dents, is missing the crumb and drip trays but all four elements work as does the thermostats and timer. Can you say reflow oven? Behind the oven is my Heathkit IM-13 VTVM.
That's pretty much it for the Electronics Lab Project. Only some finish work and reconfiguration of the shelving is left do. Any significant changes will be posted as they are completed.
So with that I'll close this project. Thanks for following!
73
Smitty
_______________________________
January 6, 2021
And just when I thought I was done, I couldn't handle the way the shelving was done. My original plan was to stack the Heathkit gear, transmitter on top of the receiver but couldn't. I put them side by side and used two shelf spaces to do it. I had a third shelf on top that carrier some extra stuff but had to put the Hallicrafters S-40B there. Can't use it up there! So during holiday season I worked out a plan to fix it.
All it took was to remove everything from the shelves, remove the shelves, the frames I built and...wait for it...start all over. And January 2nd saw that reality. I'd taken most of the stuff down off the shelves during the week and Saturday morning I began the rebuild. I'd picked up the material needed the night before so I was ready. The biggest issue was time. I'd put a few things in the living room and didn't want it there for a week so I needed to work pretty quick. I'm not good at quick. I'm too careful.
By the end of the day I had the bottom shelf sitting on the new frame and re-used an original frame to support the right-hand half of the shelf over the drafting station.
Getting the last of the old shelf frames down.
New, longer frame for the primary workspace shelf.
Very careful pre-drilling and chamfering to use two 2 inch long coated deck screws to hold it all together.
Installed the first frame with beefed up supports. I chose 2x3s to handle the weight of the front of the shelves' framing. This is much better than the 1x2 sticks I had used before. I had some misgivings about them.
Almost full length. The six inch gap from the far end of the frame to the wall won't matter. There isn't enough weight in that small section to cause trouble. For added support I did install a 1x2 support just for the front corner. The rear edge of all the shelves are supported via a support rail similar to the one in the photo at far right.
With the first shelf done I used 1 inch L-brackets and screws to anchor the rear of the shelf to the frame. The frame rests on the support rails that are screwed to the wall studs. The frames are also screwed to the wall studs.
I thought I would use the 2x3 supports inside the frame and screw them to the frame. The spacing I wanted between them didn't give me what I needed under the shelf so I made them to sit with the frames sitting on top of them. The 2x3s are then attached to the frame via 1 inch L-brackets and screws and again to the workbench surface to keep from getting kicked out and causing a collapse. All holes were pre-dilled to minimize stripping or tearing up the Melamine (aka: particle board). The stuff gums up drill bits due to the glue used to hold the sawdust together.
On Sunday I resumed and got the second shelf installed in similar fashion. With the extra length of shelf support into the far left corner, I used some of the left-over Melamine from the 4x8 sheet to make two smaller pieces that fit right in. A few corrections were needed to account for the not-square walls. In the end I'm quite pleased with the result.
Second shelf complete.
They stacked well. The SB-401 and SB-301 don't have the rubber feet attached. The SB-610 and SB-620 just fit with the short ones on them. Granted the receiver/transmitter set won't be operated in this configuration. I have another SB-401 for parts and the SB-303 that goes with this one in the photo.
So here's the set up with the built-in drafting station deployed. The lesser used equipment occupies the second-now-top shelf. That Hallicrafters will see some action after it's rebuilt. The HW-101 to the far right up top also needs a major overhaul. The GC-1107 clock on the blue pad will get attention as well.
Gotta have the parts to fix the gear with so these cabinets work great. Capacitors and miscellaneous parts in the first column. A couple of old Akro-Mils 60-drawer organizers from the 1970's contain various parts, hardware and semiconductors. The new plastic current date Akro-Mils filled with resistors makes up the third column. Old style metal cabinet with polycarbonate is better IMHO. The newer plastic ones are good but lose the feel of quality about them. The first column is stuff from a home improvement store I grabbed.
The drafting station is stowed and converts to a vintage operating position. The laptop is used for logging contacts and uploaded to my Log Of The World account. That is when I get all the pieces reworked and running again. There are a couple of pieces of test gear I need to repair first. Namely the VTVM and the signal generator. I repaired both but something went "POP" inside it and the signal generator isn't stable.
That's it for this post. Now I can call this project completed.
Happy New Year!
__________________________
January 7, 2021
Resuming projects. Beginning again.
With the workspace completed I am restarting my projects. I feel I'm in the best position I can be and with a little luck, I'll have a working transmitter and power meter by the end of the year.
I opened up the IM-13 VTVM and see how the battery is. It's still good and with a quick calibration check, it's ready to go. I considered revisiting the IG-102 next but I still need a frequency counter I can work with. The homebrew-hybrid counter I have seems okay but I'd like to explore attenuation with that later. For now I'd rather get the IM-4120 going as I think I'll be depending on it sooner rather than later.
The IM-4120 is a solid state piece and mine is dated 1979 with a few 1976-1979 dated components. This is the newest piece from Heathkit I own. I'll need the counter to help align IF stages in the radios and think this will fit the bill just fine.
If you'd like to follow me on this project, click below for the project post.
Gotta love it when a project just cooperates. The IM-4120 repair was as simple as it seemed. It calibrated good and I was able to test the IG-102 with good results. I will stop using my homebrew frequency counter as it isn't stable enough for weak signal work. Maybe some additional circuitry to specialize it's use might be useful at a later date. For now, the IM-4120 is operational and be the instrument of choice for alignments and frequency checks accompanied with the oscilloscope.
I started work on restoring the IN-37 Resistance Substitution Box and have all but one resistor partially installed. I'm waiting for the last piece to arrive before soldering the common wire to the resistors. A new lead for the Common banana jack will be put in and soldered to the center of the Common conductor rather than near one end at the jack. An increase in the wire gauge for all the wires used should be completed by the time the box is ready to button up and put into service.
The next piece is the IN-47 Capacitor Substitution Box. I'm considering using Orange Drop film capacitors rated at 500V or more. I suspect ceramic capacitors are installed and while quite good at what they do, are microphonic and very temperature reactive. Mica and most film type capacitors have neither of these characteristics. While high precision isn't the goal to be achieved, the higher accuracy derived from a greater stability in the component is desired.
A third item has landed on my bench. A Zenith H724Z was acquired. It's previous owner attempted a partial restoration. Some of those solder points are quite poorly done and makes me wonder if he either did only enough to make it work or stopped after realizing the extent of the work required. There are two components that have dark discoloration from very high heat stress. There are also many wax type capacitors that have to go not to mention the "can" filter capacitor. All of the ceramic capacitors have a kind of wax coating on them that was likely from being dipped to help reduce microphonic contamination of the signal. The wax would dampen that characteristic to keep costs down. Some radio manufacturers did this but most didn't. If you don't know what microphonic contamination does, fire up a Heathkit HW-7, turn the volume way up and tap on the case. You'll hear it plain as day.
The speaker on the Zenith does have a small tear in it but the coil does move freely without binding. I think some speaker repair compound or nail polish should keep it from tearing further. This will be a longer duration project as I will need to build a parts list. The SB-401 or Hallicrafters S-40B is my next challenge.
That's it for this session! Good night all!
_____________________________________________
February 9, 2021
How time flies! From my last post I was working on the IN-37 Resistor Substitution Box. All the parts arrived and installed. The metal film resistors I bought were an upgrade to 2 watts and were a tad smaller than the old 1 watt carbon composition resistors. The megohm resistors are also 2 watts but double the size of the old ones. Probably due to the manufacturer differences and their processes. I tried to stay with one manufacturer but Vishay has multiple factories. All were soldered in after the rotary switches were thoroughly cleaned and treated with DeoxIt D100. The old common wire used to tie all the resistors together wasn't worth salvaging. I cut a length of 14AWG solid wire and formed it. After the soldering was completed the common lead to the banana jack was changed to an 18AWG stranded 600V piece. I did this to connect it to the center of the common rather than near one end as the original did. This is to help reduce adding resistance to the readings from wire resistance. The box was buttoned up and my Surpeer AV4 was put into service to test the resistances for each selection. I'll run the same test with the IM-13 VTVM later.
I used the case as the stand. Came in handy!
The ohmmeter leads had 1.17 ohms resistance so I took the displayed value and subtracted that amount from each reading. All are within 1% of their stated values.
Next was to break out the IN-47. The contacts were treated with DeoxIt D100 and the unit tested. All of the film capacitors AND the three mica capacitors were more than 15% out of spec. The mica's may not actually be Mica types. They don't look like any I've seen before. Mr. Carlson's Lab did mention he had run into some capacitors that looked like Mica types but were actually film types in the mica cases as the values were very low. These three are 100pf, 150pf, and 220pf. All the others are "Brown Drop" or dip types at 500V ratings with 10% tolerances. As mentioned before, all were over 10%. A couple exceeded 15%. Currently I don't need this to be perfect so I'm going to put the funds into the Next Big Thing I'm putting on the bench tonight. I'm so excited to start digging into my dad's Heathkit SB-401 HF transmitter.
A few photos to start...-remember to click them for larger versions.
The top shield plate is missing as are all the crystals. If I remember correctly, Dad used the receiver as the VFO for the transmitter.
I hope that's enticing! Dad's unit was bought used but wasn't working well. He did a lot of work to it to get it right and used it for many years. It has survived a few flooded basements worth of very high humidity, without being submerged. The paint is failing and chipping away as it happening to the SB-303 he purchased with this unit. They will have to be stripped completely and repainted.
As for the electronics I already spotted the load select drive string an spring are missing. It's not inside the chassis anywhere so it disappeared at some point.
Now for a recap, I did purchase a working set over twenty years ago but never put it into service. Things happen and life throws you curves and you wind up in the weeds out in a field. The SB-301 in the set I bought was brought back to life and works. It was horribly contaminated with cigarette smoke, tar and nicotine. The chassis was stripped down and put through a wash and baked dry. The case was already flaking paint everywhere and was treated a few times with Aircraft Stripper. This paint is so tough I almost half thought it was epoxy type but no. It's just thick in places and really hard to get off without sanding. Sanding will take off metal and I won't do that.
The SB-401 of my set is the donor plain and simple. Still contaminated with nicotine and smoke particulates, it will offer all the parts I should need to bring the one my dad gave me back to life. Even the load drive string and spring.
So that should get you up to date on what's going in the shack. So hoping to have this complete by Christmas. All the electrolytic capacitors will be replaced no ifs, and's, or buts. From the preliminary evaluation there aren't any waxies, bumblebee's or paper-in-oil types. Just ceramic and maybe a Mica or two. All of the carbon composition resistors should be replaced but I'll get the unit recapped and begin the testing evaluation with the dim bulb addition to the isolation transformer and a variac to bring it all up slowly. Hopeful is the word that comes to mind.
That's it for this update. Thanks for stopping by!
Bye for now!
___________________________________
February 21, 2021
Thought I'd drop a quick post tonight. As mentioned earlier I brought the SB-401 transmitter down off the shelf to work on. I have parts on order and hopefully will be here by the weekend as it is forecast to rain all weekend.
Today I needed to get a few things from the little barn out back for the wife and came across a plastic tote with my Dad's 1983 Icom IC-745 and a Sharp FV-1710 6 band receiver that belonged to his dad. The Sharp doesn't work and needs to be recapped for sure. The Icom, however does work somewhat. It has the frequency scroll of death. It won't stop rolling the frequency unless you hit the lock button. I had installed a Piexx circuit board in it to prevent loss of its use. The original board used a battery to maintain the RAM chip for the radio's configuration. If the battery died before it was replaced, the RAM would lose power and the configuration lost and would have to be sent to a service shop for battery replacement and reprogramming. This was common on most radios then due to the high cost of an equivalent ROM at the time. Without that the radio won't function at all as the radio is programmed making it a crude predecessor to today's SDRs. It's the earliest rig I have that had to be programmed for the region and the frequency ranges allowed to transmit and receive on. The Piexx board uses a ROM so the battery only needs to maintain the stored frequency memory, not the frequency range.
The tote also had his Lafayette 23ch CB with WX tuner. It remained in the tote with a pocket TV I got from Radio Shack way back.
Figuring I have nearly all the radio gear in the shack now I should be able to crack open the Icom and clear out the encoder wheel sensors as a couple of guys mentioned is likely the problem. A spider got in there and died blocking the sensor so it keeps scrolling the frequency. Other than that it hasn't got any other problems.
The Sharp, on the other hand has numerous electrolytic capacitors that will need replacing. I'll need a manual or a schematic at the very least to find out how many and what values are needed. This one's going to be a long term work-in-progress but will be fun to do after the transmitter is repaired and the Hallicrafters and Hammarlund receivers are working again too. The list gets longer now!
Schulman Auctions is active again with a lot of Collins gear. There's Kenwood TS-530S I would just love to get but isn't in the budget. An 830S is my preferred rig as I have the relay replacement for it. I don't think it will work in the 530S though. Tube finals are cool! And hot.
TTFN!
_______________________
May 27, 2021
It has been a while since I posted here. Lots more has gone on outside the shack than inside it. So far nothing radio has been done as Jeep work and work itself has become the main routine. I will post more later on that. For now my Astron RS-20S is getting an upgrade as is my '93 Jeep XJ. Jump over to my Astron RS-20S post for more info.
Bye for now.
__________________________
June 6, 2021
I have been working on my Astron RS-20S linear power supply since my last post. Check it out here...
I picked up a pair of Panasonic TH-37LRU20 720P LCD televisions sitting out at our mailboxes. Neither came with a remote which is no surprise. A universal remote might be good enough for basic stuff and I think the menu is accessible through the controls on the TV. Both TVs are dated March of 2011 so these are pretty old units. One has a scratched screen. The other is clear. There were typically used in hotel/motel service and have a tone of inputs for stuff. If they can be repaired without gutting them and using a stand alone display driver board, That might be a plus for external analog A/V devices. I've not plugged either in yet. That will come in time. If I can get just one working I'd be happy. I could turn it into a large display I can hang on the wall above my workstation to display anything I wanted for long periods and not interfere with my regular 19" Hanns-G JC-199D displays.
That's it for now.
__________________________
June 16, 2021
The Astron project is complete now. Check out the last project post here.
I've begun doing some cleaning up and sorting stuff stored under the drafting station since the workbench was completed. I've found a few things I was looking for like the power supply to a Behringer Q802 mixer and the audio cables. Several other items as well. After the power supply was set up again and the radio back into play it's also time to organize the cabling. I have some RG8X cable from The Wire Man I purchased thinking I would modify the vertical into an adjustable sloper. Well, the trees in place filled out so much it's pretty much useless to try this. The idea was to have the feed point up high and slope down to the end and move it around to change the primary radiation direction. Too much forest floor debris makes it dangerous to walk around. Might step into a hole and break a leg so I won't do that. Instead I'll keep it vertical and use it as a SWL antenna. It's a 35 foot tall ground plane so it's a prime random length without any resonant multiples.
The RG8X will be used to make jumper cables in the shack. The DXE-400 is too difficult to work with in tight spaces and with a 100 watt radio, I'm not concerned about losses that are practically immeasurable. So many other operators use the stuff it can't be all wrong. If I were running full legal limit from the shack, I'd still use the RG8X for patch cables since the radio still only puts out 100 watts so driving the amp wouldn't be an issue either. So I'm working out where to place the switch boxes and such since I'll have two operating positions opposite each other.
A small table was put together using an old computer table stand and a plank. This holds the power supply and mixer atop it. The rest of the space is being used to sort the various things so I can get them out of boxes and see what needs to stay and what needs to go. Spring cleaning of a sort.
That's it for tonight. Thanks for stopping by the shack.
_________________________
June 17, 2021
Work on the shack/office/lab room thing is progressing. I've been through a few smaller boxes and found all sorts of stuff. Some partial sorting and reorganizing was done to downsize to a smaller containment box for future access. There a a few things I cannot sort out yet as I need to think more on their purpose/use/benefit to anything I'm planning on working on. Tossed out several things that did not meet the requirement too. I now have a standard paper grocery back full of junk I just won't go through for parts or worth repairing as it has already been replaced with something else.
One motivation for doing this hypothetical spring cleaning is to find the 9VAC transformer I used to power my Nixie clock. Dang thing's been hanging at the workbench since Christmas and I still haven't found it yet. Another reason is that I really want to use the drafting station. With all of the stuff underneath I haven't got the space to sit at it. My drafting chair doesn't have brakes so I can't lean too far forward or it scoots backwards.
The disposition of the two 37" 720P TV monitors I picked up isn't fully decided for both. One will end up on the wall above my computer station.
Three 19" monitors grace my desk now. The ARRL Amateur Radio Map of the World will be moved or taken down since the TV takes up so much wall. I could mount both TVs but that might be pushing it. I'm already on a power budget due to the mobile home's factory wiring BS. They wired the living room, my room, and my daughter's room on the same circuit. If I want to use the workbench, the computer stays off. I'm sure the TV will push the circuit over the limit and pop the breaker. The wire is 14AWG set with a 15A breaker. It's popped a few times before I mapped out the trailer and realized how bogus this wiring is. An electrician has quoted me over $1200 to run two new 15A circuits just to this room. It will have to be run from the panel down and run under the belly through the floor joists and up through the floor and into the walls. So not happy with this. If I were smarter I'd have done it with the stimulus check and get it over with.
No radio updates thus far. I've stopped purchasing any equipment until I get a handle on the space management and a couple more rigs back up and running.
Here's a pic of the Astron RS-20S I repaired and modded. I forgot to post one last night after mentioning the link to the project blog.
________________________
July 3, 2021
As yet I've not been able to get anything done in the shack except to install a 37" TV monitor.
This is what happens when I get distracted with other things like Jeeps, yard work and outdoor grilling. I really don't like Summer. Anybody got a winning lottery ticket to $40M? I'll split it with ya!
______________________
October 1, 2021
Autumn has begun! It's time to get the workbench ready for electronics and radio work. Since March the bench has been piling up with all kinds of detritus. But first a break from Keeping and Summer with a week off to go visit family in Florida and return north to camp out at Hatteras near Buxton, NC.
The beach ramp is right outside the entrance to the campground. A 10 day permit purchase is required for vehicle access but would be worth it to setup station.
Since the XJ-7100 is doing well and looks ready for the trip I'll spend time with her out on the beach and try to get some QSO's logged. Pictures should be forthcoming after I set up. Rain is for sat at 50% Thursday and Friday. I am hopefully it won't last long though.
Meals will include breakfast bars and coffee in the morning. PB&J sandwiches or an MRE for lunch and soup for supper.
Accommodations would be a good sized tent, sleep pad, an old extra sleeping bag for extra insulation and padding plus my 20F bag. They do offer restrooms and a shower house. The sites themselves do not have electricity or water but do offer level ground for tents. An extra ground tarp is recommended to put underneath the tent.
Cooking is limited to the standard National Parks onsite provided grill with charcoal you provide or a portable gas grill. No campfires are allowed but that's ok. It's likely due to the constant windy conditions.
That's it for this posting!
_______________________
October 16, 2021
Time for an update! To date since the last post: Vacation time. The drive down was uneventful and I like uneventful drives! The Jeep didn't hiccup once and I peaked at an estimated 16mpg. I'll have to calculate the larger tire size for the mileage correction but I am confident I topped 17mpg.
Lots of highway still ahead.
Got the folks out to the beach!
And it's a pretty long beach.
The Lions Bridge of St. Augustine, FL
I had a great time visiting my folks in Florida. I took them for a ride in the Jeep XJ down the beach from south of St. Augustine as far down as Crescent Ramp. The beach between there and Matanzas Ramp was closed due to beach erosion. After that we drove to old St. Augustine across the Bridge of Lions and through town to get to Schooner's. That's a good place to eat and I loved the shrimp lunch.
We drove back to their place and I went to work on a hamstick dipole for my Jackite telescoping pole.
I used an old satellite antenna mounting plate for big rigs I had laying around the shack and dropped it in the "To-Go" box. I clamped it to the mast at the top of the section at 22ft-10in which is pretty good. The diameter is large enough to handle the weight nicely and I hoped the wind loading as well. Beaches are windy! After tuning the dipole with the Rig expert AA-170 as best I could, I put it away for the next day's beach outing.
Back out to Butler Beach and set up. The first was the wire extension on the 108" whip installed on the Jeep that make up part of my XJ-7100 project I've spoken of before. Now the wire was made with 14AWG insulated wire and adjusted to make a 29ft total length with the whip. This is one of those "magic" numbers for random length wire antenna's since it isn't resonant on any amateur frequency. It's centered between a resonant length to make it tunable in a much wider range of bands without traps or loading coils. You might recall (if you've visited the XJ-7100 blog) I installed an Icom AH-4 antenna tuner in the Jeep. It wasn't my idea so I won't take credit. A fellow operator did it before in his XJ I happened to stumble upon on the web and duplicated it after contacting him with a few questions. He was quite friendly and helpful.
For the wire I made a QSO with IK6BGJ in Pascara, Italy on 100 watts. I read him at 5 and 9. He got me at 5 and 7. I was very excited about the performance of the wire extension thus far. By the time I had finished with several other attempts at Europe stations, it was late in the afternoon and I needed to go and get some things done before heading up to Cape Hatteras, NC the next day. I didn't put the dipole up. I figured I would try it at Hatteras.
The next day dawned and 13 hours after starting out I was at the campground and putting up the tent right at dark. I slept until 7:30am and after getting up and making ready, I headed out to the beach just off the Frisco Campground. Cresting the dune the view was spectacular! Only a few vehicles were out and I felt like I had the whole beach to roam. I headed east along the beach until I reached the border where vehicles aren't allowed. I set up the chair, made a cup of coffee and enjoyed just experiencing the solitude. About an hour later the "high tide" period was about to peak and one wave washed over the crest of the beach flooding my tranquil area with seawater. It was time to relocate.
After packing up I went back over the dune and took the Interdunal Road to the next ramp on the other side of the closed section of beach. But there was no ramp where Google Maps showed there was. Instead the road I turned onto toward the beach went to a parking lot that had not been photographed by Google yet. I turned around and went back to the interdunal road and headed east again. The next thing I knew I was at ramp 44. It opened out onto a very wide area that gave me the impression I was out on Cape Point. When I drove over to where the road was to continue, it was blocked off. I checked the map and found that I was about 200ft out off shore. So I came to the conclusion that the map is flat out of date making it wrong, and I had to use ten-toe drive to get to the Point. So I parked and hoofed it South and found the map is very, very wrong now. The shape of the area isn't at all what Google's satellite/high altitude images show. I think what we see is their idealized view before Cape Point eroded away. This makes sense now with the other two ramps no longer accessible. I went back to where all the fishing was happening and saw a few catch some nice fish. This area is so popular because of the turbulent nature of the Labrador and Gulf currents where the meet off shore. This makes for a great environment for a large variety of fishes to occupy the waters and the diversity of fish caught really surprised me. I'm no expert but it was amazing the number of different fish being caught there were. I'm used to only a couple from lake and river fishing a long time ago.
After enjoying the sights and excitement of angler's catching stuff they'd never caught before I decided to find an open spot in the line of others who are fishing. Well, I'm fishing too! I am a radio angler. I fish for station signals! Lol!
I got the mast up with the extension wire first and worked a couple of domestic stations. I did get another station from Italy which was good! I was hearing stations from other European countries but they weren't responding to my calls. I have only 100 watts and a wire to work with so if they have their filters turned up, I'll never be heard over the operators with 1500 watts and a beam!
I brought out the old Pac-12 ground plane and tuned it to 20m hoping it might be better due to the fact the base is ground and stuck in wet sand. A attached a couple of radials to it went back to work. Found it refreshing that only one person ask about my set up. The stations I was hearing with the wire/whip combination were barely audible. I reset the tuning load coil and they got a little louder but I think the antenna had an issue. So back in the pack it went and out came the hamstick dipole. Stations were louder than before and I could adjust the direction of the dipole to get the strongest signal on the S-meter. They still couldn't hear me. I am pleased with the receive capability of the stick dipole but again, I may be fighting the receiving station's filters to filter out weak stations or attenuate the strong signals were getting. Either way, four hours and no QSO's. My logbook is a lot lighter than I had hoped.
Put up the mast with a single extension wire to add to the 108 inch whip already mounted to the Jeep.
With the feed point at the top, the weight of 50ft of wire plus the dipole bracket, plus the RG8x-Mini from The Wireman, the mast was doing a good job in the wind. Hmmmm. Maybe not so much.
Click on the photo for the larger view. The Pac-12 is right in front about 12 feet out.
It was late in the afternoon so I went back to ramp 49 near the campground via the interdunal road. I checked the cell phone for weather info and it was deteriorating. A low had formed Southeast of Hatteras and it was rotating enough to bring precipitation over the island. I figured it would rain during the night and put Plan B on standby in the back of my mind.
After a shower and some grub I configured the Jeep as a bunk just in case. This meant folding the rear seat down and moving everything on the passenger's side over and up front. With the space cleared I put the bedding in the tent together to sleep on but ready to fold up and move to the Jeep. I fell asleep about 9-ish. Sometime before Midnight I woke up hearing a light rain falling on the tent. Plan B went into full swing. I got the bedding folded up, carried over to the Jeep, opened the rear passenger door and laid it back out. I climbed in, closed the door and went back to sleep.
Flash! Booooooooooooom! I was awake at about 1:40am and the rain began to pour in buckets! The rain hitting the roof of the Jeep was almost deafening! Fortunately it didn't last but a few minutes and calmed to a steady rain. I fell back asleep and didn't wake up until 7:30am. It was sprinkling a bit and after my morning routine, I checked on the tent. It was wet inside and knew now the waterproofing of this 12 year old tent was done. I decided to head out to the beach and check the weather since the campground had no cell service.
I parked on a higher berm above the tide line facing out toward the ocean, which in this position on this beach was facing due south. The rain spat then quite and the wind kicked up. I still opened the windows to let the very humid but windy breezes through the Jeep. I pulled out an energy bar and water before raising the mast one more time. It was now Saturday and the Oceana contesting was at full power! I heard loads of stations in every European country as well as South America and South Africa. I did hear one, very strong station in Japan that was calling CQ to any USA station. I gave it a good try but no dice.
It was getting close to high tide as the waves had occasionally washed over the berm I was parked at. I packed everything up and saw the sand all around and under the Jeep was smoothed over from the tide flows. The tires weren't buried very deep, only half way up to the rim. I checked the weather one more time and saw the Low was in full rotation now and more rain was on the way. I took advantage of the lull to go back to camp and pack the tent. It was time to head for home.
Just chillin' with my XJ before deciding to head home.
Slept in the XJ. I needed a better pad to sleep on.
The tide was coming in and occasionally flowing further onto shore until my Jeep and me were surrounded by fresh wet sand. Probably improved the ground plane coupling.
Just a great view of the sky and clouds on Friday.
Waking up Saturday with some rain still.
The last photo taken of the beach before heading for home.
Once off the Outer Banks I stopped in Manteo for some lunch. I had a shrimp platter with green beans, beets, and hush puppies (cornbread balls for those that don't know). With my belly full I pointed Jeep for home.
So here it is a week later and I got the workbench unburied, the Heathkit SB-401 back in its place to be worked on and a completed BOM list for the 100 resistors I need to get for it. The place I will get them from are closed currently and will reopen on the 22nd. I have purchased from Just Radios before and I am pleased with their prices and quality of product. Especially the capacitors from Cornell-Dubilier. CD bought Illinois Capacitor and I really like IC. I buy them from Mouser usually. If a value I need isn't there then it off to Digikey.
So now the focus has switched from the XJ-7100 to the SB-401 transmitter. The Kenwood TS-450S/AT is having issues. There's scratchy audio coming from the speaker and it isn't coming from the audio circuit. It's somewhere in the PA or the IF circuits. Sounds like a capacitor is going so I'll retire it for now and get the 401 completed.
I did about half of the resistance checks as the manual requires and found most of the values are more than10% higher than they should be. Many are over 20% higher and that concerns me. I admit I don't have enough knowledge to know what limits a circuit can take before the performance is such to cause damage. When I repair I use the values of the schematic within reason. Take a capacitor for example. A circuit states capacitor A is an electrolytic (e-cap) 20mfd at 200V. Well, the current normal value made is 22mfd and the next available voltage for that value is 250V. The original e-cap has a 20% tolerance. Okay, 20% up is 24mfd. That's where the original specification limited the value.
Now let's replace that 20mfd 200V e-cap with the 22mfd, 250V due to current industry availability. We are within the schematic's tolerance of 20% at 22mfd. But remember that 24 is our limit according to the manufacturer's design specifications. Now we're half into that specification's tolerance. We have a 20% tolerance e-cap in there, yes but now the 20% can reach as high as 26.4mfd. This is 2.4mfd higher than the maximum tolerance specified by the manufacturer. If this capacitor somehow went beyond 24mfd, what will it do to the circuit and how will the circuit be affected and in what way?
Resistors have the exact same problem. A resistor with a 10% tolerance that is out of spec by 10% when at operating temperature, can be replaced by one with a currently available value, albeit a higher value, also at 10%. Again, the tolerance of the new resistor puts the maximum value beyond the original circuit specification should the resistor (carbon composition or even carbon film types) age and rise in value. Can this cause too much voltage gain or loss and put a higher current load on another circuit or the circuit itself is attached to? Sure! But knowing what the affects are is easier for design engineers with proper training and years of experience. I do wish I could go back and change my decisions that led me down the path of computer technology and networking. It's useless to me now. I have been able to read schematics since I was a kid and have built up some working knowledge of operation over the years. But the theory knowledge is the problem. It just isn't there to properly evaluate a situation. I have struggled with KiCad, Eagle PC, LT Spice, and others that have circuit simulation functions to try and build circuits on the screen and simulate their operations. I struggle with EZNEC even though I hold an Extra class amateur radio license. I never learned this level of tech design so it's difficult. I think I could take up and relearn Morse code faster.
I digress, as usual. So the point to all of this is that I enjoy repairing/rebuilding these old rigs without fully understanding their operation or how a damaged component affects the circuit(s). I replace parts with quality, suitable parts for the job and the unit comes back to life. When a problem is encountered I work the problem to fully understand how it should work so I can make it work the way it was meant to. So call me a parts-changer, I don't mind. In the end I like making stuff work again. I can rebuild a Jeep 4.0L engine in my sleep because I've worked on them for so long. The AMC V8 engines of the '70s are the same way but put a Ford or a GM engine in front of me and I look at it like it's a brand new thing. I know many 350 Chevy engines have hydraulic lifters yet the fact the valve lash is still adjustable is simply foreign to me. I know of it but have forgotten it has that and have ruined valves aplenty. I'm listening to my SB-301 I rebuilt as I write this posting. It was a fun rebuild and the reward for the work put into it is the enjoyment of listening to its audio. I hope I can reach a higher level of understanding so I don't fry myself with the final of the 401 when it's time to power it up. Note to self, reassemble the faraday cage BEFORE you plug it in!
SB-301 receiver with sB-600 speaker enclosure. The antenna switch is a Heathkit HD-1234.
Heathkit HD-1234
Good night! Thanks for stopping in!
____________________________________
October 25, 2021
Man, oh man! I just received the last package of parts needed to get the SB-401 rebuild started! I purchased a carbon film resistor kit (post WWII) for most of the values I need. Most of the resistors are 1/2 watt but for the same price, and headroom due to the heat some of these things are exposed to, I opted for the 1 watt kit. 2 watt originals will be replaced with 2 watt carbon or metal film.types. The one 7 watt wirewound (ww) resistor will be upgraded to a 10 watt. As mentioned before, the ceramic on the 7 watt is starting to flake and crumble a bit or it's the epoxy encasing the element. Either way I'd rather not risk damage to the rig.
Some values weren't available from Just Radios in carbon film. Those are as follows: 10, 68, 750, 4k(ww), 8.2k, 10k(2W), 33K(2W metal film), 100K(2W), 500K(metal film 1% Tol.), and the 4.9M (4.99M metal film 1% 1.5W).
As you can see not all of the resistors I wanted were available in carbon film. I probably could track down some and hope none had been compromised by time or environment. I played it safe and took the metal film over the metal oxide for the 500V working voltage rating. The metal oxide was only rated to 350V. True 500V isn't in every circuit in the transmitter but it does allow me to use these anywhere in the rig without worrying about the voltage rating when it does matter.
So now it's time to do the Sort-N-Stash to put them where they belong before I start taking the 401 apart.
In other news...Over the weekend I checked out a washing machine that would try to spin but couldn't without help. Motor works, agitator works it just doesn't spin up without help. First thing that came to mind was the clutch. That arrived today as well. I'll fix it at my brother's place before I bring it home to replace an ailing 22 year old GE "mechanical timer" washer I can't get a key part for any longer. A dryer that is practically brand new will accompany the washer.
Speaking of clutches, it seems the long trip to Florida to see my folks a couple of weeks ago has taken its toll on the AW4 in my Jeep XJ. Second appears to slip a tad bit and if I get onto it hard it will slip for sure. So I need to move all my tools out of it to save the transmission for as long as I can. Which brings me to my next item.
My daughter's Jeep had a terrible whistly/wheeze when she would start it up in the mornings when it was in the mid-50s. It wouldn't start up whistling right off. Rather she would get onto the main road out of the neighborhood before it would start that. But when it did start, put in the ear plugs! It was horribly loud and I can just imagine her sinking lower and lower into her seat hoping nobody would think it was her. So with that picture in my head I decided to do this job for her. After all her 2000 Wrangler has basically the same engine as my '93 XJ. That is true with one caveat. Hers has two mini catalytic converters attached to a pair of exhaust manifolds.
Jeep introduced the 50 State Emission version of the Wrangler starting with the 2000 model year. However, it wasn't supposed to be in effect until March of 2000. Well, they must have run out of parts because hers has the 50 State Emission thing when it was built in September of 1999. Ugh! Hard to get to the bolts holding the pipe/cats on the manifolds. With much penetrating oil, sweat, scraped knuckles and excerpts from sailor's language archives, I finally got the dang thing disconnected.
The next hardest thing to get to were the bolts attaching the intake manifold to the cylinder head. Fighting corroded and rusty fasteners isn't fun especially when they are weakened from the 22 years of service without fail or removal. Success wasn't assured but they did hold up long enough to be coaxed out of their threaded bores. A cleanup of the mating surfaces, the interior of the intake manifold runners, and the de-gooing of the intake ports in the head. Yes. I said that. De-gooing. Two brass brushes pulled what could only be described as tar from the roof of each intake port in the head. No solid chunks. Goo. The brass brushes are in the trash as even brake cleaner couldn't dissolve the gooey mess from them thus the need for two.
So the intake manifold was similar in condition. This is what happens to any fuel injected engine that sucks oil vapor from the crankcase into the engine to be burned via the intake manifold. The oil coagulates and acts like cholesterol. The engine can't pull in as much air thus the less fuel used resulting in lower power output. But not better fuel mileage due to the inconsistent air flow available. Her 4.0L Wrangler weighs about 3300 pounds and gets worse fuel mileage than mine does and I weigh nearly 4000 pounds with an older engine management system and fuel delivery design.
But I digress, again. Suffice it to say she'll need to have an oil catch-can installed if there's any hope of preventing this from happening further. To be honest, I'll need one too. You didn't really have that problem with carburetor controlled engines because the fuel diluted the oil vapor and kept it suspended. There is nothing in the air flow in the intake manifold of a fuel injected engine to perform that task. Seafoam won't dissolve that much of it. In fact, letting it sit overnight with a cleaning solvent in the runners of the manifold only softened the goo. A flush with brake cleaner only moved a small amount of diluted goo out of the manifold. To really clean it it has to be cleaned by a shop and she just didn't have that kind of time to invest. Maybe in the future.
So with hers all back together, she went to work without any issue except two. A rear main oil seal leak and an elusive transmission fluid leak. But it's starting to slip too. Hopefully she'll get hers rebuilt before mine goes out or both of us might be asking Mom for a ride to work!
That's all I have to tonight. The rain here just ended and a cold front will move through later tonight. Daughter will get that whistle/wheeze test over with sooner than later it seems. Then we'll find out if I really fixed the problem. <sigh>.
__________________________
October 30, 2021
Testing a jump link to this entry from the top of the page tonight. I'll move the marker to the next completed post as I blog. I had an anchor tag but it kept breaking. Hoping the span id works better.
The link to jump to the latest posting is working so it will be easier to get to it rather than scrolling endlessly on a mobile device to get to one. All of my blog posts are done in chronological ascending order. It was getting difficult to manage it the other way 'round.
The resistors have been Sort-N-Stashed and looking at the best way to replace them. Toughest part will be the replacement of said resistors since some on the carrier board are tucked a but under the meter, controls and lamp. I am not relishing the idea of removing the board with so many connections and with brittle coaxial cable ends. Desoldering those can get tricky. I could just replace them with modern equivalent cable but that's more cost and more time, neither of which I have much of.
Sunday won't be much of a radio day. I made the pie tonight so it will be ready for tomorrow's dessert after supper. Tomorrow have a chili to make up in the crock pot and a washing machine to repair and I won't be within earshot of the SB-301 to listen to the contesting going on, not that I want to listen to contesters or their false signal reports. I think it's cheating if you give a 59 signal report when it took half a dozen tries to hear my call sign.
The Jeep is being babied a bit as it feels like the transmission is slipping. All the tools and stuff I carry with me needs to come out to lighten the load. I'm hoping she'll hold together (Hear me baby? Hold together.) until next year. Hoping to get some funds together after Christmas to buy a good used one.
That's it for this posting. Have a good rest of the weekend!
___________________________
November 16, 2021
Good Evening! FB has been reminding me of some "memories" from one and two years ago lately. Hard to believe I've had this room configured for a year now. It looks well lived in and used like the old one but less crowded and more spread out. Still, if it's flat...well, you know the rest I'm sure.
Currently the SB-401 transmitter is the benchtop star. The Mixer/Bandpass board has been removed and rebuilt with new resistors. All of the mica and ceramic disc capacitors are fine but were removed all the same. The resistors were also removed and every one of them tested outside of 5% high while most tested outside of their 10% tolerance. These were replaced with carbon film resistors purchased in a large kit from Just Radios. With the sorting and stashing of the components completed, the rebuild could begin.
Parts removed and board cleaned up a bit.
New parts matched up with old for an accurate count.
Wide view of the work surface area.
You'll notice the Bandpass Can is still in place. I'm trying not to disturb it too much but each pin was de-soldered and re-soldered one at a time with new "44" solder from Kester. I believe their part number is 24-6337-0027 or SN63PB37.
I did video the reassembly and posted for a couple of friends that showed interests. Unedited raw and about 1.5 hours long. After the board was completed I put it aside and wondered if doing the work on the carrier generator/VOX board might be worth it. I set up my old Samsung Galaxy J7 Crown, which took good photos and video but was lousy as a phone, for the purpose of capturing the work. I have done a smattering of editing and my first video was "One-man mast Deployment" here. I had Power Director then but since moving to Windows 10 from 7, it doesn't work any longer. By that I mean it won't read any of the video files any of my devices produce. So I've tried some open-source editors like OBS Studio, OpenShot, KdenLive, and ShotCut. I find I turn to OpenShot and KdenLive the most when I do need to edit something. Anyway, I might make something about the carrier board but it's mostly to document what I'm doing in case I can't get back to it for a while to pick up where I left off. So with a new ring lamp and mount for the phone camera I think I'll be able to get some work done now.
In other news...
I discovered a whisp of smoke coming from under the dash to the left of the steering wheel a minute after turning on the rear window defroster. I shut it off immediately and checked for flame using the glass on the phone as a reflector/mirror with the screen turned off. Nothing but the distinct odor of hot insulation. Looks like the Jeep work continues. I was planning of installing the fog lights I bought a couple of months ago this coming weekend but no dice. Master bath shower is in need of leak repair and this new found electrical glitch plus whenever I hit a bump in the road or run over railroad tracks the Icom IC-7100 reboots. Not happy about that. Might try and get a look tomorrow at lunch under the rear seat for a loose connection.
The SB-301 receiver is doing well and seems to be working fine. I'll go through the alignment procedure again soon now that it's had several hours of use since it was rebuilt. It drifts a little for the first hour but if there's no air current, is pretty stable. The LMO still should be tweaked but being so difficult to remove because of the dial drive works, I'll live with it. If I ever do remove it again I'll likely just put another one in since it's the same as the other two in my pair of SB rigs.
That's it for now. Thanks for coming by!
__________________________________
February 6, 2022
Good Evening!
Some stuff has been going on and I haven't had as much time to work on projects as I had hoped this winter so far but I wanted to get an update out on things. Here goes:
SB-401 is slooooooowly coming back together. Life happens but when I am able to work on it I still enjoy the reassembly. It's not what I call a Re-Kit. It's a repair to operation. Somehow I lost all the photos I took of the unit prior to digging in so reassembly has been going quite slow. I have to go through the assembly manual step-by-step and catch all of the wiring instructions to reconnect the chassis wiring to the Bandpass/Mixer board and the RF Carrier Generator/VOX board. Today I found a couple of mistakes that have to be corrected. On top of this I knocked the tub of hardware off the bench some weeks ago and haven't found it all yet. I'm missing two screws, four nuts and two inside star washers plus the Mode Switch nut. I have a supply of some of these pieces but it always disappoints me when I can't use original parts.
While working on the transmitter I was listening to some nice QSOs on the SB-301 receiver. That is until it suddenly stopped. I have no audio and after raising my two antenna's back up after our ice storm a couple weeks ago, no longer have "ears" on the air. That may take precedence over the transmitter since I don't want to run the Kenwood until I can replace some aging electrolytic capacitors.
The Jeep's alternator blew out after running over some railroad tracks I drive over every day to and from work. Guess I went too fast and the engine rocked on the motor mounts so hard the rear cover of the alternator hit a cable and caved it in. This caused a short and a high temp situation that resulted in some oily grimed factory cloth covered electrical tape to catch fire before the main fuse blew. I'm thankful I had a nearly full cup of unsweet tea to pour on it or the ol' girl would have been a goner. This alternator was the 136 amp model found on Dodge Dakota's as a heavy duty option. My XJ had stock motor mounts but will be saving up for a pair by Brown Dog with the rubber instead of polyurethane.
I participated in a Schulman Auction and bid on three items. Two Heathkit power supplies, an HP-23A, HP-23B, and a Heil microphone boom arm. I won the working HP-23B and the mic boom. Hoping to hear from the shipper this week so I can get them on the way to their new home. The power supply is needed for the HW-101 transceiver (which was also a Schulman Auction win two years ago) if and when I get it repaired. I know it has a modification I'll have to research but I think it'll be worth fixing up.
There are two main differences between the HP-23A and B. First is the absence of the adjustable Bias voltage on the B version. It can be installed but by the time the SHW-101 came out, it wasn't really required. Once set you usually don't need to adjust it unless it's removed from one rig and connected to another. The second difference is the lack of a 6.3V filament voltage created by a center tap on the transformer. Unless I find another transformer it's unlikely I'll modify it to give me the 6.3V option. maybe an internal power supply board to give me both like the 23A perhaps. Now all I need is to locate the two 11 pin connectors to build the cable between it and the transceiver.
That's it for this posting. Stay warm!
___________________________________
April 15, 1912
Today in history: RMS Titanic sinks. The designer and builders always said "virtually unsinkable" but words and invariably, ink cost money in newsprint and the media, of course, changed it. Touted by the media as unsinkable, the luxury ocean liner sank at 2:20AM ship time (5:18AM GMT) approximately 2 hours and 40 minutes after striking an iceburg on a moonless night. The resulting collision buckled the keel and bottom plating allowing seawater to flood more than the maximum five compartments flood rating to keep her afloat. When it was all over it is said more than 1500 souls perished.
This event also marked an important event in radio history. As had been established by maritime rules traditional calls for help consisted of CQD repeated twice with the ship's identifier. Titanic's radio operator put out the call for help: CQD CQD MGY at first. A suggestion was made to use the "new" call for help. McBride radio'd "SOS SOS CQD CQD MGY..." and stated passengers were being put in the boats.
April 15, 2022
I remember doing an essay on the Titanic and spent an entire summer studying the history (up to that point) about the ship, the ship line, the company that built her and her sister ship, Olympic. Even in the 1980's with a publicized, privately funded attempt to find the wreck was announced, nobody truly knew what happened when she went under. I got an A for my essay and pretty much ended my interests with it with that level of intensity after graduating high school. Only a few months would pass before my interest was rekindled later that year.
Over the years I've seen documentaries, movies, books, and new information about the lost liner. None of the information was as shocking as when Robert Ballard found the wreck of Titanic September 1, 1985 after a top secret search mission to find the USS Scorpion and USS Thresher had been accomplished with some time and funding to spare. Unable to explore the site thoroughly he would Vie for funding to return and kept the site's location a secret until then.
Returning in 1986, Ballard was equipped for a more thorough examination of the wreck site. It was this event he determined the famous or infamous 300 foot gash was non-existent. The legend had lied. What they found were buckled plating not related to the impact with the sea floor. The grating against the iceberg buckled plates and popped rivets while likely warping the keel. This would allow more than enough water to flow into the ship faster than any of the pumps could remove it. Since most of the bulkheads stopped at E deck, once they overran the pumps they would spill over into the adjacent compartment. Had they been extended to A deck, this might have delayed Titanic's final plunge to save more passengers, experts say. I am of the opinion it would have delayed it some but with the water entering through the deck plates in the boiler rooms, the water's weight would have made the bow of the ship sink deeper and raise the stern higher sooner this making it impossible to get many life boats off the davits efficiently.
With the ship found in two pieces, it was concluded many accounts by witnesses of the ship having "settled" just before it went under had foundation. It appears the break began at the rear bulwarks where deskside cranes loaded and unloaded cargo. This and the companion bulwarks near the bow were weak points for the 882 foot long structure. Ballard surmised that around 1000 feet down from the surface this area imploded ripping the stern completely away but continued a spiraling path to the sea floor until its final resting place. The two portions of Titanic's hull rest more than 660 yards or 1.5 statute miles apart with an incredible debris field between.
All in all White Star Line, owners of Olympic, Titanic, Britannic, and others fell on hard times after 1929. Cunard, White Star Line's formidible competition also suffered. With there merger, Cunard White Star Limited was created. White Star brought ten ships to the table while Cunard brought fifteen. All ships flew both their original owner's flag above the new merger flag until the last ship, Nomadic, was removed from service November of 1968. From this point, it is considered the true end of the White Star Line as all flags, marks, references and paperwork returned the name Cunard to all operational aspects of the company.
Of note: Every April 15 the whole of the Cunard fleet, including the rescued and restored Nomadic, raises the White Star Line flag to honor and commemorate the sinking of Titanic with all the lives lost on that fateful maiden voyage so long ago.
________________________________
May 8, 2022
At approximately 0215 EDT this morning, my Dad, W4KIS (formerly KF4VI) - James Emery Nash, Jr has gone SK. May he have the time of his life up there doing the things he wanted but couldn't here.
__________________________________
June 26, 2022
It's been a difficult time here in my shack. I have all of my Dad's equipment he gave me years ago and was in the process of rebuilding the Heathkit radios in hopes of having him work them again during a visit. This didn't happen and the SB-401 rebuild is on hold. For how long I can't say. I did receive one last piece of gear my brother gave me and it sits on the bench getting some attention. It was his IBM Model 200C multi-meter made by Tachikawa of Japan origin. I am happy he still had it as it was the very first piece of test equipment I learned to use as a kid. The batteries in there were Duracell and have an expiration date of 2023. They've been in there for some time given how long their alleged shelf life is after manufacture. Yes, they did leak a little and corroded the plating on contacts. These should clean up easily. Once done I will install lithium batteries and do some tests against some standards.
After I get through with this meter I am not sure where to focus my attention. The SB-301 has gone silent and that was a purchase I made with its 401 twin I am using as a parts donor. Dad's 303 won't likely see any work done anytime soon. I did acquire a Hallicrafters S-120 shortwave receiver with a loud hum and it would be nice to have something to listen too in the background again.
As for the rest of the stable, The Kenwood TS-450S/AT has crackling in the audio even with the volume turned down. It also isn't transmitting very well as the ALC seems to be activating waaaaay to early thus making the transmission very low. It has been put on the future repairs list. The Icom IC-745 my Dad had sort of works but the frequency constantly rolls up or down as if the VFO knob is turning. Dad and a couple of others offered up a spider died in one of the encoder detectors. So that's on the repair list. The Hallicrafters S-40B and Hammerlund HQ-150 are waiting in the wings as well.
I also got hold of a Simpson Model 464 digital multi-meter that works on DC but the AC mode does not. Winning an auction has it's "feel good" moments when you have been confirmed as the winner. But when it arrives broken and not working due to poor packing you have to accept the lumps. I filed a complaint with the seller and they directed me to their shipper. Their shipper did not respond. Typical UPS store fare. The HP-23B I won is salvagable but disappointing to say the least the phenolic discs two of the four filter capacitors were mounted on broke to pieces. Other than that everything else looks okay.
There's more in here but it's late. There're years worth of rebuild projects in this room and I will get to them eventually. My Jeep stuff has to take priority as she is my daily driver and she has to get me to work and back.
Speaking of the Jeep XJ, after I converted the rear brakes from drum to disc, the rear gears were in fine shape for their mileage (272k). After I buttoned up the case I poured in Royal Purple 75W-140 gear oil in it as that was what I had. I'd never used the stuff before and won't ever use it again. After driving to Florida for Dad's funeral and back home the rear end was roaring. I pulled the cover and the fluid glistened in the sun. A magnet confirmed metal particles in the fluid. I put the cover back on, filled it with conventional 80W-90 gear oil and stayed off the highway as I saved up for new gears.
After getting gears for the front and rear together I got the rear gears installed with just enough time to put a few hundred miles on them before heading to my sister's for a tree planting memorial. I have about 200 miles on them now and they seem to be working well so far. I hope to have 400 hundred miles by July 9th and I'll drain the oil and inspect them for abnormal wear, check backlash, and the pinion preload. Passing all of this she'll be ready for the 2.5 hour drive to see Sis sans 4WD capability. I didn't have all the parts I thought I needed to get the front axle done. That will get done this Autumn.
So a lot of nothing is going on in the shack right now but things should turn around and I'll get back into the projects later this year.
___________________________
June 28, 2022
It's funny how things work out. Had a nice conversation last night with my my stepmom about my Dad and it really helped us both feel better about things as we move forward. After we chatted, I sat down at the workbench and stared at the meter he taught me how to use over fifty years ago. Things went through my mind about all the times I could remember him using it and some of the times I used it. I remembered something about batteries not being installed the way they were marked in the case only after installing them the way it was marked and discovering the batteries got very warm very quickly. After finding a schematic that was for a later model with an external access fuse holder, I saw a video depicting that meter. I realized the batteries on this model for IBM are in parallel instead of in series like the original TMK design used. Then I found the marked-up schematic used in the video on the eevblog website thread discussing the TMK and IBM meters and reinstalled them in parallel, + pointing down toward the bottom of the meter and giving it a try.
The first thing was to reset the pointer with the physical needle set screw to put it on 0. The I shorted the leads on Rx1 and adjusted the "Zero Adjust" thumbwheel to get 0 on the ohms scale. With that done I selected the other ranges and found all made the needle deflect with the thumbwheel able to zero out the full scale. Next was the DCV test. Each range had no input and the meter failed to deflect. Something else came to mind as I looked at something he did to modify it. I suspect it is a rectifier, to be confirmed later, and it was connected to another lead. I found a photo of one just like this one with all the test lead jacks labeled. This should help me figure out his mod as his meter has not silkscreen or printing denoting the other two jacks. I think it coincides with a Micronta meter I have also made my TMK and sold through Radio Shack as TMK could not sell (at that time) direct to the USA market.
So tonight I'll use his Heathkit IN-37 I rebuilt to calibrate the meter's ohm ranges and see if it passes muster.
That's it for tonight. ____________________________
July 25, 2022
Tonight I pulled out the Hallicrafters S-120 onto the bench after putting away my Dad's gear including the IBM meter I was working on last month. The Ohms ranges on it works again. I'm satisfied with that for the time being.
The S-120 is going to get attention as it's an untouched factory original condition piece. It was an entry level SWL receiver in its day. Not touted as a good receiver, I acquired it for the sole purpose of having an SWL receiver. I will post more details on its own project page in the coming days. For now, I am getting back into radio electronics again but with a different driving purpose than before.
On the Jeep Front, the rear axle gear set was changed out and appears successful after a few hundred miles of daily driving to work and back then a 165 mile trip one-way to visit my sister. We planted an Aspen tree in our Dad's memory in her back yard. Whilst there I drained the gear oil and found nothing of significance in it. I refilled it and drove it home another 165 miles. The only odd thing is a vibration I think due to the tread blocks on the Hankook DynaPro AT/2 tires. I replaced the u-joint at the pinion o the axle and reset the pinion angle. I'm inside 2 degrees of straight inline with the driveshaft so any leaf spring wrap up is compensated for under load. We'll see how it plays out after rotating the tires.
That's it for now. __________________________
September 17, 2022
Getting back into the swing of things I did complete the Hallicrafters S-120. It's back in service and I have it connected to my vertical out back to listen to some SW stations in the evening or local broadcasters during the day. With the usual night time fade but listenable.
It was time to get the ol' SB-301 on the bench and find out why it went silent some time back. To keep up with that project, click the link below to jump to it.
As for the Jeep, she'll get the front Dana 30 regear she was promised earlier this year. A few other tiems will be dealt with as well. They include new DB Metalworx engine and transmission mounts, new spherical rod ends for the tie rod, a new rear driveshaft output bearing at the transfer case's SYE housing, removal and inspection of the rear driveshaft, inspection of the front driveshaft, as well as removal and inspection of the IRO Rock Link long arms. Pending what I find during the draining of the NP231 will determine if the rear half of the case will need to be removed. If metal particles are found, the oil pump will have to be replaced and the case flushed out at the bare minimum. A rebuild will have to be planned.
That's it for now. Until next time...
_______________________________
October 2, 2022
First thing: Let's do what we do as decent human beings for those impacted by Hurricane Ian. Remember there were lives lost regardless of choices made. Donate to the Red Cross what you can to help those in trouble and keep them in our thoughts as they rebuild their lives. Amen.
Greetings and I'm glad it's Autumn! Can't believe we've gotten to October so soon!
On the radio-front: The SB-301 still has a gremlin that eludes me. Ugh! Now it won't produce audio even when cold like it did before. I suspect it is in the main audio circuit but how it separates it from the IF through the detector looks a tad confusing in the schematic. I found and downloaded a full copy of the SB-301 manual and printed out the troubleshooting section to begin with. Alas, I've been struggling with Jeep issues since the front axle re-gear. The spider gears are worn out and don't meet the tolerances but can't get any at the moment. The rear seems more loose and the transfer case's rear shaft output bearing has play in it. Spent 5 days trying to get the front axle done due to missing/shorted parts in the kits.
The Jeep has to take priority since it gets me to work and back. The 301 will be put on hold as soon as a radio at the furniture restoration shop arrives for me to repair thus starting down a new path.
Since the storm sort of passed through my area both the Inverted Vee and the vertical wire antenna are still up.
The Kenwood TS-450S/AT has still not been looked at and likely won't be for a while so I only have the Icom IC-7100 in the Jeep to work with. The Kenwood has some very scratchy audio telling me a capacitor or resistor is failing. From what information I've seen about similar events, C104 is leaking and may corrode the traces on the PC board. I should put the 301 aside and just open up the Kenwood to see if that's the case. If it is I'll have to deal with it pronto! I also found a blurb online and discovered a downloadable service manual for it. Perusing the pages I found adjustments down via the front panel to calibrate to and such, various aspects of the radio. I've always felt the ALC was way too sensitive. Maybe there is some issue with the ALC after all.
The shack itself is cluttered with stuff. I have removed some of the things I'd like to keep but really can't use and either donated them or sold them off. I have a few flat panel LCD displays from some Hanns-G 19" monitors that had dead power supplies that couldn't be repaired. I kept the displays and bought two display driver boards that work fine. Mounting the panel is problematic as they don't fit the original case. I'm not a fabricator as it's difficult for me to imagine how to make something I need. I suppose I could just cut the front of the case out and figure out how to mount the controls but making a fascia is beyond my skills. I don't own a 3D printer and likely never will. Since I can't make something I need I can't describe well enough what I want to anyone that does have the skills so I'm stuck. I'll keep two of the displays and driver boards and scrap the rest.
My sister in-law gave me her old CRT television. It's a solid state model and though I could use it in my repair experiences. If I can't I'll donate it with a converter box. It just needs a power cord.
I have the Alinco 605 mobile radio in here and use that for the 2 meter and 70cm comms. I listen to the nets and once in a while participate.
The Hallicrafters S-120 is working pretty good on the vertical antenna so I try to find something from far-away lands to listen to in the evening.
That's it for now!
________________________
November 2, 2022
The
Kenwood ALC could not be successfully reconfigured to function
correctly. The cost of the function generator I purchased to
assist in the attempt isn't a loss however, since I can use it on
plenty of other future projects. It's discouraging but at least
the 1991 Kenwood TS-450S/AT will still make a good general coverage
receiver up to 30MHz. It's been a fun radio to use and I'm
happy with the use I got out of it. With its reassignment to
receiver-only service it's time to look for something newer and Get
Back On The Air (GBOTA).
At
the moment I am cleaning up and reorganizing my workbench spaces.
The area on the right will become what I planned to use it for as an
operator's position and drafting station. The space beneath the
workbench still needs a bit of attention but I'm pretty sure I'll
have it taken care of before Thanksgiving. The Kenwood after
all, needs to sit there on the shelf above in order to work it
properly.
The
space to the right was originally supposed to be the radio operator's
station. It will triple as that plus drafting station and
personal equipment repair when working on a customer's unit on the
left.
That's
it for tonight.
_____________________
November 27, 2022
I haven't made much progress in organizing the bench these last two weeks. My Jeep has been acting up and finally did something to make her nearly immobile. I have been able to sort of make her run but she's got something going on with an alleged lean condition making her run really rich. The catalytic converter probably is damaged at this point. So with my primary mode of transportation on the blink, my attention span is occupied on her. Rest assured I have made some progress.
This isn't the final placement of the new storage cabinets. They are side by side next to the gray crates.
The bench above this is full of undistributed detritus I still need. The left side of the bench where I do the work is completely covered with more of the same as I try to sort through the little boxes of stuff and find places for it all. So far I've tossed out so much just to get this far I have a bit of anxiety about it. I know I'll need parts from the old electronics which will save money, but I don't have the space to save money, so I put them into a recycle box and give it over to the electronics recycler at the local recycle center. I have the room for the aforementioned storage cabinets with cables, power adapters, wall warts, HT radios, and various cable types. I might buy more of these storage cabinets since I can see into the front of them.
That's it for now!
_______________
December 28, 2022
Season's Greetings!
Yeah. Sorry. A day or three late but better than not. ;-)
So things haven't progressed like I had wanted. Still tough dealing with my dad's passing as I keep trying to get my radio shack in shape to get back to repairing radios. Lack of motivation, overwhelming amount of stuff and a general lack of knowledge on how to go about tackling it. I have parts donor circuit boards and lots of little bits of hardware without enough storage bins for it all. So I'll have to make choices to figure out what goes into boxes to the shed and what stays inside.
On the shed side of things I'll have to organize the stuff to know where it is and ease of access to it while still maintaining some semblance of order. Mmmmm-yeeeeeaahh. Right.
The computer desk opposite the workbench is getting an upgrade. At the moment I have two 27 inch wide screen displays occupying the right half of the desk. I'm planning the left half to be the "8 Bit Station". I'll elaborate in the future but for now I'll let your minds imagine what that means. ;-)
This is the last post for this year in this blog. Look for the Shack Happenings-2023 blog next month.


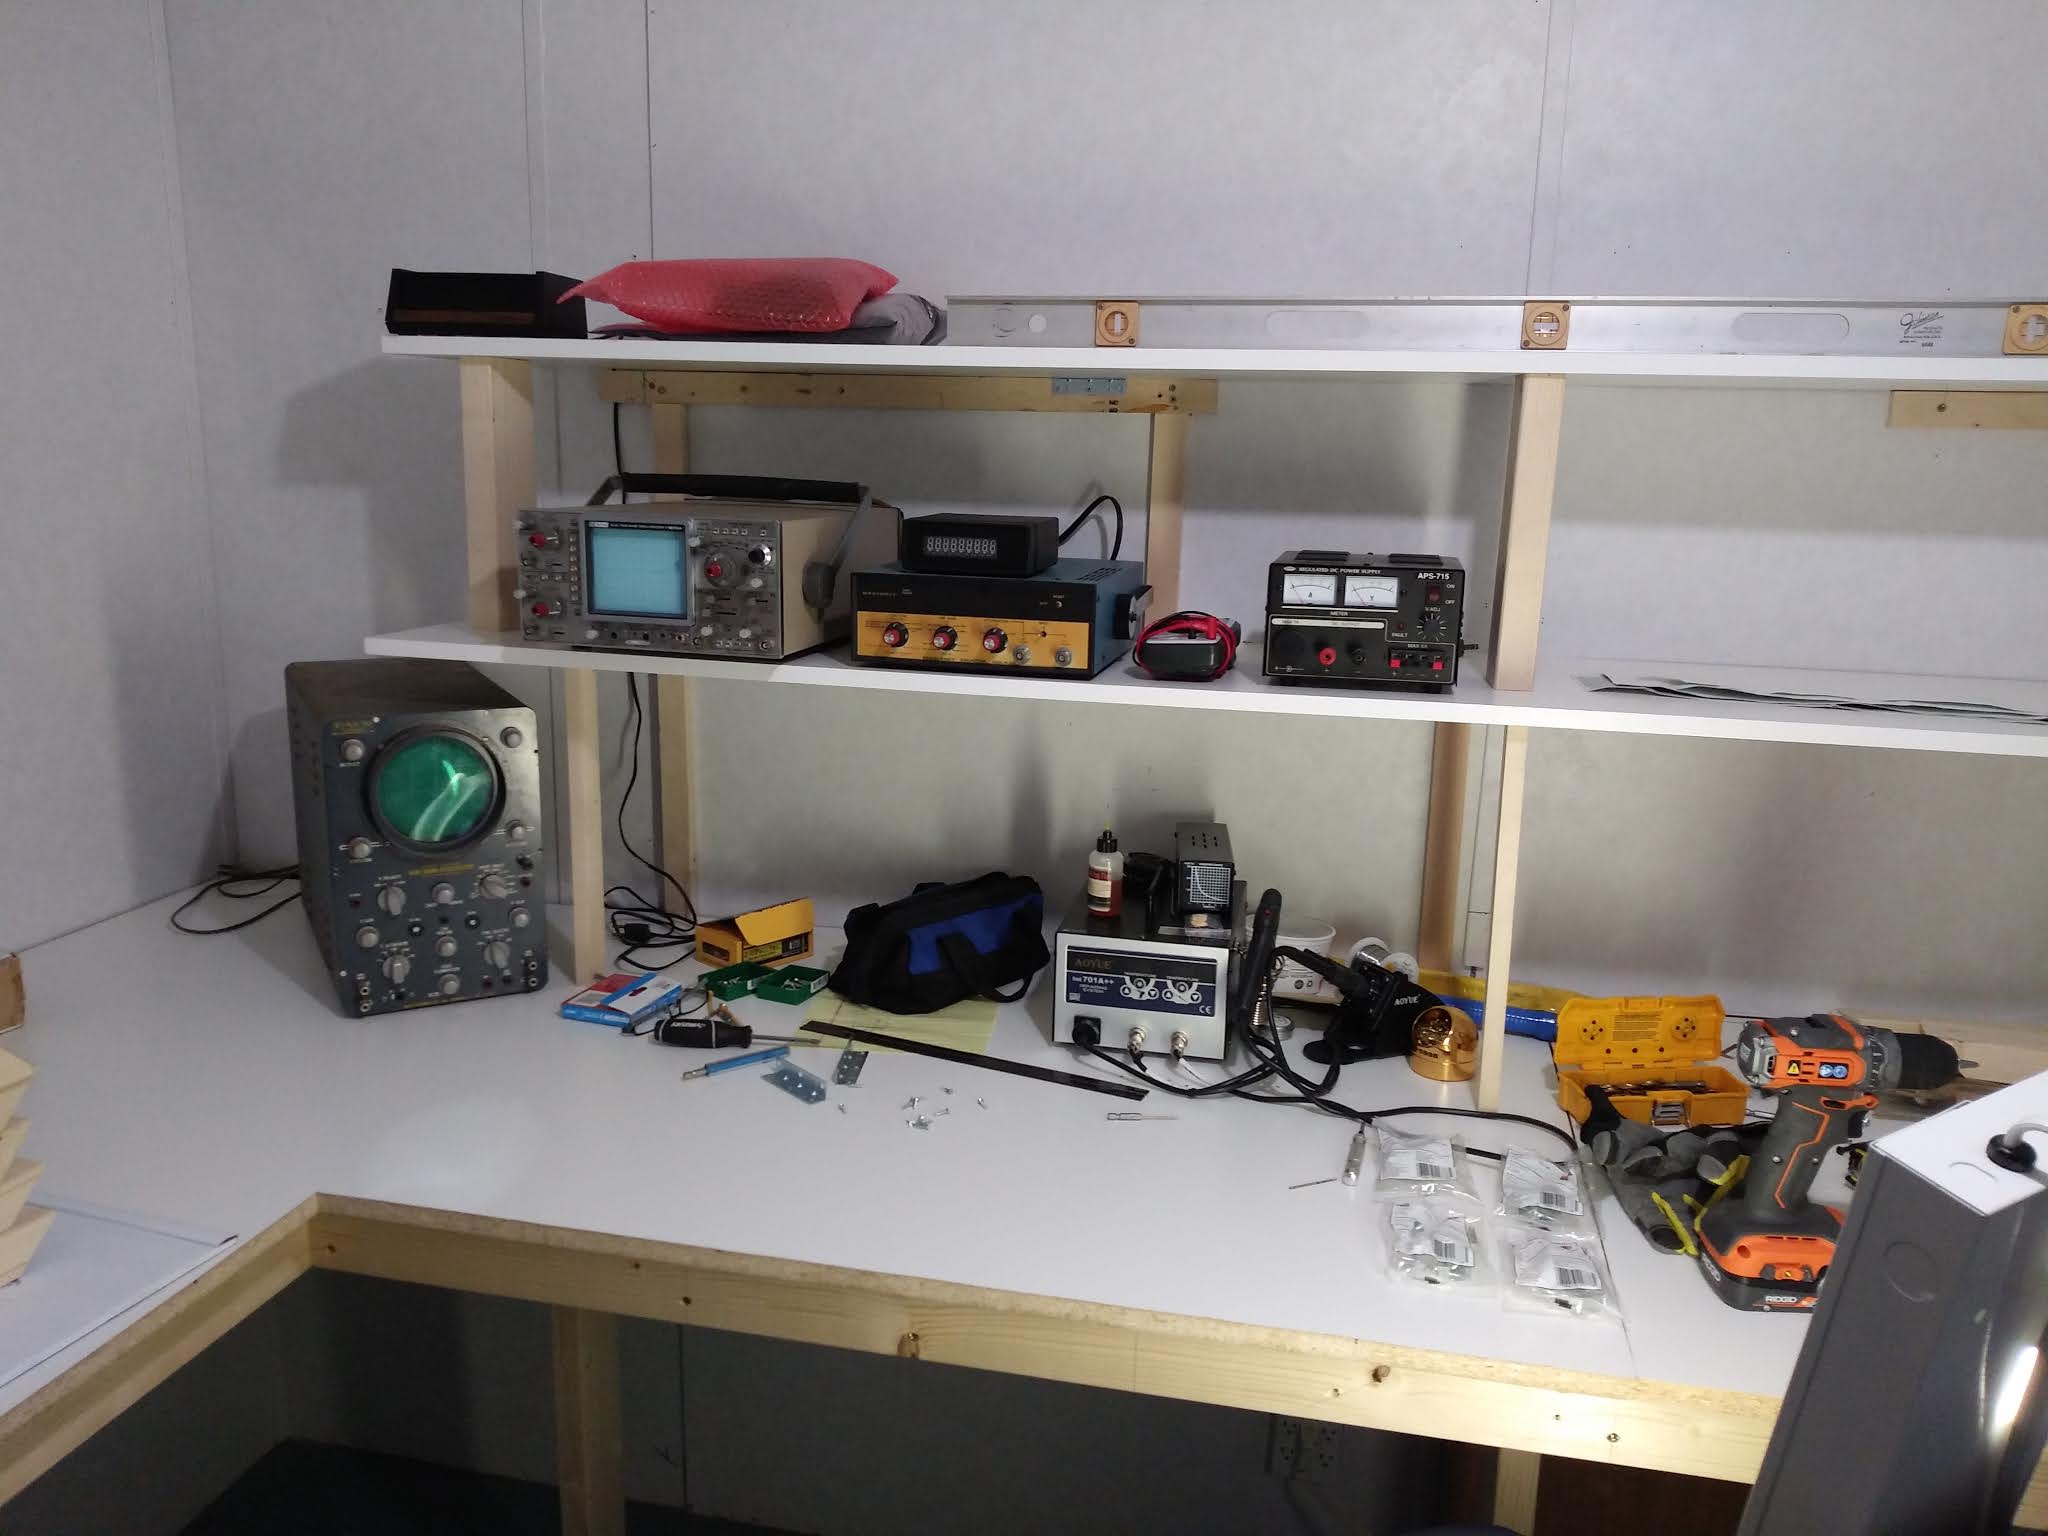


Comments
Post a Comment